Friday, March 30, 2018

Antique Chair Card

I decided to go back to vintage today using the chair and a sentiment from Unity’s March 2018 KOTM. I stamped the image on a tan card base and colored it using my new Kuretake Gansai Tambi watercolors for the first time and added a green background and distressed the edge. I had already picked out a red patterned paper that had dull green leaves in it that I ended up replicating here and on the card in various locations.

To try something new, I had recently picked up embossing folders on sale at Tuesday Morning. It has a quilt pattern. I wiped wet ink over the embossing folder and placed some of the same tan paper on it and ran my hands over the paper, using it like a stamp. After it was dry, I ran it through my Big Shot to get the impression on the stamped paper. Love how it turned out...you can see bits of it on the right side.

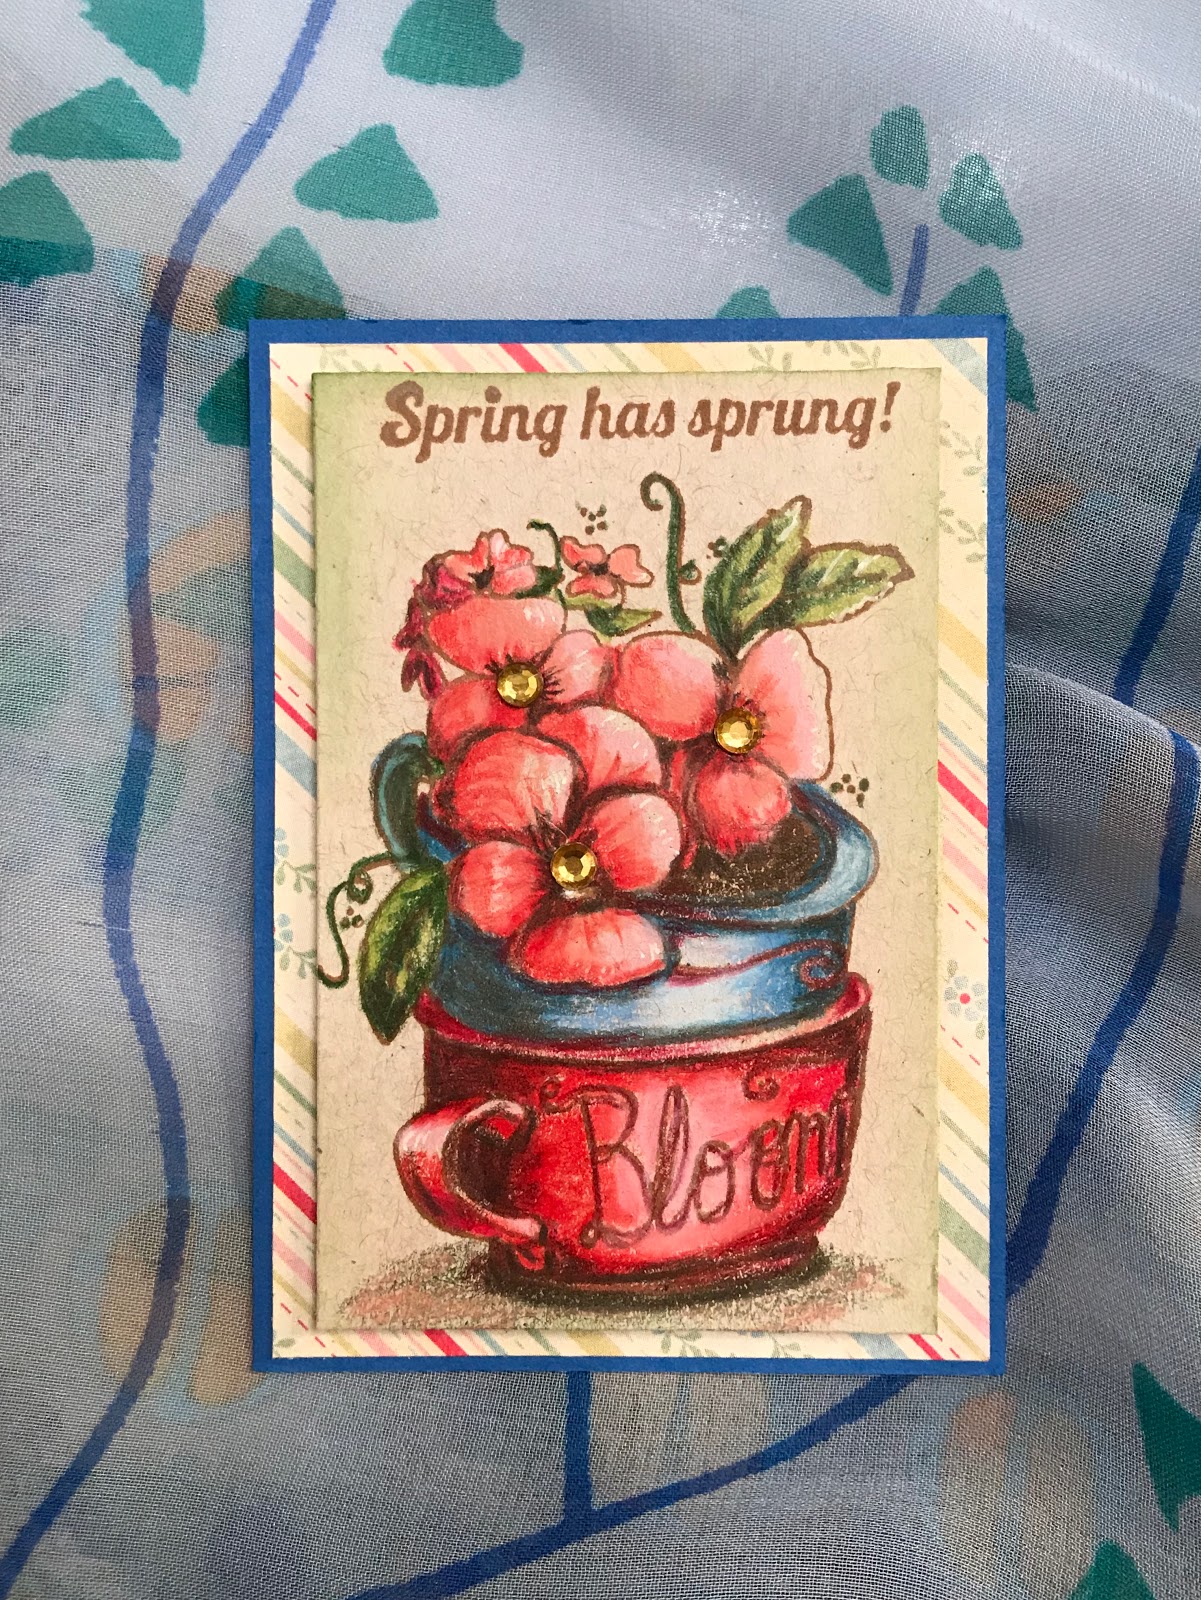
I stamped the sentiment on a piece of ephemera and backed it with the patterned paper.

I placed more of the same red patterned paper underneath the stamped image. To create the card, I used bits of ephemera in various colors to match the flowers on the chair and added faux flowers, twine, Tim Holtz flowers, buttons, enamel dots, fabric, and a metal embellishment.

Felt good to return to return to vintage before I turn back to my ATCs. I really like this stamp, and I’ll need to try another card as I think I can achieve a better look with it. But for now, hope you enjoy this card, and, till next time, happy crafting!


Thursday, March 29, 2018

Echo Noble’s Tile Case Study

Today I was inspired by a card posted on Unity’s Show and Tell FB group created by the very talented Echo Noble.  She created 3 cards using a bone folder and scoring board to create the impression of tiles and then stamped on it. Very creative and a very cool look! 

So, I decided I needed to try this technique and record what I’d done for future use. I happen to have a copper back plate above my stove with a diamond pattern. So, to begin with, I cut a 5x5” paper and turned it diagonally on the score board. I proceeded to score every inch and turned it again and score it again every inch. I then took a black Derwent Inktense pencil and ran it down all the scores as my grout is dark. I then sponged Spiced Marmalade, Vintage Photo and Black Soot with a touch of Forest  Moss into each diamond alternating dark and light tiles (as mine is). I did this rather quickly and to help I cut 3 sides of a 1 inch square into paper to produce a mask. After this was done I re-scored the paper to make sure I hadn’t lost the impressions. I then took the flower from the March 2018 KOTM and stamped it delicately on the paper. I didn’t get all the lines but for the sake of using this as a case study...it was good enough. I then took some more Derwent pencils and filled in the flower keeping away from the tile edges. I think it turned out pretty neat and created a frame for it and used pencils on that. 

For the sentiment, from the November 2015 KOTM, I took a corner stamp that I bought in a swap, I think from the 9/11 KOTM, and stamped it on the paper to create a frame using the same paper I used to frame the tiles with Forest Moss ink. I then stamped the sentiment in black archival ink and used some watercolors to try to darken the frame to match the tile colors.

To finish the card I mounted all components, added a border at the top, some enamel dots, and ribbon and yarn with a button. Not one of my greatest cards, but I think it demonstrates the look of a tile background, so I’m happy! Let me know your thoughts or if you have questions!


Wednesday, March 28, 2018

Spring has Sprung and Believe in Yourself ATCs

Created another set of ATC’s for March. This group had the option of using spring or Easter as a theme. I chose 2 different design styles - the first using a cute Unity flower arrangement stamp set called Spring and Bloom. I stamped it on tan Kraft paper and added a sentiment above it. I then used my Prismacolors pencils to color it in. (Not sure I would do this again as it took a lot of time and my hand was stiff afterwards coloring 10 of them and I quickly lose interest in repetitive tasks. And that’s why I change styles or techniques so frequently.) Used about 12 different color pencils on this one and backed it with patterned paper.

The second was feeding my mixed media need to play with texture paste, stencils and Charvin watercolor chalks/sticks. I had also recently purchased through a swap FB group a Unity 1/15 SMAK kit. It had a flower in it, but it was more the impressionistic version of a flower. I’ve learned using pencils or watercolors, I tend to want to be detailed. Not possible with this stamp. So, I chose the chalky sticks to color in and around the flowers and pulled the colors around with water and my fingers. I really like how they turned out. Through the Expo I recently attended I picked up a ton of 12 x 12 paper very cheap. I decided to use the blue paper and used a square stencil turned on it’s side and created diamond impressions here and there. I then cut the paper up to create 10 ATCs. I used a graphite pen and some white chalk to emphasize those diamonds more. Once I had 5 relatively large flowers completed I cut them in half. I played with torn edges and decided instead to use a circle die. Now I had the 2 main pieces I needed to add a sentiment and create a card design. I stamped a sentiment from Simple Wisdom. Playing around with all components, I decided I wanted to add black and some other textures. I used an Elizabeth Craft die to create the circle string using black and brown paper. I also pulled out some washi, burlap and buttons. One of the papers I had had wording all over it. I decided to cut out the “be happy” phrase which I thought complemented the “Believe in Yourself” well and attached it to a burlap strip. Putting everything together, I added the blue strip of washi at the top, black strip of Washi tape with the sentiment and a cream button with black dot which mirrored the strip and the half circle flower. It’s a strange ATC, but I really like it. What I didn’t like was that it pushed some of Post Office boundaries on thickness. So, I’ll be more careful next time.

Well enough about these. Hope I didn’t lose you in the explanation! See ya next time!


Friday, March 23, 2018

Day is Beautiful Card

Had to take a break today from vintage before I start next month’s ATC’s! Today I wanted to use some of the Love from Lizi kit paper and vellum that I think was part of a Bo Bunny collection. There’s another jar in March’s 2018 Unity KOTM. I thought it might be neat to stamp glass on vellum and have it look like a window showing the pattern paper behind it.

So, I stamped the image on the vellum using archival ink and turned it over to color the image. Since I had already selected the papers I was going to use on the card, I pulled complementary Spectrum Noir colored pens from my stash. I did notice that the colors are more muted on vellum. After coloring I used fine point pens to give more definition to the image and added a background paper.

The card was easy to put together with the papers from the kit. I stamped the sentiment on another paper from the kit and punched out a few small butterflies with a hand punch. To finish the card I added crystals. This is not my favorite card, by far, but it was a nice change and I was able to do a little experimentation with vellum! Thanks for stopping by and have a great day!


Thursday, March 22, 2018

French Kindness Card

Inspired by Amber Trubiak’s Throwback Thursday post suggesting we pull an older Unity kit and make a card, I decided to pull out the oldest KOTM I bought, Everyday Fairytale, from Dec 2012! After you join the monthly kit subscription you can pick up any KOTM at deeply discounted prices! I picked this up because of the Eiffel Tower and the Paris vibe, since I visited Paris this past summer. So pulling out the vintage label and a few sentiments, I stamped the image in an archival ink and pulled out my watercolors and, this time, matched colors to Prima’s Romance Novel pad. I pulled out a Spellbinders die, cut and distressed the edges. I then decided on the bottom paper. Since the card is a slightly larger size than the paper, I pulled out a black patterned paper and lined both edges of the card base with it. I used the same paper to run a strip across the card and layered lace on top of that.

To add embellishments, I decided to pull another deeper colored paper from the pack and used my Verso Damask die. I fussy cut portions from it and added it to the bottom left side and the top right side. I also pulled out a Tim Holtz card with roses on it from an embellishment pack and and cut it to fit on the top to the left of the center. I then stamped Merci in a red ink and the Kindness sentiment both from the kit. Again I backed the Kindness with the same black paper. I had picked up metal embellishments from Tuesday Morning and used several on the top righ and bottom left. And I attached the Kindness sentiment to the top left.

To finish emphasizing the image, I used a different Spellbinder die on red paper to back the image. I then cut some branches using a leaf punch and found 2 leaves from embellishment packs. I placed those on top of the lace framing the image and finished off adding enamel dots around the card.

I think the card turned out pretty vintage looking and, I must say, I love this stamp and the results I achieved with it. Thanks for stopping by.


Free and Wild Card

Inspired last night to stamp and color Unity’s Wild Heart Kit. I used Distress inks in pinks, green and brown to match Prima’s Wild and Free paper that had similar feather images and sentiments as the kit. I used Distress inks around the edges and also spattered paint across the image and stopped there. Went back to looking through the pad to see if I could combine the 2 to create a card today. Since the pad also contains stickers, I found a beautiful girl sticker I wanted to use and finally called it a day.

Today, I went back to the image and strengthened the colors using Prismacolor pencils and a white pen. I then used a Penny Black die to cut the image. I also used an Elizabeth Craft die to create a fancy swag using 3 pieces of paper in combinination. I added a decorative ribbon that I attached additional strings to to mirror the image strands hanging down. I backed that piece with a dark paper from the pad. 

To create the card, I started piecing paper from the pad onto cardstock. I distressed many of the edges either by running a Tim Holtz serrated scissor across the edges or tearing the paper. I layered the card using different papers and fussy cutting images from the papers to use as decorative ephemera. I also used a glittery washi tape, Prima flowers and beads.

To create the sentiment, I used a background stamp from an older Unity KOTM that I picked up on the Unity Stamp Swap FB site. I stamped the sentiment on that paper and fussy cut, distressed and tore that paper. I added that to the card and called it. I think the stamp and papers go great together and am happy with the result. I love exploring papers to see what images I can find and use to complement the card. The Prima paper pads excel at burying great finds in their collage papers. I used stamps, a tape measure, a dream catcher and boots this time. See if you can find them in my card! 

Have a great day and till next time, happy crafting!


Wednesday, March 21, 2018

Make Yourself a Priority Card

Created another simple card today using Unity’s March 2018 KOTM. Watercolored the image stamped onto Spectrum Noir Aqua paper using Oxide ink. Used Bella Blvd Make Your Mark paper which seemed to match my direction for the card! I really like this stamp and I tried to make this card more fun aligning it with my own passion for art and crafting. I didn’t strive for painting perfection today, but more for a reflection of my style and I added the impression of a palette. The paper pad offered up the words I strongly identify with. So, I had to add “Make time for the things you love”. I stamped the sentiment on paper from the pad and added a few more paint spotched. I believe I may just keep this card in my craft room, as a reminder! The card was completed with layers on Kraft cardstock, twine and a button, and enamel dots. Hope you enjoy this card and have a great day!


Sunday, March 18, 2018

Create a Life You Love

Inspired today by Prima’s Lavender paper pad, the Unity 6/17 SMAK kit and the new Unity Show and Tell Paper Piecing Card Challenge, I created this elaborate (at least I admit it) card. I used a variety of Unity kits on this one besides the SMAK kit, namely, She Never Says Never, chairs from Enjoy Your Company, All Hail Queen Bee, One Night Only, and Journal Box.

I stamped the woman on gray Kraft paper and colored with Prismacolor pencils. I stamped her again on patterned paper for her outfit. I joined and fussy cut all the pieces and played with potential backgrounds. After playing, I stamped the candelabra on a plain paper from the pad and added script for the background and distressed the edges. I backed that with another sheet from the pad that I used the journal box stamp on and then a solid gray paper.

I took another paper from the pad to stamp the chairs on. I mixed lilac and seedless preserves oxides and a white Tattered Lace spray to stamp the stamp in and then stamp that on the paper. I distressed that paper and then used a Sissix Lace trim die on gray paper to make a border. I adhered a paper from the pack and the chairs paper to the cardstock. I then stamped the bees and ticket onto the backside of the scraps from the pad and trimmed those to use as Ephemera in the background. I added part of a doily behind the ticket and punched a hole in the end to add ribbon. I added keyboard washi to the bees.

After playing with all the pieces I decided to give the romantic impression of a hall like for a concert or show...or whatever, using the candelabra framed alone.  (Watching too many Hallmark movies I think!) So, instead of framing the woman in a box, I decided to give her an outline shadow to make her stand out. After trying some solid sentiments I decided to use a sentiment on vellum on the bottom left. I added a fussy cut crown from one of the kits and added crystal dots around and about, including giving her earrings!

Okay, I freely admit, this one is over the top again. But, my imagination just rolls with the ideas to create a theme and I’m driven to complete it! If nothing else, I hope you enjoy the romance of it!


Saturday, March 17, 2018

Unity Artist Trading Card Binder

I decided to try my hand at a little mixed media this weekend. After having taken a class, I’ve been anxious to get back into it before I forgot the techniques. I wanted to cover the bland binder I had purchased to hold the Artist Trading Cards from the 2 swaps I’m participating in. So, I got out the Art Anthology gel products I had purchased and the following items: white gesso, Stazon ink, brushes, texture paint, distress stain, metal frames, Unity stamps, spatulas, Charvin pastel chalks, fabric tec glue, gold cord, and Tim Holtz stencils. I applied gesso yesterday and let that dry. Today I started applying paints to the front. Once dried, I painted those areas again for deeper color and allowed it to dry again. I then used the stencils I picked out with texture and sand pastes and developed random patterns. I painted those again and applied some stain. After drying again, I then applied some black and other color pastels to highlight the textures and even out colors. I then glued on the metal pieces and applied gesso to those. While that was drying, I stamped out several images and sentiments from the following Unity kits: Hug, Beautiful Every Little Thing, 6/17 SMAK Kit and the 12/12 KOTM kit using Stazon ink. I then painted the metal pieces and applied a little more paint in different areas. I took some chipboard letters and added my initials in the metal frames.

A lot of this effort was trial and error, rework, overzealous stenciling (love doing that), and impatiently waiting for various mediums to dry. Since I completed this after the sun went down, I may end up fixing things a little more tomorrow. But, in general, I think it’s a perfectly imperfect first attempt and I definitely like it more than the original binder cover. In a few days I’ll turn it over and just paint the back. I intend to also paper over the other sides of the covers either with my own designed paper or some of the beautiful patterned paper I own. I’m hoping this binder will complement the beautiful ATCs I receive!

Hope you enjoy seeing my efforts and, of course, I’m open to any suggestions you have! Thanks for visiting!


Wednesday, March 14, 2018

Happy Moments Vase Card

Today, I watercolored this card using Unity’s new Happy Moments kit. I colored the beautiful flowers and vase using tube paints, having matched them to the paper shown. I spritzed the image with paint and a bit of Cadmium Yellow Brea Reese glitter ink. I framed the image with a postage die cut grey patterned piece and black dotted paper. Used the same dotted paper on the card base to frame the pretty patterned paper. I stamped the sentiment on a matching patterned paper, backed that with the dotted paper and added a matching Bo Bunny brad.

Finally, pulled the card together and after review, added prills and white pen to flower centers and added a little white gesso to flower petals for texture. With that, I decided the card was done. Always interested in feedback! Thanks and have a great day!


Saturday, March 10, 2018

Simple Wisdom Simple Card

Created another simple card today after working on ATC’s. Had my watercolors out (tube paints), so I decided to create a Spring card given we’re springing forward tonight on daylight savings time. Our daffodils have already bloomed and now our flowering trees are just glowing with color! I used Unity’s Simple Wisdom for both the daffodil vase image and the sentiment. I stamped the image using a soft Coffee Archival ink. I proceeded to color the flowers, leaves and vase, quickly, matching colors to Prima’s Life Time paper collection. Once completed, I die cut the image and distressed the edges. I then fussy cut some paper keys. I wrapped the image with a fancy blue/brown twine, used a marble tan button to tie the strings, and added the distressed keys all on the side of the image. I then fussy cut out a matching tag from the paper pad and a strip of key patterned paper. I stamped the sentiment on the tag using Stampin Up’s Delightful Dijon ink and attached a brad. 

To complete the card, I affixed a brown paint spattered paper from the pad, added the strip of paper behind the image and the image. Finally I added the sentiment and called the card done. Pretty simple card, but I hope you like it. Thanks for stopping by and have a great day!


Thursday, March 8, 2018

Banner Birthday Card

Today, I pulled out my Derwent Inktense pencils. I’ve been wanting to stamp out the banner from Unity’s 10/15 KOTM. I used a Colorbox archival ink and stamped onto Spectrum Noir Aqua watercolor paper. I then just proceeded to pull pencils out of the box and colored. For once I had no plan or color scheme in mind. I knew I wanted a vintage look though. I shaded the banners individually. I painted the background using Distress inks and then I spritzed the page. I stamped the sentiment from the same kit and used the pencils and water to frame the sentiment. I pulled out some new vintage brown based washi tapes and added them to a card. I backed the watercolor page with a brown wood grained paper. I then found a muted vintage paper to fill in the rest of the card and added the banner frame. I added some ephemera and crystals and the card was done.

This card is relatively simple to produce. Thanks for visiting and have a great day!


Sunday, March 4, 2018

Just Breathe ATC

My second ATC was much easier to create and I think is a little more cohesive. I chose Unity’s Just Breathe Bloom for the image. I love this stamp, the song I sing in my head when I see it, and the sentiment’s recommendation, in general!

I pulled out my Tim Holtz stencil and decided to couple shaded lilac and twisted citron distress inks along the edges. I pulled out the background stamp from Unity’s Beautiful Every Little Thing. I wanted to achieve a very faint image of the “trellis”.

I stamped the lilac shade on my mat and spritzed it with a white Tattered Angel Glimmer Mist and stamped the stamp in the mixture and applied it to the card. I LOVE how it turned out, a very faint color with shimmer in it.

Now, I embossed the image on the card. To color the image, I applied shaded lilac, blueprint sketch, some greens and Perfect Pearls to my mat,spritzed water and colored, and to finish the card, I outlined the card with a purple Glimmer pen. I was happier with the outcome of these cards.

Hope you enjoy these notes. Thanks and have a great day!

Do It Anyway ATC

Couple weeks ago, after joining an Artist Trading Card (ATC) Unity swap group, I designed and created my first ATC. I chose to use a variety of Unity kits on this one, specifically, Boldly Believe, Feel the Fear, Hug, Straight Laced and a freebie butterfly stamp. Given this was my first ATC Swap, as well as some of the others in the group, and, I was feeling a little nervous, I quickly decided on the sentiment and the Believe flower.

To begin with, after watching several videos, I realized you could use a variety of platforms for your ATC’s. I had some leftover poster board and cut that into twenty 2 1/2 x 3 1/2 cards. I picked the Distress colors I wanted for the background, stamped them on my craft mat and began “smooshing” the cards into the colors. I then took a Tattered Angel Glimmer Mist and sprayed each card to give an overall yellow Glimmer. I then took the script stamp and stamped that sideways on the card. I decided  to add an edge and used a Copper Colorbox archival ink to stamp a lace border.

Now for the images, I stamped the flower in green and butterfly in black archival inks. I then pulled out my new red and yellow Brea Reese Glitter inks and colored the images. I then stamped the sentiment all over a 7 Gypsies 12x12 sheet. I fussy cut the sentiment into 2 pieces and distressed the edges.

To finish the cards, I affixed the sentiments, added tiny flowers and sticky sparkles. Once completed, I decided the cards were over the top, as usual, but I was able to use my new toys (sprays and inks). They adequately lived up to the “first card ever” ATC, and my initial fears were confirmed - I needed more design practice! Here’s some pics of products and efforts,


Saturday, March 3, 2018

Stamp and Scrapbook Expo Classes

Update: added pic below of 2nd day mixed media focused purchases!

I’m currently attending a Stamp and Scrapbook Expo in California. Besides buying out the vendor booths with paper, bling, all the new Oxides, I also spent a lot of time in classes.

The first was focused on Alcohol inks and the techniques used with them. I must admit I had a headache from the fumes afterwards but the class was great and I got to play with Ranger inks. Nicole Peterson gave the class. She supplied each table with the hand sanitizer, rubbing alcohol and Copic blender liquid which we used to create the shown designs. Takeaways: 4 inks, a gelli plate, instructions, couple Yupo papers left, and our creations.

The second and third classes were given by the owner of Art Anthology, a mixed media vendor. The first class focused on creating the cover of an art journal. If we took the second class, focused on page creation techniques, we got the book. I created a video showing my art journal efforts. Some pages turned out okay, some not, but the good thing is you can always add to a page and change it. The last class ended at 9pm and was a 3 hour class. Because this was the first class she gave on the techniques...she served us pizza as we got to explore with her the techniques. It was pretty free flowing and she made all her products available to us to use. It was a very creative and exhausting night! I now have a foundation I can build on!

During the day, knowing I wanted to explore mixed media techniques, I picked up a variety of products I thought I could use. I especially loved the finding of 49 and Market products! I loved the paper pack besides the chip boards! I also picked up a couple different metallic watercolors. Found a bunch of cool stencils and the 2nd day (not pictured here), I picked up several interesting background stamps. See pic of these purchases!