Sunday, December 30, 2018

Flower Card for Another Color Challenge

Pulled out the 11/18 Unity SMAK kit, which I’ve not played with yet, for another color challenge. I decided to use a painted background paper I created for another card, even though the pattern was a bit more blue than the pic below. I started by adding more gray and mint colors to it by dipping the paper into water sprayed ink, on my craft mat. I then cut a piece of the paper out to fit the front of an A2 card. I stamped the leaves and butterflies from the kit in peach and gray colors. I did this by using a combo of distress inks. I then pulled out a TCW stencil and added a pattern over the too dark butterflies using a mint Heidi Swapp paste and another pattern using a dark gray paste. This is the color palette posted, however, my “mint” color ended up more on the blue side as the paper I started with had a bluer tint to it.


I then cut a piece of watercolor paper and stamped the flower using a combo of gray inks and a peach archival ink. I added color to the panel using the Distress inks and then played (a lot) adding details using pens (colored, white and gray), watercolors and pencils. Fussed a lot with this one!

I then added more color to the background, by stamping the corner stamp in the kit with the mint color. I also used a doily TCW stencil to add a peach color. And finally, I stamped the leaves around using Hickory Smoke.


I added a peach colored paper backing, mint and peach ribbons and crystal dots to the panel. Mounted with foam tape on the background and decided to die cut “Hugs” to add to the the ribbon. Attached all to a cardbase and called this card done.


I think it’s a soft and fairly pretty card in person, but it’s not anything special, to me. I think I might try this color palette with a softer look tomorrow, because they are pretty colors. Till next time, happy crafting!


Saturday, December 29, 2018

2019 Crafty Resolutions and Unity Card Challenge Cards

Not sure about you, but I, definitely, have developed a few new resolutions to follow when crafting this next year. As I scurried to get out birthday and Christmas cards this month, I was wishing I had followed just a few of these rules throughout the past year! So, here goes (and, really, you all already know this, but I’m still catching up in my second year of carding):
1) Keep the back of cards “clean”... create a space to complete cards clear of paints and inks, and adhere the created cardface as the last step, if possible!
2) Create, at a minimum, 2 cards in the same style. I’ve done that with the cards below where I restamped in a similar style. This could also be accomplished by creating larger backgrounds that could be cut down for multiple cards. (I cannot do mass production, just not in me - easily bored!)
3) Be more conscious of card weight and standardize on size.
4) Make more birthday cards and a few other standard event cards.

So, keeping these in mind, I had decided to join in on Unity’s Color Ink Challenge, when another Unie, the Squirrel of Judgement, layered a specific color combo challenge on the table (see pic). LOVE THE COLORS!


So, I then started thinking about stamps to use and happened upon the 2 butterflies (1 solid and 1 lined) and a sentiment from the 8/17 KOTM. I wanted to use the 2 stamps with generational stamping using only 2 colors, Abandoned Coral and Weathered Wood. I stamped diagonally with the two stamps starting from opposing sides. I did have some missteps and had to restart, allowing me to create 2 different cards. I also got the bright idea to try to create a background paper using white and silver embossing powder and then apply the ink as a watercolor. I noticed with generational stamping I could achieve better effects by doing it freehand. I tend to re-ink the stamp automatically with my Misti.

The first card was more what I had envisioned and I used the created embossed background in it. I used a whitish Kraft paper as the cardbase and backing.


The second card was a happy mistake as I wanted to emboss the key butterfly and sentiment with silver ink and started by using the white powder instead. So, I had to cover up the original sentiment with a tag, but I think that’s okay. I, luckily, happened upon the coral colored paper, a silver card and grey paper, that I could use to frame the card. The butterflies were a little too dark on this one, so, offsetting with colored paper helped to make them pop more.


I’m pretty happy with how these turned out. They may or may not totally meet the challenge guidelines, but I’m still happy! Plus, I’m also very pleased that I ended up with 2 cards, they are lightweight, and I kept the backs clean. I also think they can be used as birthday cards. So, so far, I’ve got a head start on 2019. Now for some personal resolutions, hmmm.... have to think about those...back to the drawing board!

Well, feel free to share your goals for next year, as, who knows, I may add a few more of yours to my list. Happy crafting till next time!


Thursday, December 20, 2018

December ATC’s!

Oh my, it’s been a busy month! I finally got “got my butt in gear”, as my husband says, and created these cards. I wanted to make sure they looked very festive for the holidaysand reflected my messages for this heartwarming season.


I again had a lot of fun with the first card. I took a watercolor paper and used a variety of green, blue green Distress inks to add color. I stamped them on the craft mat and dipped the paper in. After drying, I then sprinkled green Perfect Pearls on the mat, sprayed with a clear gold spreckled Tattered Angels Glimmer mist and again dipped the paper in. By adding the last bit, the paper has a very soft sheen to it. I picked up another paper and created a second sheet with the leftover inks and sheens (which I’ll use another time). After completely drying the sheet, I then softly stamped the flower from the Little Rebellion kit all over the paper using Vintage Photo Distress ink for background interest. I then cut up the paper into 10 ATCs.


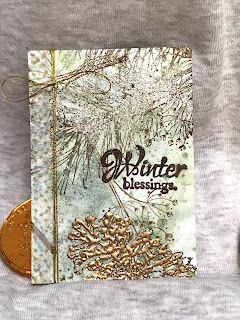
I pulled out my Misti and first stamped the pine branch from the Winter Blessings Kit using distress inks and embossed the image using the lightest, glitteriest embossing powder from a 5 pack Stampendous kit. I then stamped the pine cone and embossed with a gold with brown flakes embossing powder from the same kit. I love, love, love how the two powders look together! I picked up this kit on a whim and am so happy with it! I then stamped the sentiment with a dark brown Gina K ink. I added Washi tape on the side and gold thread and called this one done. Very glittery for the season!


The second set of ATCs were easy to make but took longer as I colored in the image. I used some gingerbread patterned paper as the base and took the image from the Snow Place Like Home kit and stamped it onto Kraft paper. I then used a variety of pencils, white and red pens, a green Arteza watercolor brush, and a peach Spectrum Noir Glitter pen to add color and shine to the gingerbread house. I fussy cut the houses. To complete the ATCs I die cut the Tonic sentiment using the other side of the patterned paper and added a coordinating ribbon.


Hope you liked these 2 ATC’s and that you have a wonderful and blessed holiday with family/friends. Happy crafting, till next time!

Sunday, December 9, 2018

Hope and Peace Card

Wanted to try creating a scene with the 10/17 SMAK kit from Unity. So far, pretty happy with my first attempt. I also wanted to match up with the Bo Bunny Winter Playground paper pad. If you’ve been following me, you know patterned paper is often a source of inspiration for me. I just can’t stop picking up pretty paper (especially if deeply discounted)!

I started by stamping Stormy Sky and a bit of Iced Spruce Distress inks on a craft mat and dipped the the top 2/3rds of the paper in the ink. I dried and repeated this. I really liked some of the patterns it created. To me, I see mountains in the distance. I then stamped part of the tree stamp in the middle on the left using the Iced Spruce. I then stamped the bottom right the same way. Next time I’ll vary the intensity and brighten up the colors of the closer trees. I embellished the rolling hills a little added a few more trees by hand. I then stamped the fence on the bottom left, by first stamping the brown parts and the the red bird. I ended up embossing the bird to make it stand out. I finally stamped the sentiment in several colors till I settled on a teal Memento ink, and clear embossed it.

To complete the card, I backed both the patterned and watercolored papers with a plain teal green paper. I embellished the card with Washi and sparkly crystals.


Yes, I know, I noticed I seem to be on a blue Christmas kick with my cards this year! Well, hope you enjoy this blue trend for a change! Thanks for stopping by!

Friday, December 7, 2018

Coffee Lover Hop- Last Card

Found a coffee paper in a 12x12 kit I picked up at Tuesday Morning recently. I really wanted to try my new Concord & 9th Cozy Christmas stamps (of which I bought 2 by mistake. I think there’s a magic age where this starts to happen, I think late 40’s early 50’s. Anyone knows clue me in! Will be putting the 2nd bundle up for sale soon)! Anyway, I then searched for a good coffee cup I thought would match well and happened upon this Unity stamp from the 9/15 KOTM. I like how the paper, the cup and the cozy set all have fabric designs.

To start, I stamped the cup on watercolor paper using a combo of Vicki Boutin blue greens in the bottom and a Beige Simon Says ink on the top. I then pulled out Evergreen Bough, Tumbled Glass and Blueprint Sketch Distress inks. I started by painting the backgrounds around the cup. I then painted the cup, blending inks to keep to the palette colors. I ended up adding a bit of pencil color afterwards and used Spectrum Noir silver and clear glitter inks. I also spattered a little of the colors.

I stamped the sentiments by starting with the word Cozy using Teal Momento ink and a combo of Turquoise and Silver embossing powders. I then lined up the smaller two and using the teal ink and turquoise powder embossed those. I always have a bit of a dilemma, because I never seem to cut the paper large enough to use standard dies. So I had to play a little to get a seam around the paper. I backed that with a gray paper from the pack.

I stamped the stitch pattern using the stamps from the kit using all the inks I already used. I cut that paper down and covered a side of the patterned paper. I used a stitch die on this paper. I also used a Bo Bunny die to create a doily with the same dark gray paper. I mounted everything on a Kraft card base, adding blue ribbon and coordinating sequins. I’ve included a pic of the products used.


Thursday, December 6, 2018

CLPFALL 2018 Peppermint Frosty

Made another card for the blog hop, using the cutout from the last shaker card!


I used another Unity freebie Kit, Snowman to Go. I stamped the cup on watercolor paper using a light blue archival ink. I then colored the cup with pencils and then used the Art C clear glitter ink on the white snow areas. I had found matching papers - a silver patterned paper, a pink/red check and a blue stripe that I tried matching colors to. I then pulled out another freebie I recently received from Concord and 9th, that makes a snowflake border. I decided to put the shiny silver on the bottom and use the blue stripe with the die cut. This die is cute, as I kept the cut snowflakes and used them on the card.

I stamped snowflakes from an Angie girl kit on a piece of white scrap and then added red/pink stripes diagonally. I die cut that paper and backed with the same red paper. I stamped the sentiment in grey ink and embossed it with Brutus Monroe Silver powder. To complete the card, I added white silver tipped ribbon, the snowflakes and glittery crystal. I also used the Holiday Treats kit to add another candy cane and peppermints!


Hope you like this little card. I was a little happier with this card, but tomorrow, I’m hoping to make the best blog hop card (hopefully). Till next time, happy crafting!

Tuesday, December 4, 2018

Coffee Loving Blog Hop Peppermint Mocha

Created a quick card to try participating in the Fall/Winter Coffee Loving Cardmakers Blog Hop. Used Unity’s Cozy Layers Mode and Holiday Treats kits. I picked up way to shiny card stock from Tuesday Morning. I had some pinkish/holographic snowflake glitter from Target I thought I’d try using. And I picked up a shiny silver media spray and silver embossing powder from Brutus Monroe to use.

I created the background paper using the silver spray, and pink Distress inks. I then cut out a slot to make a shaker card with it and wrapped some Washi tape around it. I stamped the candy canes and peppermint candy in a pattern I thought would fit on the cup. I then stamped the cup. I also stamped dots around the cup and embossed them with a pink embossing powder. I then watercolored the card and added another candy cane and fussy cut it. I added another candy cane that I had fussy cut.

I created the shaker out of 2 acetate sheets as I didn’t think I could get foam to adhere well enough to the glitter cardstock. I attached that behind the paper and adhered it to the card. I then stamped, silver embossed the holly strand and fussy cut it to make an embellishment. I stamped and silver embossed the sentiment to paper I had added pink watercolor to. I fussy cut that and used a silver pen on the edge.

Not so proud of this card, but I was able to experiment with new products and combining these stamp sets. I love the Brutus Monroe products; they performed well. And, I figure out how to add a card to the blog hop. Hope to make a much better card for the next entry!


Saturday, December 1, 2018

Friends of Unity December Blog Hop

Holiday greetings everyone! Friends of Unity are back, with a Thank You blog hop. It seems a perfect time, between Thanksgiving and the December holidays, to recognize the generosity of friends and family! As usual, several members, including myself are offering giveaways. To WIN leave comments on EACH blog in the hop AND check back on next month’s hop for the WINNERS from this month’s giveaways. Thanks for playing along with us!

On the first card, I was still channeling autumn colors and went on a fabric tangent. I really wanted to use this fabric pattern from an autumn kit in paper piecing. I decided to use the girl from the 2/18 KOTM and a freebie grab bag stamp (perfect timing)! I stamped the girl onto ivory cardstock and the patterned paper. I colored her with pencils and fussy cut and attached her top. To create the background on the same type of paper, I used 3 Distress oxides and brushes to create 3 color lines. I dulled the colors by brushing the other colors over each. I then stamped the new Dance with Denim background stamp with Peeled Paint Oxide. I also spattered Picket Fence drops. I love the fabric like feel of the background. Using Colorbox brown, I then stamped twice the trees from the So This is Love kit. I added the girl and diecut it all and backed with brown paper. I mounted that on a burlap pattern paper. I then took a paper scrap and used a Sizzix embossing folder to add another fabric style. I inked over the texture, stamped the sentiment and added color and border with pens. To complete this one I added 2 fabric ribbons and enamel dots.


With the second card, I decided to create a simpler card and use one of the recent buy freebies (since I have 2, one will be part of my giveaway), the Shakin’ Things Up Kit. I think this kit makes a perfect holiday gift thank you note. I stamped the image with black ink onto white watercolor paper. I stamped one of the sentiment kits on the globe in red ink. I watercolored the image using distress inks and added yellow Brea Reese glitter ink around the edges and a clear Art C glitter ink on the snow. I stamped the thanks sentiment from the Thanks, Thanks and Thanks Kit. I then added the same colors to the banner. I stamped the Hit the Brick stamp on red paper using brown ink and heat embossed it to create a background paper and adhered it to Kraft cardstock. I die cut the image, added paper and washi behind the banner, mounted it and added a poinsettia embellishment, crystals and ribbon.


I think the adorable snowman on this last card was a freebie stamp from last year, Winter Frosty! Again, a perfect thank you note stamp! I also used the Thank You stamp from Abundant Blessings (at this point, I realized I needed more plain thank you stamps!). To create this card, I, again, stamped the snowman and sentiment onto white watercolor paper. I watercolored the background to create snow mounds and shadows using distress inks. I used pencils on the snowman. I added the clear glitter ink on the white parts of the snow, including the snowman. I found patterned paper I thought would be a good background, added ribbon and crystals and called this one done.


Hope these cards and the others shared on this blog hop serve to inspire your thank cards! Remember, if you wish to participate in the giveaways, be sure to comment on every blog entry in this Hop and check back next month. We, on the Friends of Unity design team, are always interested in your feedback! That’s why we use our own stash to offer giveaways.

We are NOT sponsored by Unity Stamp Co., but they approve our hop. We are huge fans of the company, their products, the owners and staff, and the Unity Show and Tell community, which is why this hop was started. If you enjoy my crafting style and learning journey, be sure to follow me or add your email address to get the latest blog entries!

You are here -> Joyce Verdon
Jeanie Marie Hays

Thanks for stopping by! Till next time, happy crafting!