Wednesday, November 25, 2020

Let Light Shine Card

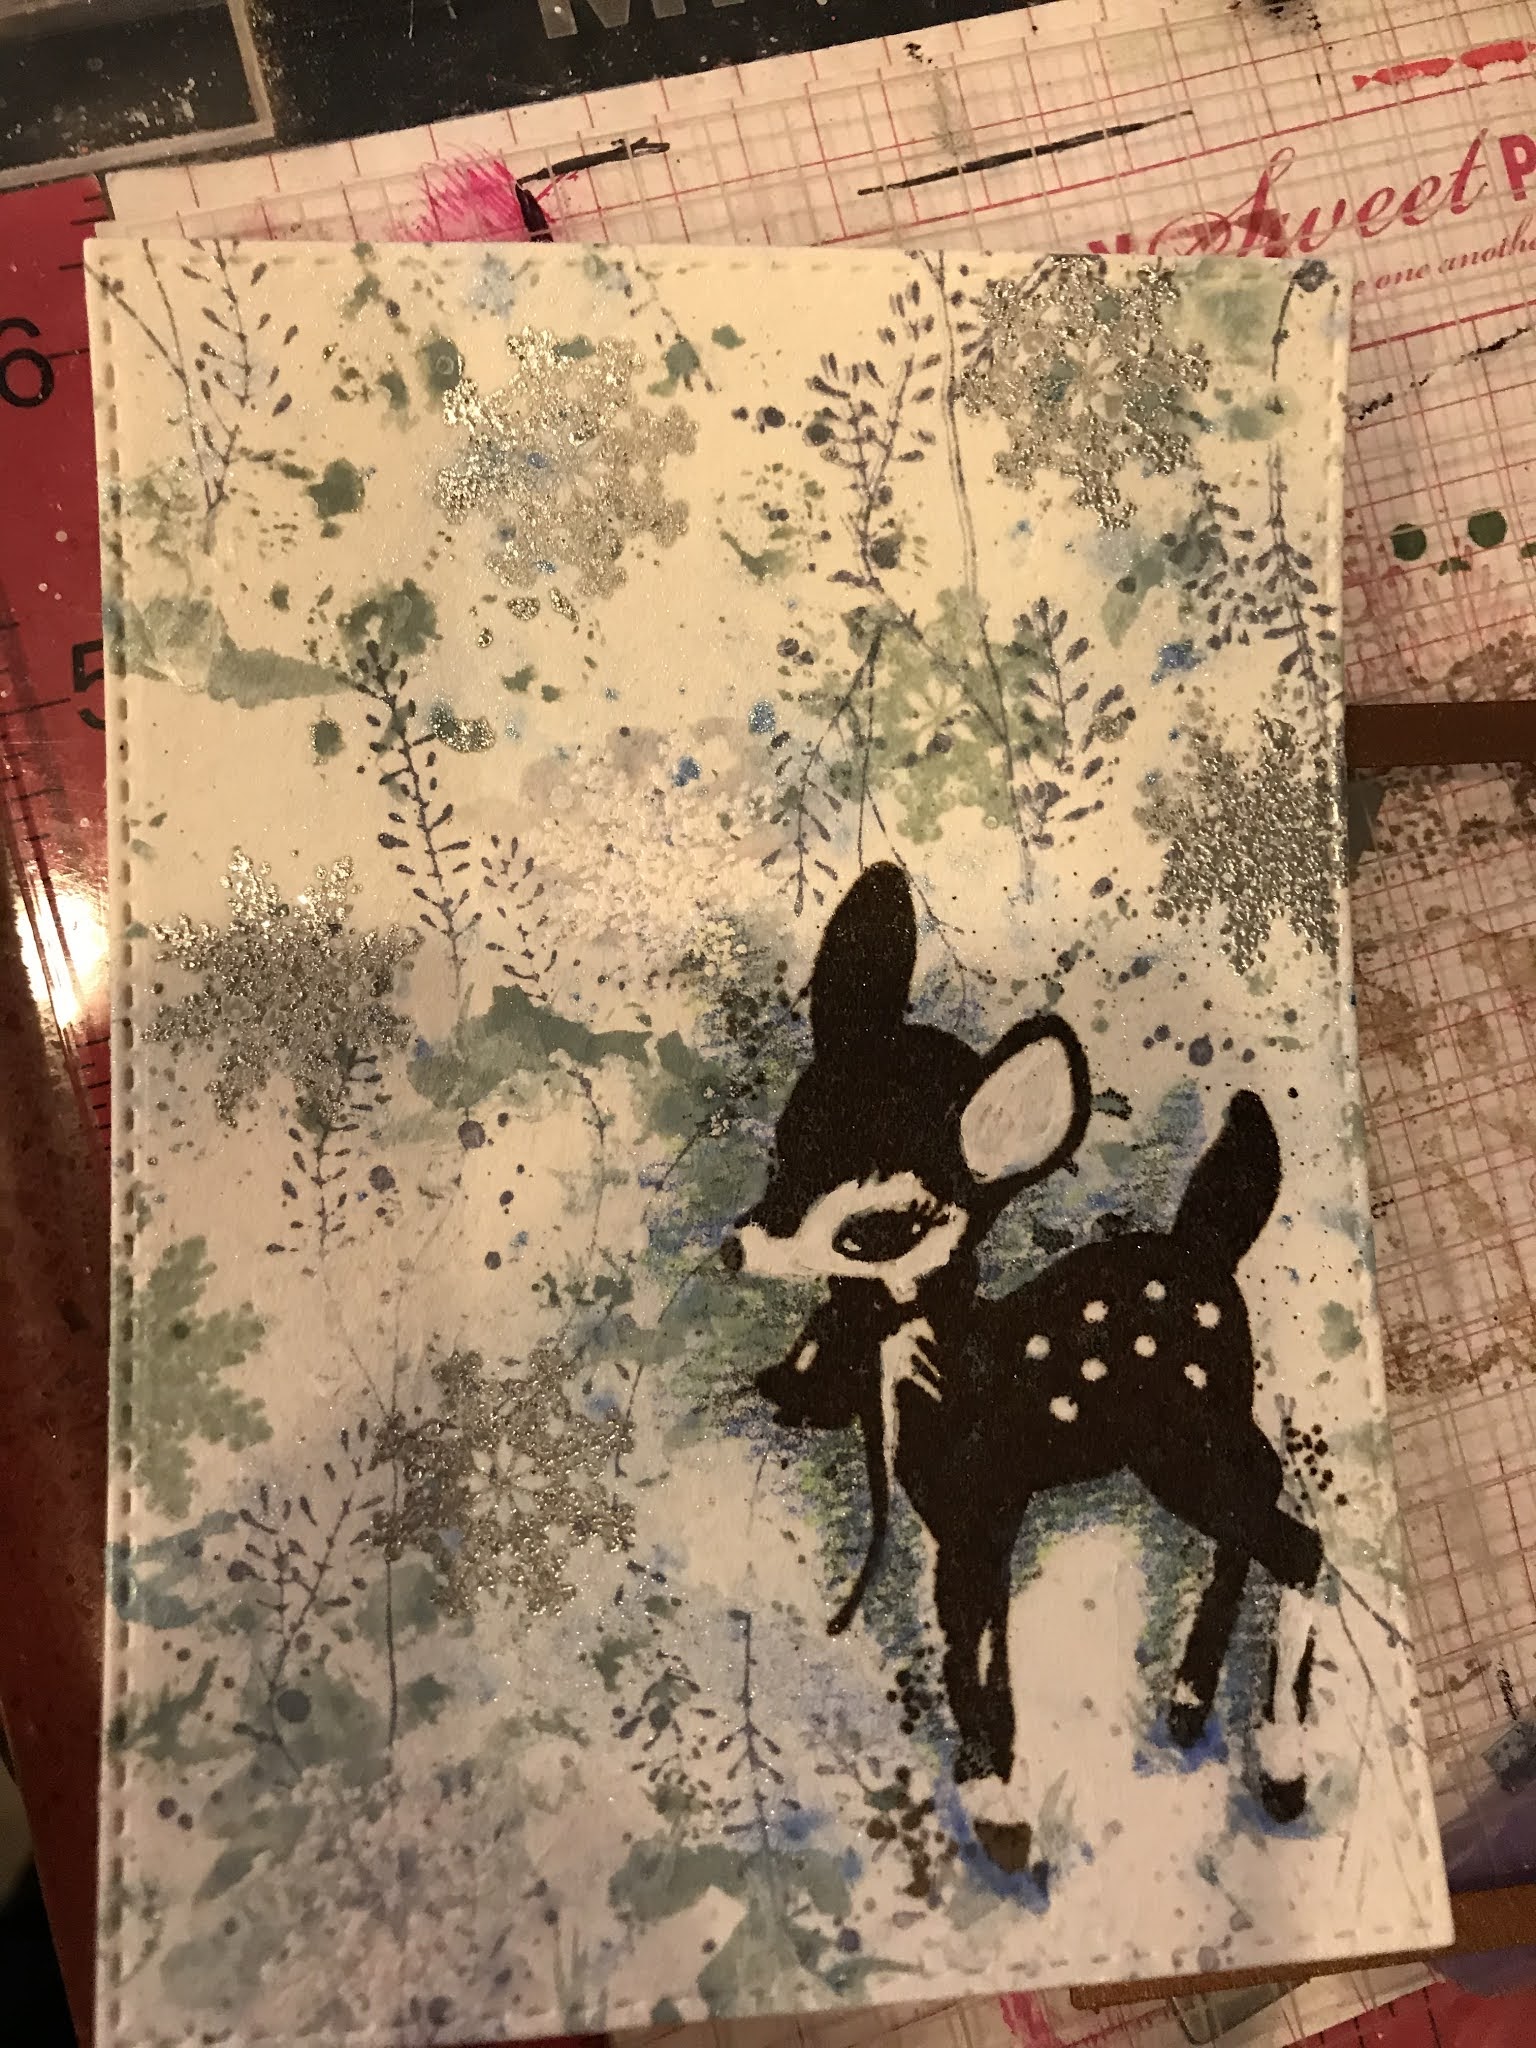
Well, as I said to my crafty friends, I knew I was jittery, in pain, and anxious Sunday, but I didn’t know I was depressed too, until this image appeared. Your art speaks for you, I guess!

My husband who is currently working for the federal government on the East Coast (I’m 3000 miles away on West Coast) told me Friday that he’d been exposed again, on the job, to Covid-19. Three strikes and you are out, I guess! Luckily, he was wearing an N95 mask... he’s been really good about that. But he felt funny with a headache and congestion. By Saturday, he had eye symptoms and was losing sense of taste. Meanwhile, I had to go off all my pain meds and was feeling poorly, in preparation for a needle injection in my neck Tuesday. I have bulging disks and radiating arm pain all the way to my fingers! Plus, I have friends who are in much distress as well for a variety of reasons. Anyways, this was the result I produced Sunday feeling all of that. Until I saw it Monday morning, I didn’t realize how dark I felt!

Anyway, I started this project with paper from a very old Love From Lizi kit and Unity’s Shine Out of Darkness kit. I first gessoed the part of the paper I’d be using. I pulled acrylic paints in white, copper, blue and black and proceeded to add color to the paper with both my fingers and a paintbrush. I then decided to tear a strip off another sheet of paper and used gel paste to attach it to the bottom. I then added more color to blend the pieces together. After pulling out the stamp, I realized it was too short for the space I had created for it. So I stamped it on tissue paper, twice, using a navy Stazon ink, allowing me to expand the height.

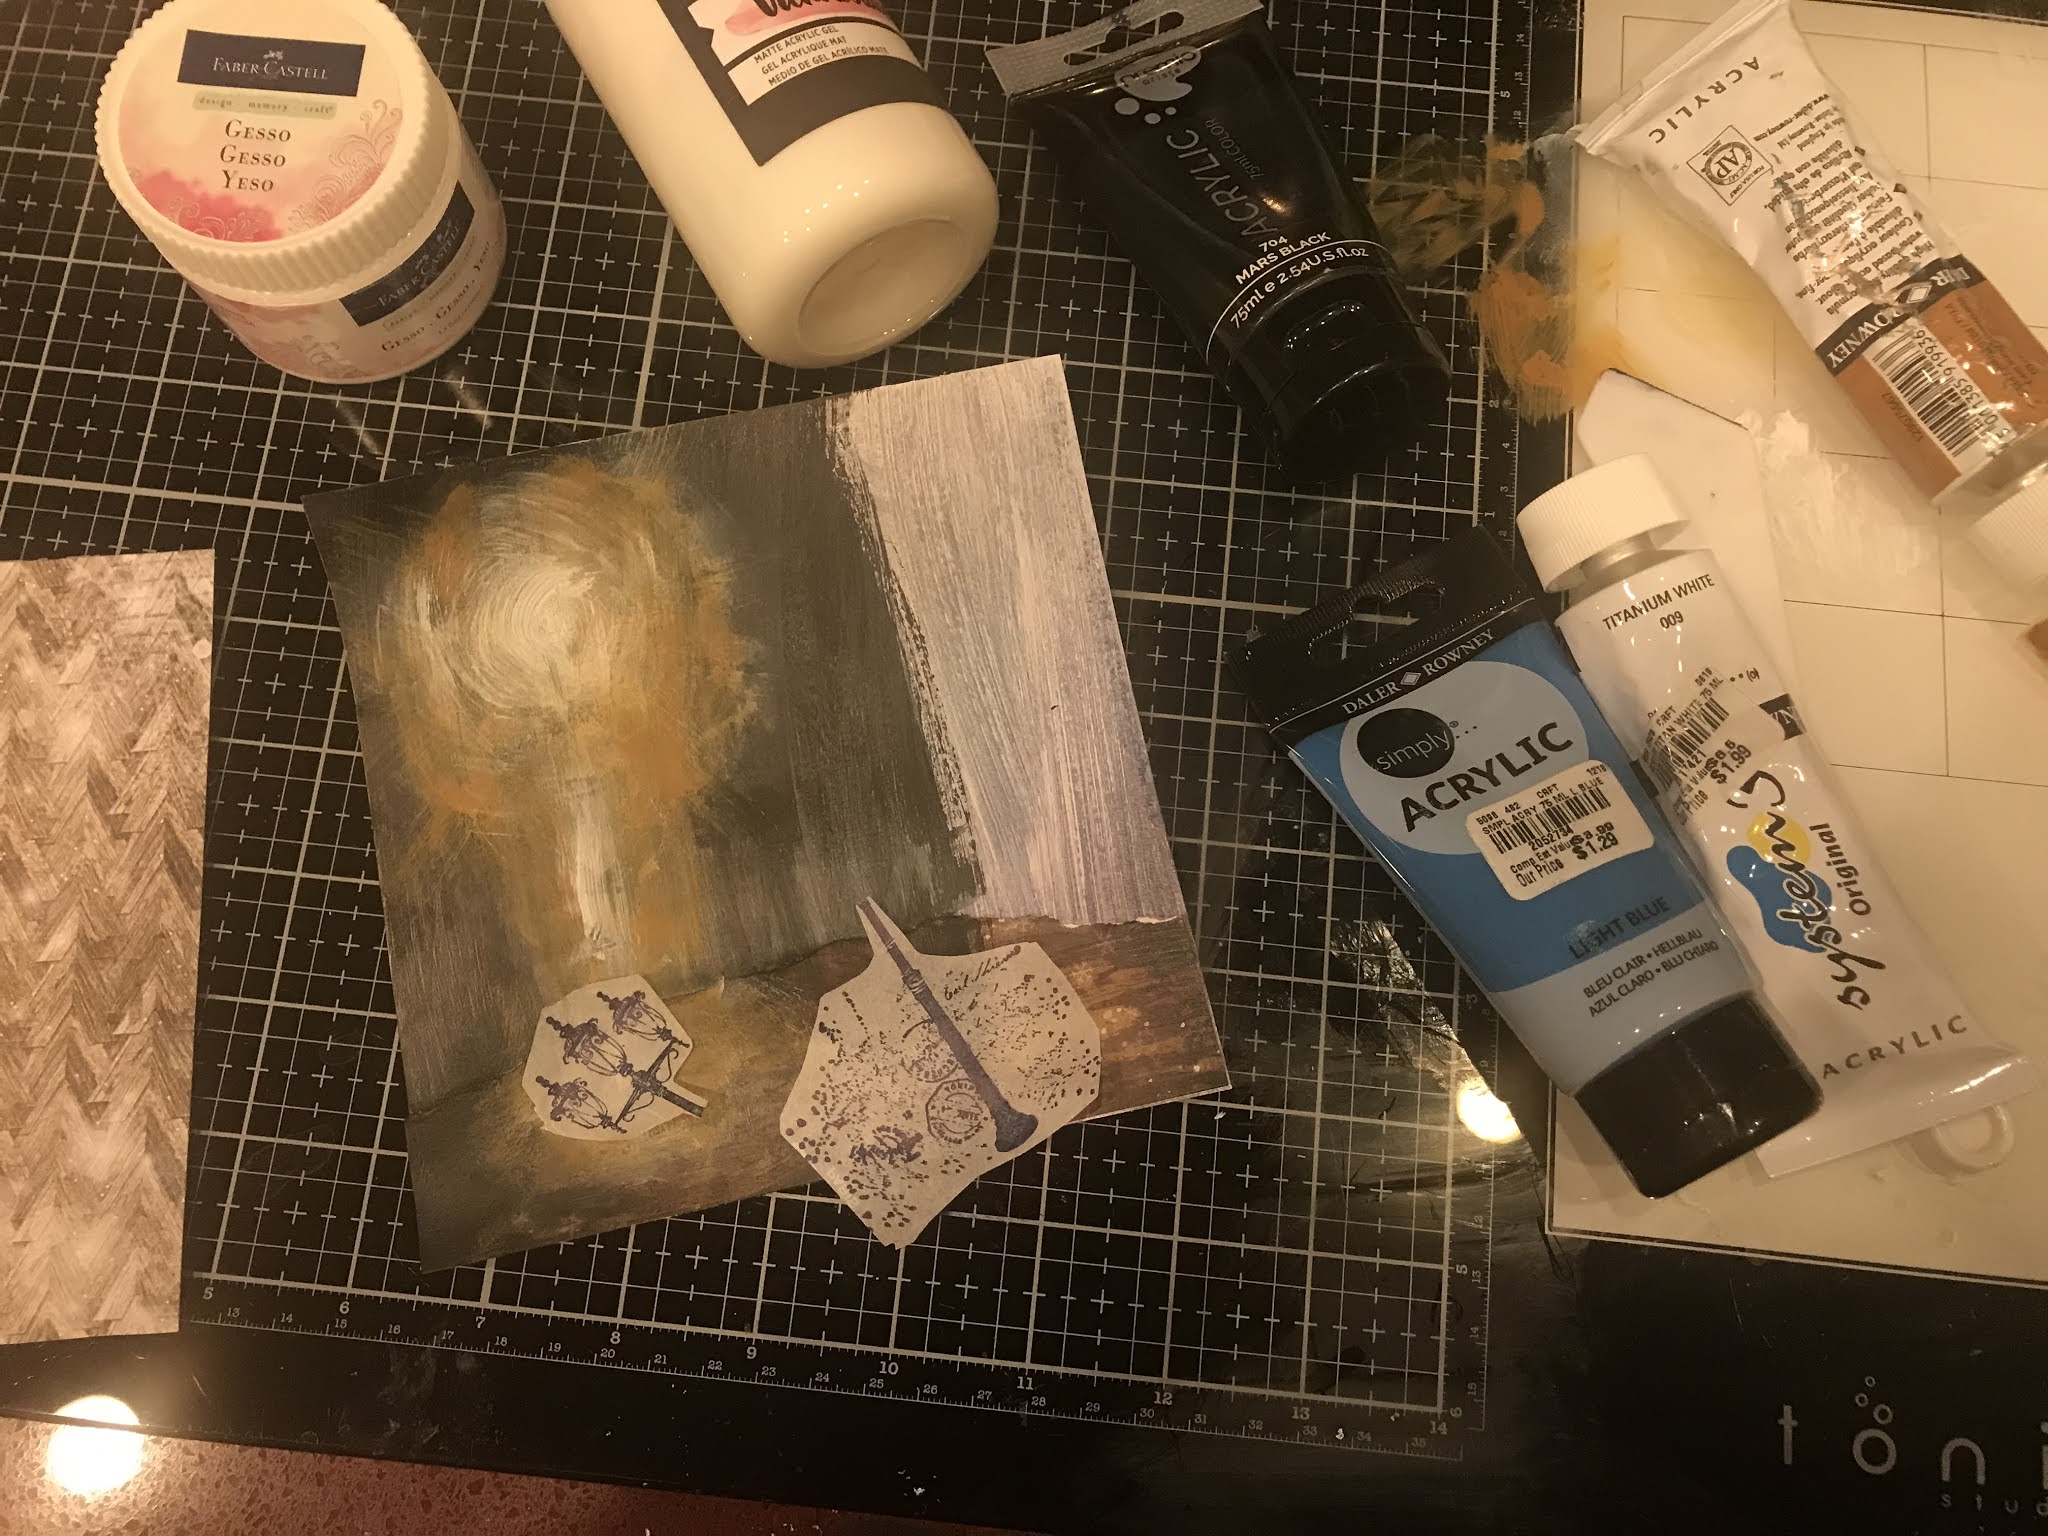
I cut off the excess paper and carefully added the stamped images using gel paste, aligning the posts to link up. I then added more paint to cover up the edges.

I decided to also add a platform for the lamp to sit on. I used my Gansai Tambi watercolors to add lines simulating a paved platform. Before I did anything else, I thought I’d better figure out how to add the sentiment. The kit included paper which had gold frames. I decided to try using one, and therefore added Gansai Tambi gold watercolor paint to the squares. I stamped the sentiment using black ink and then added gold pen to make the words “ shine”. I then turned back to the image and embellished the light post by darkening some areas and adding lighter colors around the light fixtures. I used both watercolors and pens.

Finally, after recovering from yesterday’s needle ordeal, texting with those same friends and seeing my husband’s symptoms are staying very mild, I’m in a much better state and was able to pull the card together! I used a variety of the papers and added a BoBunny Antique Gold TCW stencil image on one of them. I die cut the papers down and added a ribbon to complete the card.

Hope you were interested in how this one was put together. I guess, this serves as a good reason to keep an art journal as it captured a real life moment. I actually thought about putting this in a journal, but right now I think others can benefit from this card! And, if in need, I hope you do too! Things will get better! Well, till next time, happy crafting!


Saturday, November 21, 2020

Making Spirits Bright Card

Used this month’s Unity SMAK, Peace in Your Soul, to make this elegant fun card! I also used Bright Spirits, the 11/19 SMAK Beauty of Life, and a random scroll from an unknown older Unity kit. The base layer is a paper from Unity’s Rustic Winter Wishes

I first started by embossing the bottles into a shimmery white card stock, using Antique Linen, Fired Brick and the new Rustic Wilderness oxides and corresponding embossing glazes. They turned out beautifully! After checking through my whole stack of papers, I couldn’t find anything that would work but I did get inspired by some of them! So, I decided I needed to create my own paper background. I first started by laying down a water wash of Antique Linen oxide on to white card stock. I stamped the pad onto my mat, added water and swiped a large brush through that and across the paper lightly to add the color. I lightly stamped the music background down the entire page, once dried. 

I then used all 3 oxides again to add the holly, pine cones and scroll to the sides. I die cut this sheet, and stamped the sentiment at the top in black Versafine. I then adhered/mounted the bottles. I backed this paper with a gold glitter paper and mounted everything onto an A6 size card.


I love how this one turned out and enjoyed using my new glazes and green color. Was also fun creating that background. I didn’t add any embellishments to the card as it seems complete to me! But if you think I should, comment below! Thanks for stopping by! Till next time, happy crafting!


Thursday, November 19, 2020

Polka Dot Orchard’s Dolly Doily

Started playing with the 2 Dolly Doily sets from Polka Dot Orchard, Dolly Doily (square) and Dolly Doily (mask) using a variety of mediums and techniques. I’ve made cards with a few of them, but have kept the others for future efforts (potentially mixed media projects).

I used the Cosmic Shimmer Holly Green texture paste on green card stock paper for the first card. I die cut a Simon Says Stamp snowflake using gold glitter paper, and embossed a sentiment from Unity’s 9/20 Elements of the Season KOM. I attached a large holiday themed DCWV Washi Tape from a 6x6 paper pad onto white card stock and die cut it for the bottom. I die cut a gold paper tree. I finished off the card with the die cut remnants, red crystals and some gold sticky strips.

I used the Brutus Monroe Raspberry Glitter Glaze on pink card stock for the second card. Here I gold embossed the cute image from Unity’s Uniquely Unity kit, ... All Wrapped Up. I then used a mix of Spectrum Noir Glitter pens on the image and die cut it. I paired it with wintry patterned paper, gold trimmed ribbon and pink and gold crystals.


For the last card, I used the ink blend on shimmer paper creation. I decided to use it as a background for Unity’s Simple Lovely Birdie kit. I picked up on a sale site, a 12 set Caran D’Ache Museum Aquarelle watercolor pencils. Giving the bird texture was important to me, so I thought it a perfect test of the pencils. I’m new at using watercolor pencils, but this set was so easy to work with... my only complaint, I wanted more colors! I had to resort to my Schmincke set to add a redder wash to the bird. I also ended up using pens to add definition. I fussy cut the bird and stenciled paper. I paired them with Simple Vintage Christmas paper from Simple Stories, Simon Says Stamp dies, fussy cut Pinecone, striped red twine and enamel crystals. Pretty busy design, but it’s festive.


Hope you enjoyed these ideas. Had fun combining products and using older stuff! Well, till next time, happy crafting!

Sunday, November 15, 2020

Another November SMAK Card

What a cute SMAK kit this month! Peace in Your Soul has a variety of interesting images that can be used for cards, canvases, journaling, etc.! As I’m still on my quest to build up my holiday card stash, I paired it with, a new to me brand, AB Studio paper. I believe Christmas Cheer was released last year. I was called to the loose cheerful free hand artistic style of this kit. Has a very stamped/gel print look to it. You’ll notice the paper I selected for this card has bits of red throughout.


So, I started this card by cutting out a corner of this green paper, which has the red stripes on the opposite side. I embossed the deer from the kit using the beautiful Pam Bray’s Buttered Pearls embossing powder. I then pulled out the trees from the SMAK kit and embossed those randomly around using Brutus Monroe’s Milky Way embossing powder... it looks black in the jar but turns out almost a thick chrome color with flecks of black in it. I made sure to wipe the powder off the deer before heat setting it. Finally, I pulled out the branch from the SMAK kit and embossed a few of those around the bottom and sides using a brown/gold Stampendous powder. 


Once I was done, I used a spatula and white gesso to create snow drifts around the deer by scraping the gesso over the card. I used a wet wipe to remove the gesso off and around the embossed bits. I also scraped the gesso with a plastic card to ensure a non smooth look. I then used my Kuretake Gansai Tambi watercolors to add green, brown and black colors to enhance the impression of a winter forest. I also added a little red in spots. Finally, I pulled out a Paper Rose stencil and added white gesso “snow” around the whole card. I used pens to add shadows around the trees and white some globs to the sides.


I embossed the sentiment from the kit using a green Zing! Embossing powder on a lighter green paper from the kit. Again, I added black, brown and red colors to the image. I fussy cut it and a striped background out. Once dried I covered the forest card with wax paper and die cut it. I had decided to make an A6 card so as to preserve most of the image. To fill the card, I cut 2 strips of the striped paper for the top and bottom. I distressed all the pieces and constructed the card. To complete it, I added 2 green and 1 red striped threads. 


Oh my, this was fun! I must admit, most people probably wouldn’t enjoy this type of card... but I love this style! I’ve always been obsessed with art and art galleries. My first stop in any new city... the art gallery! From impressionists to Raphaelites to abstract to realism, I enjoy the creativity in artists rendering views of this world in all styles! So, I hope this card gives the receiver, whoever that may be, a calm but festive holiday greeting!

Till next time, happy crafting!

Thursday, November 12, 2020

Simple Joys Holiday Card

My first Slim Line Card...wow! Took awhile, didn’t it? (Little slower to catch on!) I pulled out my Holiday scraps from last year and remembered I had cut up a Daphne’s Diary magazine last Christmas! I had fallen in love with many of the images and saved them for art journaling or whatever. I noticed many of the pieces were long and slender and I immediately thought, well, perhaps I could try the new fad with one of them. I also found a very pretty glitter paper from DCWV that I thought a perfect green for holiday cards. 

So, after pairing the pink scrap from the mag and the glitter paper, I looked for a good size image I could use from Unity. I decided to use an image and sentiment from the Elements of the Holiday KOTM from September of this year.

I began by stamping the image using Ink On 3’s Fadeout NoLine Coloring Detail ink on watercolor paper. I then watercolored the image using my Schmincke watercolors, trying to match colors to the papers. After I completed the watercolor, I turned to my Prismacolor pencils to enhance the colors. I then used a combo of pencils and pens to add a little more detail. Once satisfied it was good enough, I fussy cut out the poinsettia’s vase. Placing dots of glue on the image, I added old Sprinkle and Sparkle matching green glitter to the petals.


I then found a few useful dies I could use to help frame the card, a Wild Rose Studio corner piece and a mitten set with a pine branch from Penny Black. I embossed the sentiment using a very pretty Nuvo green powder. I framed it with a red patterned paper scrap I thought would match using a Memory Box frame die.


I created the card base using a metallic card stock from Neenah, I picked up on sale. Framed the pretty pink paper with the glitter paper. I’ll be pairing this with a pink Simon Says Stamp envelope, I picked up on sale as well! This was a fun change and I think this one will be given to a special family member!


Well, on to the next adventure... till next time, happy crafting!

Monday, November 9, 2020

First Unity November SMAK Card

When I saw the background twig stamp in Unity’s Peace in Your Soul November 2020 Kit, I saw snow-kissed ground, with wisps of branches peeking out, looking down from above. I decided it might look great with a sentiment from the same kit and the deer from the Be Very Merry, September 2019 SMAK Kit.

I started this card by first sprinkling Stargazer Primary Elements Pigment on a card and spritzing with water. Once dried I stamped the twig stamp in gray archival ink all over. I then sprayed Iced Spruce and Speckled Egg oxide sprays onto a mat and dipped a bit of bubble wrap in the wrap in the mix and made small splotches of the mixture all over. I then stamped the deer in dark brown ink and used a white pen to whiten the areas of the image.

I next turned to silver, teal and white embossing powders to add a bunch of snowflakes from the kit. I used Prismacolor pencils to add the impression of a shadow. I embossed the sentiment with silver embossing powder on a piece of patterned paper and used another patterned piece from the same collection as a foundation layer on a dark brown card base. I backed each layer with dark brown paper and added another patterned paper inside the card. To complete the card, I added a sheer snowflake ribbon and brown crystals.


Can’t wait to try out other stamps from the kit! Till next time, happy crafting!

Saturday, November 7, 2020

Friends of Unity November Blog Hop

Starting another Friends of Unity Blog Hop today, this time, with a focus on backgrounds!

As usual, comment on each blog for a chance at winning some Unity goodies! Random winners are picked each month and FOU members kindly donate from their own stash to promote this hop! I’ll be giving a kit away this hop, so leave a comment and check back during next month’s hop to see if you are the lucky winner! Enjoy the hop!

This month I made 2 cards showcasing background ideas. The first card was made using the pretty Background Builders Set 1 from Ann Butler. I also used the sentiment from Warmth of Christmas. I used 2 of the strips and green and red Archival inks to create the background layer. I separated the stamped strips with white/gold sticky strips. 


I created the top layer by gold embossing the branch with ornaments from the Twigs of Merry kit. I die cut the paper and added a matching sticky strip border. I then stamped out some more of the strips and paper pieced the ornaments using Washi tape and more sticky strips. I embossed a piece of vellum with the sentiment, fussy cut it out and added it and some crystals to complete the card!

I created the second card using stamps from Unity’s Ticket to Christmas, the 2019 SMAK Home With You and 2019 SMAK Be Very Merry kits! I started by spraying and adding sparkly colors to a watercolor paper, that I ended up watercoloring over with Kuretake sparkly gold watercolor. I then green embossed the socks from the SMAK kit all over the paper. I added gold paint pen and red sparkly paint to “complete” the socks and then outlined them with charcoal pencil. I finally added red dots with a pen.

I stamped the mittens using Watering Can archival ink. I then used paint pens again for the deer, center design and part of the mitten fabric. I colored the rest using my Prismacolor pencils. I gold embossed the fabric background stamp onto patterned paper and used that and green paper as a back panel for the mittens. I gold embossed the sentiment, cut it up and backed them with green paper. I green embossed one of the tickets and added it as an embellishment along with a gold string.


Had fun making backgrounds with both of these cards! Thanks for stopping by! Leave a comment and enjoy the creativity in this great group! To continue on, go here:

To start at the beginning, go here:


Tuesday, November 3, 2020

Thankful Polka Dot Orchard Sampler Card

Had a chance to play with Polka Dot Orchard’s October Sampler Kit, from Jessica Pickeral’s company. My favorite season is autumn because of the beautiful fall colors, fun holidays and the autumnal weather change... such a needed break from summer’s heat (and in my case, drought and fires).

I debated posting this card today, but regardless of outcomes, I am so thankful Election Day is here and all the political debates and ads can stop! I am so done with it all! So, indeed, I am thankful!

After watching a mixed media YouTube hop...all 12 videos, I just had to go back to this style... and, with a stencil, chipboards and those beautiful ribbons from the kit, it seemed destined! Also, I had just brought out some fall napkins and I was dying to try decoupaging a napkin card. 

So, I began by pulling out a Ranger mixed media A2 card front. I sprinkled some Primary Elements, Spiced Pumpkin, powder over the card and spritzed lightly with water and dried the card. After cutting out the section of napkin I would use, I pulled out Vicki Boutin’s Acrylic Matte Gel and liberally painted the area the napkin would cover. I adhered the napkin, again liberally painting over it with the gel to smooth out wrinkles. I then tore up pieces of the dictionary the kit’s components were wrapped in and decoupaged pieces of that onto the card the same way.


I thoroughly dried the card. I then added some floral ephemera pieces to the top corners using the matte gel. I then started adding white paint, cream paint and Crackling Campfire paint to the card using a brush and my fingers.  I added Raw Umber to the corners and outlined the image areas with a charcoal pencil and pen. Where needed I added a little more paint to the image. I then used the leaf stencil and added leafs using a BoBunny antique gold paste and outlined those as well, once dried.

Next I turned to the thankful chipboard and embossed it with an antique gold embossing powder. I then looked for scraps to back it with. I tried lots of combinations and settled on brown paper. Wasn’t happy with result so ended up using the acrylic Crackling Campfire to paint in the letters.

Turning back to the card, I darkened the edges, glued on 5 little leafs from the kit and added the ribbon. I decided to spice it up a little by glueing on a thick Ranger gold glitter in spots to both the card front and the sentiment. I attached the card front to a Kraft card base and added the sentiment.


Certainly, not your average card, it perfectly matches my aura today! Edgy, happy, thankful, and grateful on a unique autumn day! Hope you like the card and check out Polka Dot Orchard’s cute kits! Till next time, happy crafting!

Monday, November 2, 2020

October ATC’s with Unity Stamps

Used some new techniques in the creation of these 2 ATC’s. With the first one, I actually had started by playing with a stencil after watching a Vicki Boutin video... and I do mean playing. Had no intention of using the results. I pulled out my VB crayons, scratched them on a craft mat, sprayed with a little water and used a big brush to flush out a flower stencil. I then flipped the stencil over. After pulling out another black crayon, scratching it on the mat, and spritzing it, I then used a brayer to lay that color onto the stencil and reapplied over the already printed image... therefore filling in the empty spaces. Didn’t turn out great, but interesting effect! 


I tried fixing it and then, just before I scrapped it, I cut it up for ATC’s. I then took a black pen and some pastels and added striped tendons and brightened the colors. Thought they may make good backgrounds for Halloween ATCs. I stamped the hat from Unity’s Halloween Chatter and fussy cut them out. I stamped the sentiment onto gold foiled patterned paper. And I added fussy cut cards, an ephemera piece (varied), part of a silver web doily and ephemera sticky’s to decorate the hat. Finished off by blackening the edges and adding sparkly purple crystals! Perfectly grungy!


The second set of ATC’s were created using 3 unity kits, Everything is Up to You, for the leaves, Letting Go, for the sentiment and splotch, and Count Your Blessings for a yellow frond. I started by stamping and embossing the leaves with Ranger brown powder all over an 8.5x11” paper. I then stamped the orange splotch all over. Finally, added the yellow frond. I cut them up and loosely added water to the flowers and carefully sprinkled Primary Elements Spiced Pumpkin to the leaves and painted on a little black! Made them quite sparkly! Embossed the sentiment with copper powder, added Nuvo drops, Unity patterned paper backing and some copper colored mesh and called those done!


Always have fun playing with these! Till next time, happy crafting!