Monday, September 26, 2022

A Walk in the Park

 Found this Crafty Individuals stamp in my stash, that I picked up in a craft magazine from a couple years ago. I fell in love with it as, by adding another dog, it feels like a view of my husband and I!. He always wears flannels and plaid shirts and I have longer hair. When I first saw it, I had considered picking it up from a craft store, but then happened upon it in a magazine rack! The stamp is called A Walk in the Park.

Pulled Prima’s Amber Moon paper pad from my fall paper craft bin. I stamped the image on one of the papers using a combo of ink colors that coordinated with the paper. I stamped and fussy cut a second dog, as both Pico and Allie needed to be on the card! I then used colored pencils to add dimension. I cut up the papers and distressed all the edges. I fussy cut a couple tags, a butterfly and pumpkin image. I used 3 sticky images that were part of the Amber Moon line. I also found some matching lace to use and a fussy thread. Finally, after pulling the card together, I added several Prima crystals, also from the line.


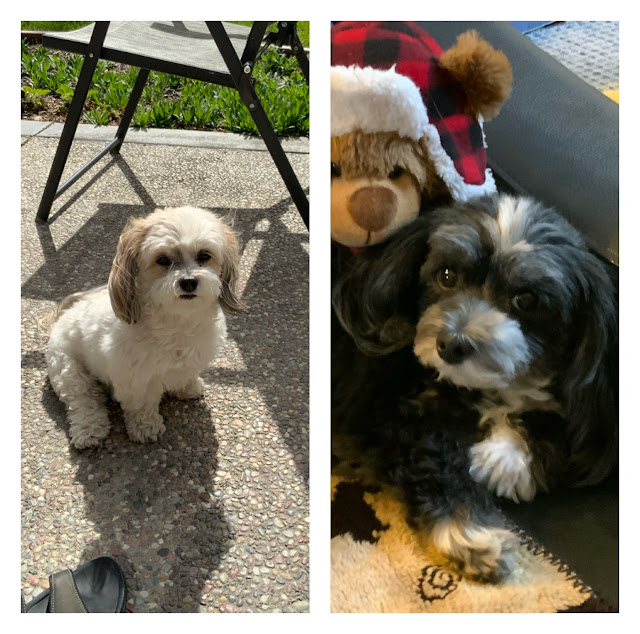
Update: forgot to take pic of our lovable 2 little Havanese:

Hope my husband enjoys this card! Love how it turned out! Thanks for stopping by! Happy crafting till next time

Tuesday, September 20, 2022

Gears and Tools Card

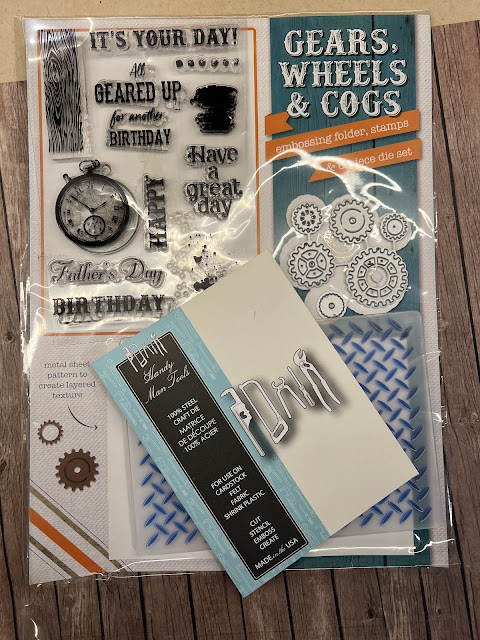
 Well, now that I’ve mostly organized my craft room and found a bunch of magazine kits, I’ve decided I need to “shop my stash” and try to use some of them. So, here’s my first card. I’ve long discarded the magazine, but here’s a picture of the set… btw, I have no idea which companies (magazine and craft supplies) produced it!


I started by pulling out a wood patterned paper from an old industrial looking paper pad and embossed the texture into it. I then rubbed a Nuvo cream colored paste onto the top of the paper to enhance the look. I stamped the wood panel stamp 3 times using a combo of Gina K inks onto ivory colored paper. Luckily, I managed to line up the images fairly well by sight using my Misti! I stamped the sentiment in between wood panel images. I added nail heads with white embossing powder using the kit image, and then, paint spatter images using both the Gina K color ink and an old VersaMark chalk ink in teal.

I pulled out an old Handy Man die set and cut up a set of black tools and I used one of the gray papers from the pad for the second set. I also cut up some gears the same way using the die set from the kit. I glued them together. I added white pen and brown pencil to add dimension to the die cuts and painted a little of the teal color on top.

Finally, I stamped and colored the stop watch image using pencils and the chalk ink and attached that and square silver stick ons and an old nail stick onto the card. I backed the embossed paper with a wood textured paper I had from an old ArtC ephemera pack and called this card done!


Hope this card provided a little inspiration for you to shop your stash as well! And, I hope my son likes his birthday card! Till next time, happy crafting!


Wednesday, September 14, 2022

Story Writing Card

 Oh my, I’m so out of practice! Now that the weather is finally cooling down in California, I decided I needed to get back to crafting! And today was a lesson that while practice may make perfect, lack thereof, is guaranteed to result in something else altogether! 🤣

So, today, I decided to pull out some of my fall patterned papers. One of the pads, Mintay’s Fall Festival, has very muted colors perfect to create a masculine card. I then searched thru some of my newer kits and found Our Blooming Story. I stamped the image on sketch paper using Acorn Archival ink. I then pulled out my Prismacolor pencils and matching colors and filled in the image. I ended up using and couple pencils as well. This stamp is beautiful and I certainly didn’t do it justice, but after playing around a long time I called it done. Couple lessons, the sketch paper wasn’t that great a quality and pencils are not great at detailed images. I did splatter some acrylic paint as well onto the image which was also a no no as it blurred the image too much. All good lessons to take into the next project!

I had some Tim Holtz chipboard windows lying around and one particularly caught my eye. I decided to couple it with the image. I stamped the sentiment on paper from the pad. I used an A6 card base and added ribbon, flowers and sequins for embellishments.


Glad I spent the time on this card trying to build back skills and knowledge. As usual, my cards are the farthest from CAS as one can get. So enjoy the layers!

Well, till next time, happy crafting!


Sunday, September 11, 2022

Quick Anniversary Card

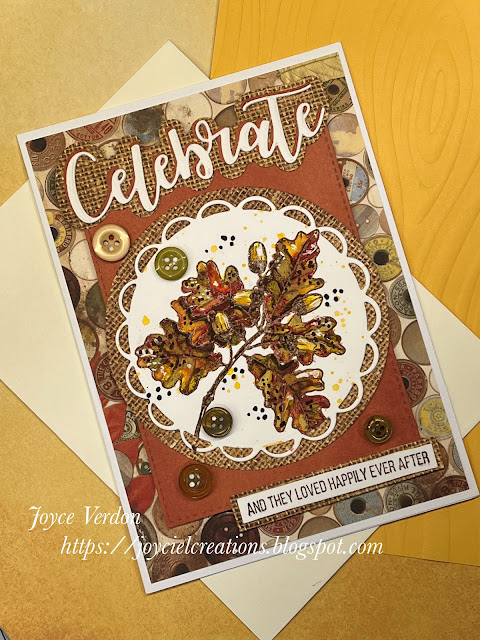
 Hello again! Just here to show how I put together this card using an old fall based Bo Bunny paper pad, Farmer’s Market, Unity’s Thankful Oak kit and a Couture Creations Celebrate die. I needed a card today to celebrate my kids’ anniversary!

First I identified the papers I wanted to use and pulled out a Sketchbox watercolor pad (another subscription that was fun for while). This paper is not that great for detailed watercolors… but okay for cards. I stamped and clear embossed the image using Gathered Twigs Oxide ink. I then quickly watercolored in the image matching colors to the papers, smoothed it over with a bit of gold colored pencil, and added gold, white and black Posca pen marks. It’s a bit of a mess, as I said I did this quickly, but I think one knows it’s a twig with leaves. 

I die cut the image and background paper and cut the other patterned paper to fit an A6 card. I then stamped a sentiment from another Unity kit, and die cut the Celebrate word a couple times. I pulled the whole card together and added buttons to match the background paper, for embellishment.

It’s funny… you might wonder why I didn’t spend hours on this… well, kids today are not that into cards. At least mine aren’t! So, given time is priceless, I say, know your audience and match your effort to that reality 😂!

Well, until next time, happy crafting!

Saturday, September 3, 2022

Friends of Unity September Blog Hop

 Hello friends. Oh, it’s so good to be back and feeling crafty! Enjoyed a marvelous European trip where my husband and I visited 5 countries! So refreshed. We thoroughly enjoyed the countryside, the cities and rich history that you can’t help but stumble upon every step! But, I’m back and ready for this month’s hop theme… 


As a reminder, we do giveaways, so be sure to comment on every blog in the hop! And this month, I’ll be doing a giveaway! So, check back next month to see if you are a winner!

I had a lot of fun using my favorite techniques this month, starting off with a mixed media collage and the Revive kit! I started with a mixed media paper and started “collaging” onto it pieces of paper and vellum. I added splatters, Nuvo pigments, pencil marks, white gesso, and acrylic paint. I love this technique as I can just play and relax while doing it.


I then stamped the image onto the dried paper and die cut it. I colored in sections of the image with metallic paint. I then restamped the coffee cup, colored it with metallic pen and fussy cut it out. I die cut 2 Tim Holtz coffee spatters to use as the base of the cup and rounded the cup so it’s raised. After inking the edges,  I added a blue butterfly, twine and black enamel dots to complete the card. I used part of one of the sentiments and another sentiment from a new snarky Unity Kit.

For the next card, I used beautiful Unity paper from Coffee Lovers and the Coffee Lovers stamp kit. Had fun watercoloring the image to match the papers and fussy cutting the donuts out! This card was really easy to create… but the colors of that paper… oh, my, are just awesome!

Finally, last but not least, another favorite technique… colored pencil coloring! This time, I paired One Sip at a Time with a Mintay paper pack, Homemade. I tried something new this time - I used a blue toned drawing paper. Must say, I think it worked out pretty good. I stamped the image with Hero Arts white ink, so that I could see it. What’s kind of fun is, I used a metallic pencil for the cup sleeve, so it stands out. I stamped the sentiment on an image from the pad. Because the image and paper are so pretty, I just embellished them with a pink and a blue ribbon.


Well, hope you enjoyed these cards and find inspiration in the ideas used! I so loved finally using these stamps for a coffee themed event!

Now on to Alaine’s post… ps… don’t forget to leave a comment!

Alaine’s blog

Or, you can start at the beginning, with 

Crystal’s blog

Thanks for stopping by!