Wednesday, August 14, 2019

August Unity ATC’s

I went for 2 mixed media looks for the ATCs this month, however, I went about it quite differently. For the first set, I used patterned paper from the DCWV “the Dear Jane Stack” paper pad for both the base card and the heart image. The heart came from Unity’s Beautiful Elements Kit and the other stamps, the sentiment, scribble, script and stamp images, came from the 10/15 Just Magic SMAK kit. I used a combination of inks and embossing powders with the stamps. For the heart, I used pens to enhance the image. After stamping all the images, I cut the ATC’s to size and fussy cut the hearts. I added some alphabet ephemera from a couple My Mind’s Eye kits to each ATC according to the recipients’ first names. I then added 2 Washi tape strips, a crystal, and added black outlining with a pen and color to the edges.


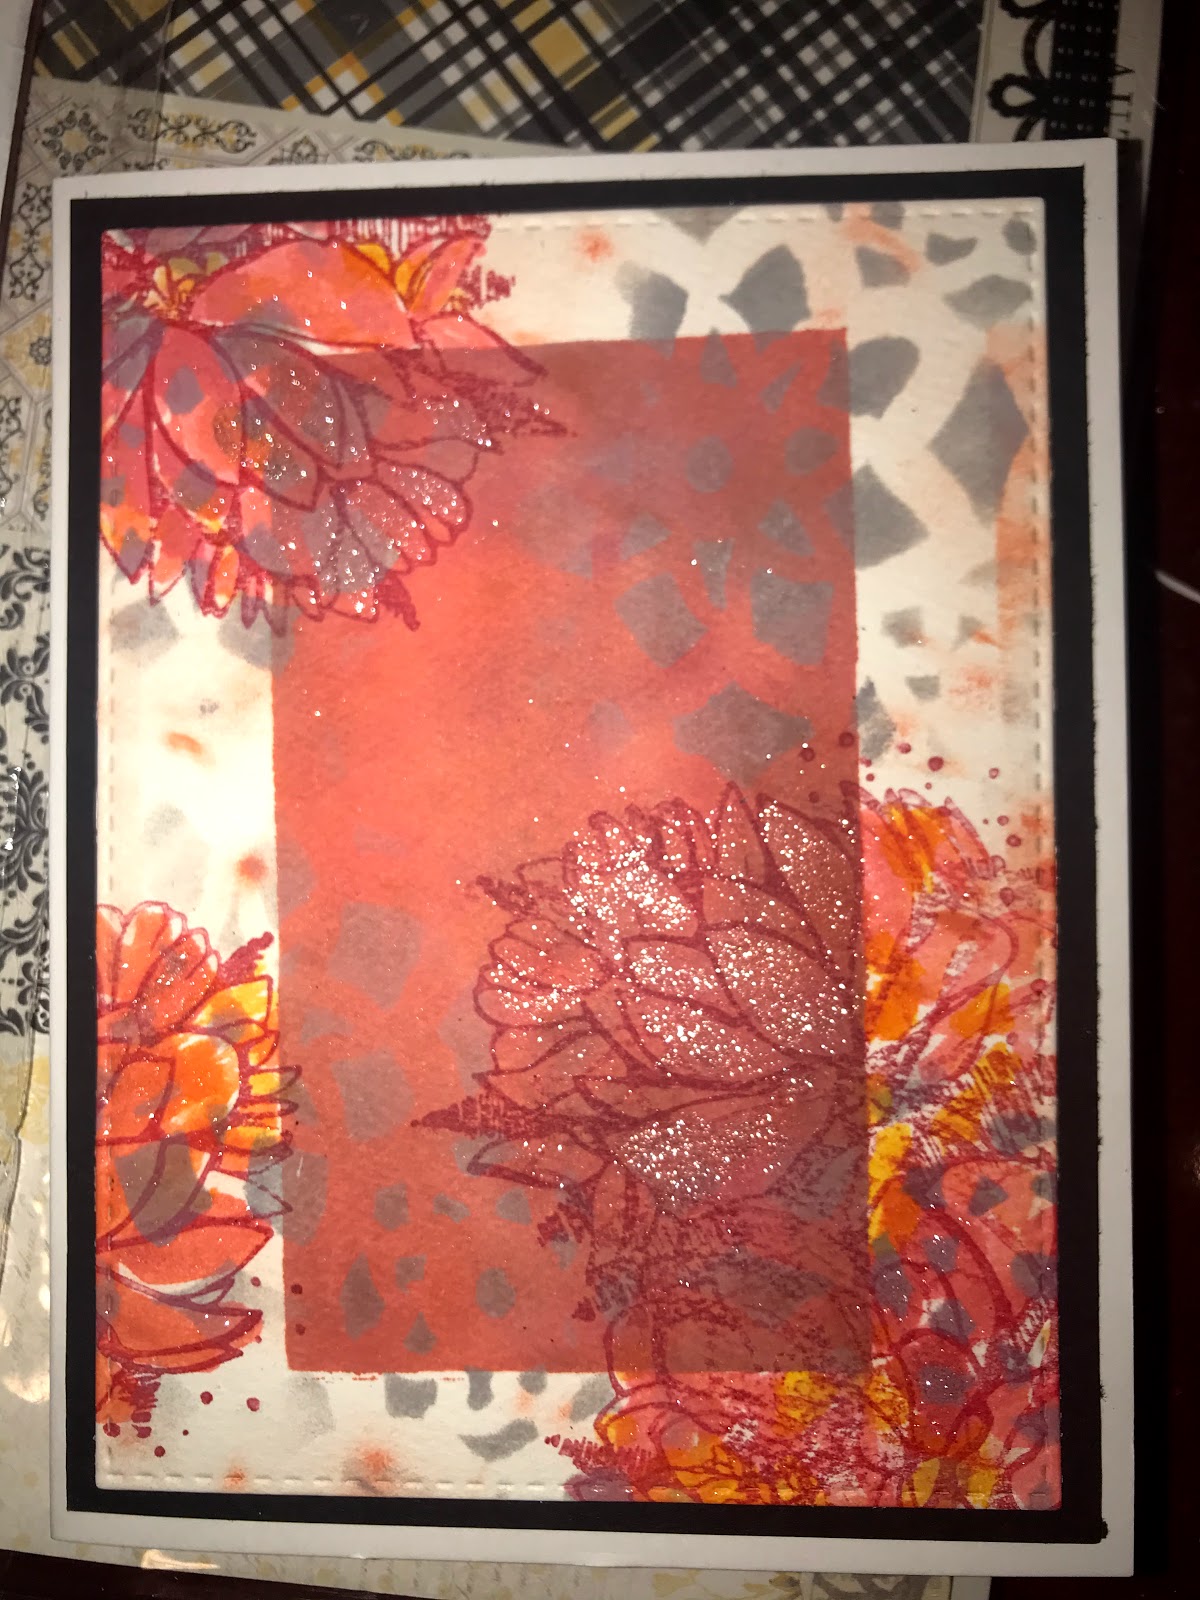
The second set of ATC’s were started by stamping Antique Linen and Scattered Straw oxides onto a mat, spritzing it with water, and dipping the 8 1/2 x 11” paper into it. After drying, I cut the ATCS up. I then stamped a green oxide, Peeled Paint, onto a Stencil Girl Stencil, spritzed it with water before placing it on top of each ATC’s. After drying, I stamped the image from the Never Random Kit onto the ATC’s. I then took out some Art Anthology paints, and Ranger paints and stains and painted the image and parts of the background. To mute the background a little, I added white gesso. I stamped the sentiment out from the same kit and fussy cut them down. I added Black Soot streaks on the corners and blackened the edges. Finally, I pooled gel medium in the center of the flowers and added Vicki Boutin glitter mediums (a thick and a fine one). I adhered the sentiment and outlined it.


These were both fun to put together using different mediums. Hope you like them. Happy crafting till next time!

Tuesday, August 6, 2019

Now and Always Card

Created another card for a special person! This time I used one of the backgrounds I had created using a gelli plate, some acrylics and a blue Primary Elements pigment. I had used a Carabelle texture  and a Stencil Girl Stencil on the plate to create the designs. I embossed the sentiment from Unity’s June 2019 KOTM using 2 archival inks. This paper turned out very pretty with a sheen to it thanks to the pigment!


I stamped the flower onto watercolor paper and watercolored the image using distress inks and the pigment. I fussy cut the flower and then turned around and fussy cut the outside edges of the flower. I
die cut 2 pieces of navy card stock and adhered the flower and all it sections onto the circle.


To complete the card I added silver ribbon, silver paper backing and navy crystals. Not my usual style but I wanted the paper to be showcased as well. Till next time, have a great week and happy crafting!

Fairy Godmother Card - see Read Me First

READ ME FIRST: stop reading here if you are offended by bad language!

I picked up an “After Dark” Kit by Unity called WTF Fairy that I think is perfect for those of us aging... couldn’t resist it! Pretty snarky of me, but WTF (what the fairy ;-) )! I combined this kit with 2 sentiments, one from the Beautiful Birthday Wishes Kit and the other from gossip, hot flashes and crazy Kit! I also used a Tim Holtz die, a rose gold metallic paper and the beautiful Paper Studio Terrace Blooms Kit, which has a lot of rose gold foiling in it.


I paper pieced the girl and used pencils and pens to color the non paper pieced area. I used the Tim Holtz thinlit on the metallic paper, and backed that with another sheet from the pad. I really love how the paper piecing turned out... I did not plan it that way, but the paper design perfectly matches the image. I used the leftover cutouts to decorate the inside of the card... and stamped a scroll from the Growing in Unity Kit. I ended up making her wand as I didn’t think stamping on the metallic paper would work! To complete the card I added pearly dots and ribbon.


This and the next card are going to a very special person who has a great sense of humor even though she is bedridden. Hope she likes it and it makes her smile... it was created with love for her!

On the the next card... happy crafting!

Saturday, August 3, 2019

Friends of Unity August Blog Hop

Welcome to August’s Furry Friends Friends of Unity Blog Hop! I must say I stretched this one a bit (with permission, of course) and took the liberty using animal friends of the farm category! (Especially after seeing pics of Jeanie’s son hugging his chicken friends!)

This blog hop, as usual, offers giveaway goodies. To be eligible, please leave a comment on each blog in the hop. Winners are randomly selected and posted on or by the next month’s blog hop. Speaking of, I would like to announce the winner of last month’s hop from my blog, and that’s Rachel Duong! Congratulations! Please PM your address to me within the next 2 weeks and I’ll mail it out promptly.

I used the brand new Funny Farm kit for my first card and a brand new Prima patterned paper pad called Spring Farm House that coordinates beautifully with it! I even cut one of the small matching advertisements from the pad to include inside the card... check it out!


I simply stamped the images and sentiment in coordinating colors and fussy cut them out. I then cut out various papers, backed them with a dark red and started playing with a design. I decided to use a a coordinating piece of corrugated paper and a ribbon to top it off. I added copper crystals to finish the card. This is a really cute stamp set... love it!


The second card was very easy to make. Again, I used corrugated paper to back the images and some random paper to pull in the colors I wanted. The stamp sets used were Barn Wall and New Day Rooster. I stamped the Barn Wall in several different oxide colors and added the same colors to the rooster. Added the same colored copper crystals and matching jute to finish the card.


Just to remind everyone, we are not sponsored by Unity Stamp Co., but they do approve of this hop. I and my fellow crafters on this hop are keen users of their products and enjoy focusing our attention on monthly themes where we can showcase a variety of their products - old and new! We use our own stash as giveaways to share our inspiration and ideas with others. Hope you enjoy these efforts as much as we enjoy doing them! If you are interested in my art journey, I invite you to follow me by clicking the follow button, or adding your email!


Now on to the hop:
You are here - Joyce


Wednesday, July 31, 2019

July Unity ATCs

This was a mixed month, hurting in the beginning, much improved in the end! Besides my wrist, I was also dealing with a partial tear in my rotator cuff and tendonitis in my foot. So, needless to say, my work improved as I improved! 

I started this month’s ATCS during our 100 degree weather, so I first pulled out a popsicle and sentiment from the 2/19 KOTM. I used glitter inks and oxides to color the popsicle. I used Tutti Fruitti patterned paper to back the popsicle. After backing the paper on an angle using ATC sized colored cardstock, I decided to try creating faux popsicles using a stencil and used 2 different BoBunny glitter pastes with it. Remembering a lot of Heartfelt Creations classes, I decided to shape the popsicles using a stylus tool, where you wet the back and roll the ball over the areas you want to add dimension to. Finally, I used pens to add details. These turned out pretty funky, but I just couldn’t redo because of pain. 


I ended up liking the second set better! I started by stamping the girl from the May 2019 SMAK kit. Masking her off, I then lightly stamped the flower from the No Rain No Flowers Kit 3 times. I then took a simple butterfly from the Heart Flutter Kit and off stamped (or second generation stamped) it in blue to add a simple touch of blue. Finally, I used part of a “stamp” stamp from another kit to add a little darker red. I added a little Tattered Rose to the cheeks and a couple small scroll parts using a stencil and Vicki Boutin rose colored paste. Finally, I stamped the sentiment that I felt when doing these ATCs (snarky of me, eh?) on vellum and attached it with a coordinating different brad to each ATC. I must say, I am very much in my happy place doing vintage work ;-)! This sentiment came from the Art & Possibility Kit. 


Till next time, happy crafting!

Sunday, July 28, 2019

Gardenpartychallenge on Instagram

Was intrigued by the cards/art work in this challenge, so I decided to try my hand at it. The instructions were rectangle, blue, stars, woman’s portrait and embossing. I was originally going to use one of the Unity’s SMAK kit ladies, but then I had just received the Unity’s No Time for Guilt lady and decided to try her. I also used a sentiment from She Never Says Never Kit. For the stars, I used the Hello it’s Me kit, for the dots on the shirt, a Good Life Kit, and for the squiggly line, the Beautiful Elements Mixed Media Kit. I used a background stamp called Dinged Dots for the large dots. I did pull in another vendor with the star stamps from a Dina Wakely kit.

I have been wanting to try to create an acrylic gelli plate background, so I pulled out some acrylics and a Primary Elements powder. I used a Carabelle Studio texture plate and a Stencil Girl Stencil to create 3 backgrounds. I liked them, but next time I’ll use better contrast between colors. The process was rollout colors, add design and press paper down on top. I did this about 3 times on each paper, changing up the designs.


For the card I began by stamping the large star design a couple times. I then added color to the stars using Derwent Intense pencils, Glitter ink and water. I then added the large dots in several areas using a blue Brutus Monroe embossing powder. I then stamped and embossed the sentiment in black and added squiggle lines.


Turning to the image, I stamped it in Memento London Fog. I then added color using oxides in Tattered Rose and Picked Raspberries for the face, and Derwent Inktense pencils and silver glitter ink for the shirt. I added some of the Primary Elements blue to the hair as well as the pencils. I embossed Dinged Dots again around the girl and added a little of the cream acrylic on one side of the girl. I used a black pen on the girl to make her stand out more.


Finally, I added some black and white pastes to the bottom later using a couple different stencils (one being a Tim Holtz Star Stencil). I used the pencils again around the white stars to make them stand out. For the Dina Wakely stars, I used a Kraft paper scrap. I just stamped the large bottom one, but the 3 surrounding the girl are embossed. I inked the edges, added black string and a navy background and called the card done!


This was a fun exercise, as I got to experiment a little, hone my skills some more, all while playing around with different media. For all that, I think it turned out okay. Let me know what you think...

Till next time, happy crafting!

Wednesday, July 24, 2019

Patterned Paper Matching Card

I am a big fan of Kaisercraft paper, and, I think, the Greenhouse pad is one of my favorites! The colors are gorgeous and, for a change, it was focused on succulents. Used a Unity Itty Bitty Kit called Bravely Planted and paired it with a sentiment from the Poppies and Love Kit.


I stamped the image using London Fog and colored it in with Prismacolor pencils to match the papers’ color scheme. I then watercolored the background using distress oxides and stamped the sentiment also with oxides. I gave the image a border using the Rectangle Scalloped kit again combining a couple oxides to achieve the color I wanted. I gave definition to the image with light pen strokes.

I punched out a preformed tag from the pad and added the sentiment to it. I finished the card with a brad and crystals. This card was put together pretty quickly. A thank you card is always useful to have around.


Till next time, happy crafting!

Tuesday, July 23, 2019

With Sympathy and Sadness Card

I needed to make a special card for a very close friend who just lost her father. I took my cue for colors from a fellow Unie who posted a great summer color scheme that I thought would also be appropriate for a summer sympathy card for a father. I used Stormy Sky and Antique Linen oxides, dipping the card into the ink and drying in between. I made the blues darker at top. I then added a little Brea Reese Neutral Grey Gliiter ink to my pad, spritzed it with water, and dipped the paper one final time.


After drying the paper, I embossed the image from the Beautiful Moments kit onto the paper. I then found solid coordinating, papers and die cut all 3 pieces. I brushed on a little more blue ink at the top and lightly added black to the edges. To make the butterflies stand out a little, I mixed a blue glitter ink with the grey one and painted part of the butterflies with that and the rest with the grey ink.


I stamped the sentiment from the Owl So Sad kit and embossed it with Liquid Platinum powder. I die cut it and backed it with black paper. I cut another white piece of paper matching the card size and hot gun glued a Tim Holtz weave to it on the side. I then adhered all the papers to that and then adhered that to the the card base. I added a lovely internal sentiment from the ...beautiful life, blessed memories kit, some sequins and crystal dots and called the card done.


Such a sad card to make but at least it was put together with love. Happy crafting till next time everyone!


Wednesday, July 17, 2019

Mixed Media Inspired Birthday Card

Came across some videos demonstrating mixed media art using a combination of colored and black and white stamped images which I thought was striking. I think I may have also caught a glimpse of cards created like this as well. I combined those ideas with the image of one of my Lang coffee mugs which I love seen here!


As usual, I also added another twist in that I created a rectangle using purple tape and distress oxide reds and grey inks and then dabbed more color around that. I used a stencil and the grey oxide ink to add to the background. I then stamped the flower image from the 11/16 KOTM several times using a red ink. I then grabbed more paper and stamped the image again several times using black ink (I embossed the image with black powder for the one I was keeping black and white). I used Brea Reese glitter inks and a yellow color burst to add color to the base card, very loosely. I colored in the additional image more carefully. I embossed the sentiment, from the Tulip Wishes Kit, which will continue inside the card, again with black powder. I assembled the card adding black outline papers and red sequins.


Unfortunately, my hand is still not fully functional and painful, so, of course, I see the errors where I couldn’t handle the techniques fully. But I think you can get the gist of the style. So fun and I love the dramatic look it achieves. I love both the black and white contrast and the use of a rectangle as a background.


Hope you enjoy these ideas; till next time, happy crafting!


Sunday, July 14, 2019

Just Because Card

I started this card out with embossing the flowers from Unity’s Just Because Kit with white embossing powder. I then used my watercolors to add color to the flowers and then the background. I didn’t like how plain it looked. So, I decided to add some Cosmic Shimmer powder to the background and spritzed it with water and then added some to the flowers. I embossed the sentiment (seemed apropos for the July empowerment challenge and so right on!) from the 11/2016 SMAK kit using gunmetal powder. I then spattered white, silver, and black inks and the shimmer color around. I mounted this on gray corrugated paper, and added string and a precut tag and called the card done.


Back to crafting again! Have a great day and till next time, happy crafting!

Saturday, July 13, 2019

Bird and Feather Cards

Been exercising my hand with some cards lately using Unity stamps. The first card’s inspiration was the May Friends of Unity hop with a fruit theme. Wanted to create a cherry based collage card. I had pulled out random stamps I thought would look cute together and stamped some prototypes right before I broke my wrist. I’ve been itching to complete that design. So, since then, I bought a cosmic shimmer powder and I used that along with a red oxide ink to create the background... very shiny! I stamped the images using Stazon inks, inked the edges of that and some ephemera, stamped a cute sentiment, added Washi tape, ribbon, a gold heart and crystals. I did use some glitter inks and pens to enhance the images.

The second card was inspired by the current Resist Emboss Challenge on Unity’s Show and Tell FB page. I used the feather from the July 2019 KOTM. I stamped that using clear embossing powder and added watercolor (from my tubes) to the image. I also added paint spatter and crystals. The sentiment, also embossed, came from the You Will Shine Kit.


These cards have provided me a variety of techniques to exercise both my hands and skills. Not up to par yet... but I’m enjoying playing again! Till next time, happy crafting!


Saturday, July 6, 2019

Friends of Unity July Blog Hop

Welcome to July’s Friends of Unity Blog Hop focused on Vintage. With my cast and splint finally off (broken wrist) and healing underway, I couldn’t wait to get back into the blog hop... especially with this month’s theme being one of my favorite styles!

This blog hop, as usual, offers giveaway goodies. I will be doing a giveaway this month as well. To be eligible, please leave a comment on each blog in the hop. Winners are randomly selected and posted on or by the next month’s blog hop. I also want to take this time to congratulate Karen Decknick, the winner from my very last blog entry... yikes, from April’s hop! Please message me with your address within the next 2 weeks to secure your giveaway!

For the first card, I used Unity’s Magnolia Flowers kit, Authentique vintage paper pad and an assortment of ephemera, ribbon, BoBunny paste, a stencil and enamel dots. I started by stamping the whole image of the flower with Hickory Smoke oxide ink. I then used a pink Ranger embossing Powder to outline the flower. The lineup wasn't exact, but I was actually okay with that. I then used black watercolor to add shading to the image. I stamped the sentiment onto ephemera, stenciled a design on another sheet, added shading to the edges and finally added dots. 


For the second card, I used  A Girl and Her Adventures Kit. I started this one by stamping on a sheet from Kaisercrafts MemoryLane pad using a combo of Vintage Photo, Tumbled Glass and Iced Spruce to match the paper. I then took a brown pen, lightly outlined the image and added the sentiment. Again, I used a variety of ephemera, flowers and ribbon. I also used corrugated paper and inked it in the same tones. I added distress color to the edges and called it done.


I wanted to use the camera image from the same kit for the last effort. So I took a large Graphic 45 tag and first started using background stamps from the When I See You Kit. I then stamped the camera and sentiment. I added special papers and ephemera using a glue stick. I cut up one of the papers to add the numbered pieces. I also added a doily a friend sent me. I inked up the edges, added “Shoot!!”, a stamp from a gift bag and added outlines, and darkened edges. I finished up the tag with ribbon scraps and paint spatter.


Just to remind everyone, we are not sponsored by Unity Stamp Co., but they do approve of this hop. I and my fellow crafters on this hop are keen users of their products and enjoy focusing our attention on monthly themes where we can showcase a variety of their products - old and new! We use our own stash as giveaways to share our inspiration and ideas with others. Hope you enjoy these efforts as much as we enjoy doing them! If you are interested in my art journey, I invite you to follow me by clicking the follow button, or adding your email!

Now on to hop:
- You are here -

Sunday, June 23, 2019

June ATC’s

Back again with the next set for this month! Had fun doing these even through pain! Still somewhat hindered by a wrist and fingers semi-locked into the cast position. (I really can’t complain though as this will all heal eventually, worse things could have happened and the injury was a good wake up call to lose weight... which, yeah, I’ve already lost 15 lbs! Kudos to MyFitnessPal!)

With the 100 degree days we experienced, my thoughts immediately turned to a water theme. For this ATC, I used the She Mermaid Unity Kit! I also used 3 different stencils, an acrylic paint, an oxide ink and a couple spray paints. After creating the background, I white powder embossed the jellyfish and sentiment. I then added black and white pens and darkened areas around the jellyfish using Gamsai Tambi watercolors. I added bubbles using another stencil with white textured paste and added Sugar Cookie BoBunny paste over bubbles and jellyfish.


The second ATC is my tribute to the 4th of July, using the red, white and blue colors of the holiday! I used pieces from both the June and May SMAK kits. I first created a crude mask for the Ferris Wheel (love that wheel). I then stamped the stripes using a bright red oxide ink around the cards. I embossed the wheel using a glittery blue Stampendous embossing powder (which I love)! I then stamped purposely messily the blank ticket image using the red ink! I fussy cut those and then used another darker blue embossing powder from the same kit for the sentiment. I finished these with sequins.


Hope you like these additions! Happy crafting till next time!