Saturday, August 5, 2023

Color Challenge - Abstract Art - Unity July 2022 kit

 Thanks to Ginger Pelfrey, I was sucked into this beautiful color scheme and abstract art challenge. I’ve recently been engrossed watching Denise Love’s YouTube Abstract Art videos and shared my love of them with a group over on the Stamper’s Swap Shop/Buy/ISO/Share/Swap FB group. I think it’s a fun way to create background paper for cards! Here’s the color scheme:

So, to match up the colors, I pulled out a Ranger acrylic paint, several Gansai Tambi paints, a red graphite pencil, and a gold Daler Rowney acrylic ink. I used a small piece of watercolor paper, taped the edges and began scribbling with pencil. I then randomly added the paints and gold ink. After drying with a hairdryer, I added some red marker marks, pink paint circles with a stencil and white swirls with a stencil and embossing paste. Here’s the result with a piece of corrugated cardboard attached.


I decided I wanted to pair up my abstract art paper with a seashell image and create a shaker card! I also used a matching corrugated paper and scrap paper. I used my Prismacolor pencils in matching colors to color in the seashells from Unity’s Fresh Air and Sunshine kit. I fussy cut out the image and adhered on top of the acetate. I cut out a frame in matching patterned paper and adhered that to the acetate. I added corrugated paper to the bottom of the abstract art and added sequins and stars in coordinating colors. I then used thin foam tape to secure the framed acetate onto the abstract art. 

I used a blue paper for the base, added a gold embossed sentiment and sequins and shells for embellishment. Turned out to be a busy card, but a fun one to create!


Thanks for stopping by and check out Denise’s YouTube videos for a fun look at creating backgrounds. Till next time, happy crafting!


Thursday, August 3, 2023

Unity’s Naturally Beautiful Kit

 Watercolored the image from Unity’s Naturally Beautiful kit after stamping it with Antique Linen Oxide ink. I had promised to create a demo video for the wonderful ladies who I met on my Georgia Stamp Camp 2023 trip from a few weeks ago. I decided to capture my efforts on this image as a first step. While my watercoloring skills still need work, and this is certainly not my best, at least my videoing skills are improving… as I captured most of my efforts within view! ;-) —- Low bar, I know! Here it is:


I used Arches Watercolor Cold Pressed 140 lb. paper and Daniel Smith watercolors. I cut down the paper and found 2 scraps to back it with. I added and embossed a sentiment from the kit using both an orange and a green oxide ink. To complete the card, I added crystals and an orange ribbon bow.

Well, thanks for stopping by and checking out my watercoloring journey to improvement! Happy crafting till next time!


Tuesday, August 1, 2023

Unity November Chrysanthemum

 Decided to try videoing my no-line watercoloring… only to realize, I hadn’t set up my phone right. So, I’ll need to try it again later. In the meantime, although I have no footage of it, I did get Unity’s November Chrysanthemum image watercolored! I used Arches watercolor paper and Daniel Smith watercolor paints. I stamped the image first with Antique Oxide ink. I used painters tape to create a rectangle for a frame. This is a somewhat complicated image, so I took my time and relaxed working through the details. 

I used this photo as a color reference.

After cutting down the paper, I added a white embossed a sentiment from Unity’s Everything in Between kit, and mounted it on a card base. 

Thanks for stopping by… happy crafting till next time!


{BYSHC} Sketch Challenge #36 - Colorado Craft Snowman and Bunnies

 Welcome to a new Sketch Challenge on the {Build Your Stash Holiday Cardmakers} FB group!

So, this time I turned the sketch on its side, as I was internally compelled to use this background paper for a card (and the bricks in the paper required me to)! I pulled out a stamp set I thought could go with this sketch and paper - Colorado Craft Co.’s Snowmen and Bunnies kit. After stamping the image on cream colored paper, I ended up using my Prismacolor pencils to color it. I used 2 Washi tapes for edging and added a perfect matching sentiment from SSS’s Snowflake Builder stamp set. To complete the card, I added a few snowflake stamped with Brushed Corduroy, a burlap background and Prima crystals.

What can I say… it’s unique! I love the rustic feel and cream/brown/red color combo for a change!

Thanks for stopping by and till next time…happy crafting!

Friday, July 28, 2023

{BYSHC} Christmas in July Linky Party - Sheena Stamp

 Hey there, made my 3rd card on the fly for the Linky party!

I pulled out an already die cut sentiment and went from there to build a card around it … go figure! First, I grabbed a watercolor paper and used a magical powder on it, by spritzing the paper with water and sprinkling the powder on it. After drying it, I grabbed a Sheena stamp set I picked up in a craft magazine. I used Versafine inks in green and black on the house stamp set. Because the powder ended up green I decided I needed to paper piece the house part on the paper. 

To create the house part, I again used the stamp on Kraft paper and used pencils, pens and a white Posca pen to roughly add details and the impression of snow. I fussy cut the house parts out. I used pencils and the Posca pen to add more detail and color to the trees and shrubs. I found a chipboard piece I thought would go. I lightly used watercolors to darken the sky and ground areas, and added a few background trees. After adding twine, I used glue and glitter to add sparkle to the trees, snowy bits, sentiment and chipboard. I mounted the completed paper onto Kraft cardstock, and added coordinating sequins. For how quickly I pulled this together, I think it turned out fine.

Was interesting to see how green the background became. Thanks for stopping by - till next time, happy crafting!

Monday, July 24, 2023

{BYSHC} Christmas in July Linky Party - Unity Happy Jolly Holiday

 Created another card for this fun holiday Linky Party using Unity’s Happy Jolly Holiday kit. 


I stamped the image onto Stampin Up brown paper using Antique Linen. I had decided to use Prismacolor colored pencils to add detail to the image. I die cut the image in a size to match the paper circle I fussy cut out of the Ciao Bella Northern Lights paper collection. I adhered that to another paper from the Ciao Bella collection. I added crystals around the image and fussy cut more stars from the leftover paper scraps for embellishment. I then stamped the sentiment from the kit in brown ink.

I just love trying to match images with papers. Pretty simple vintage card to put together! Thanks for stopping by!

Friday, July 21, 2023

{BYSCH} Christmas in July 2023 Linky Party

So happy to be sharing my first card in the Christmas in July 2023 Linky Party. Check out this blog for more information!


I stamped the images, using a masking technique, from SSS’s The Magic of Christmas kit using Antique Linen Oxide ink onto Canson Watercolor paper. I painted the image using Schminke watercolors. I paired the image with Moda Scrap Christmas Italian Style papers, a corrugated cardboard scrap, and a sentiment from SSS’s Joy to You and Yours Kit. To complete the card, I added crystals.


Join in on the fun and add your cards for a chance at winning a prize! Check the blog for inspiration and remember to add the graphic above to your social media posts!

Thanks for stopping by and happy holiday crafting!

Tuesday, July 18, 2023

{BYSHC} Sketch Challenge #35 - Couple of Simple Cards!

 Made a couple of simple cards for this sketch challenge:

For the first card I used a Bo Bunny sentiment chipboard I had collected along with Unity paper, a ribbon, buttons, and some crystals! Just cut the paper down and pull everything together - easy peasy!

For the second card, I combined foiled DCWV holiday paper, a random scrap paper, crystals, with scene diecuts from a craft magazine. I added metallic string and cornered the card edges to mirror the insert. I layered the die cut sentiment with gold paper.

Very easy cards to make and perfect for last minute cards needed in a pinch!

Reminder, our Christmas in July 2023 {BYSHC} Linky party starts Friday! Join in the fun and link up your holiday cards for a chance at winning some sponsor goodies! Check out the graphic for more info!

Thanks for stopping by!


Monday, July 3, 2023

Trying out a New Technique

So, recently, I’ve discovered a few YouTube artists whose focus is on abstract painting. Their joy of putting paint and many other mediums on paper with varied techniques, such as scribbling, drawing, mark making, use of stencils, has been so inspiring and freeing of perfection expectations, I decided to try it! (My perfectionist traits can paralyze me sometimes… i.e., not “good enough” work.) I loved what they produced and could see using their techniques as fun backgrounds for cards!

My close friend sent me a quote recently about crafting and or being an artist is more about the joy of the process than the outcome. And I must admit, I can lose hours and be totally happy and at peace with life just in the doing part. So, this new form of art is so appealing for that reason alone… play, experiment and enjoy the outcome, whatever the result. Here’s the first video, by Denise Love that really snagged me in… https://youtu.be/SIywgiXCyTA

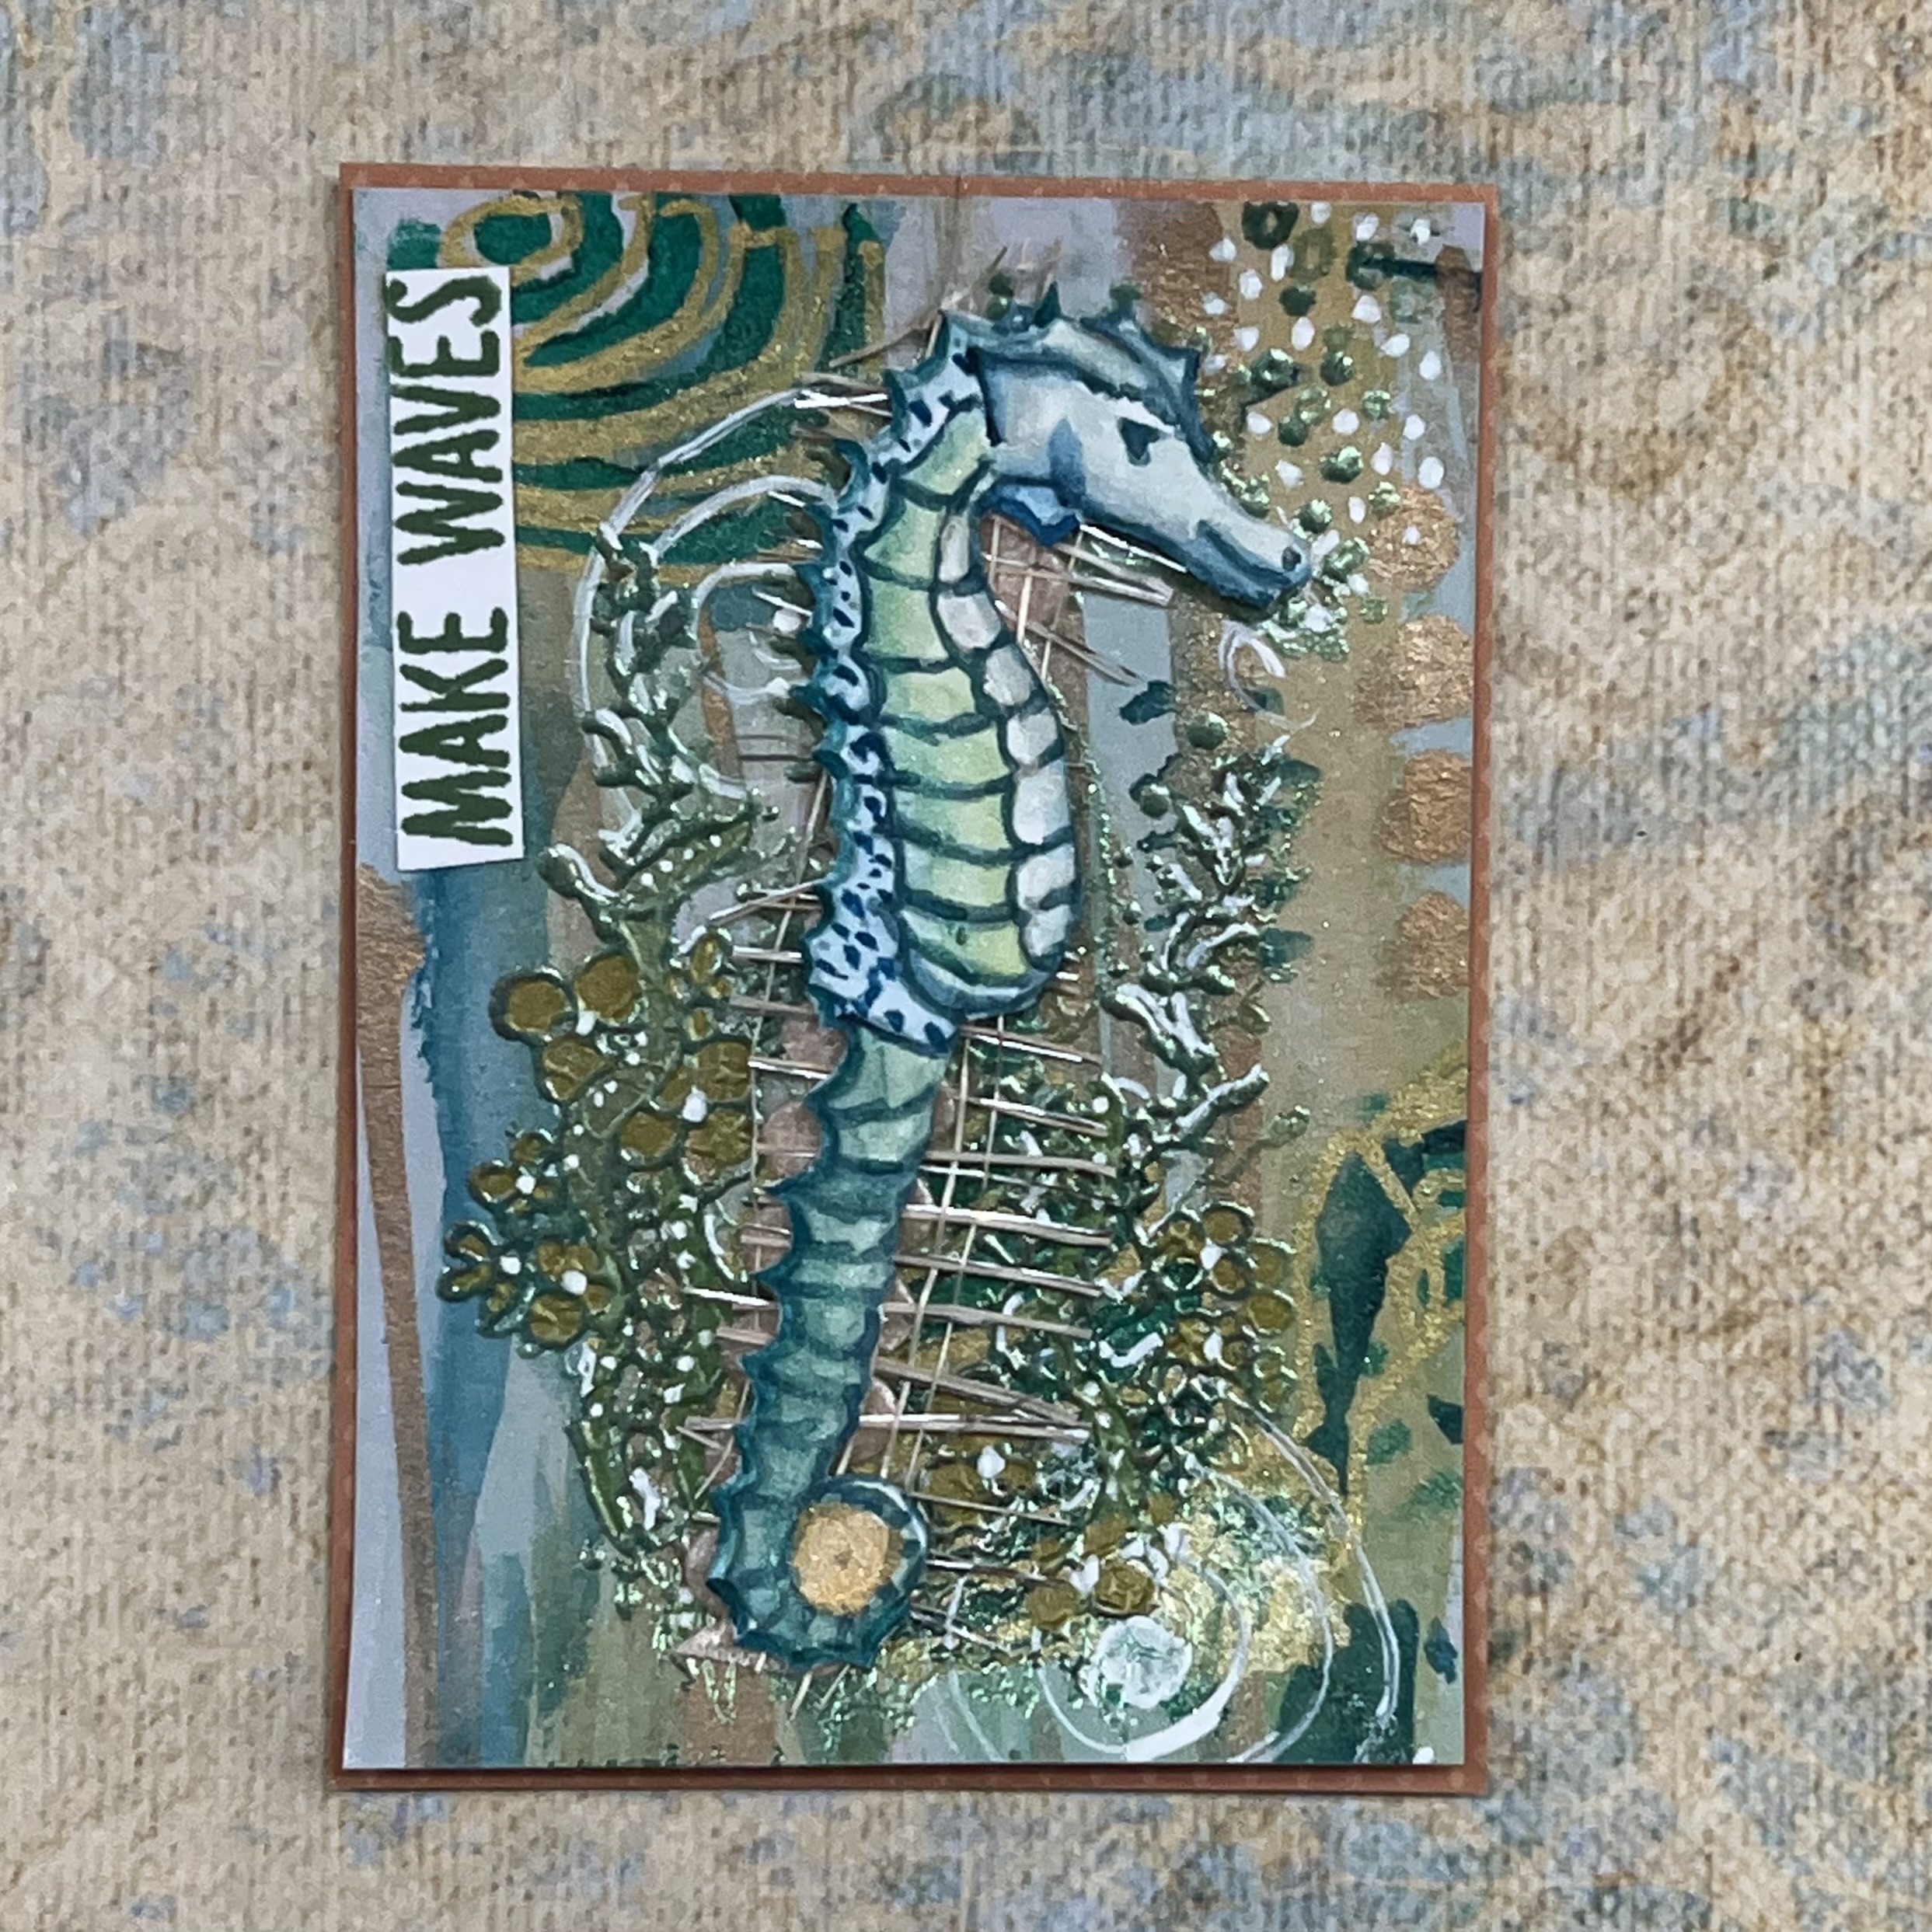
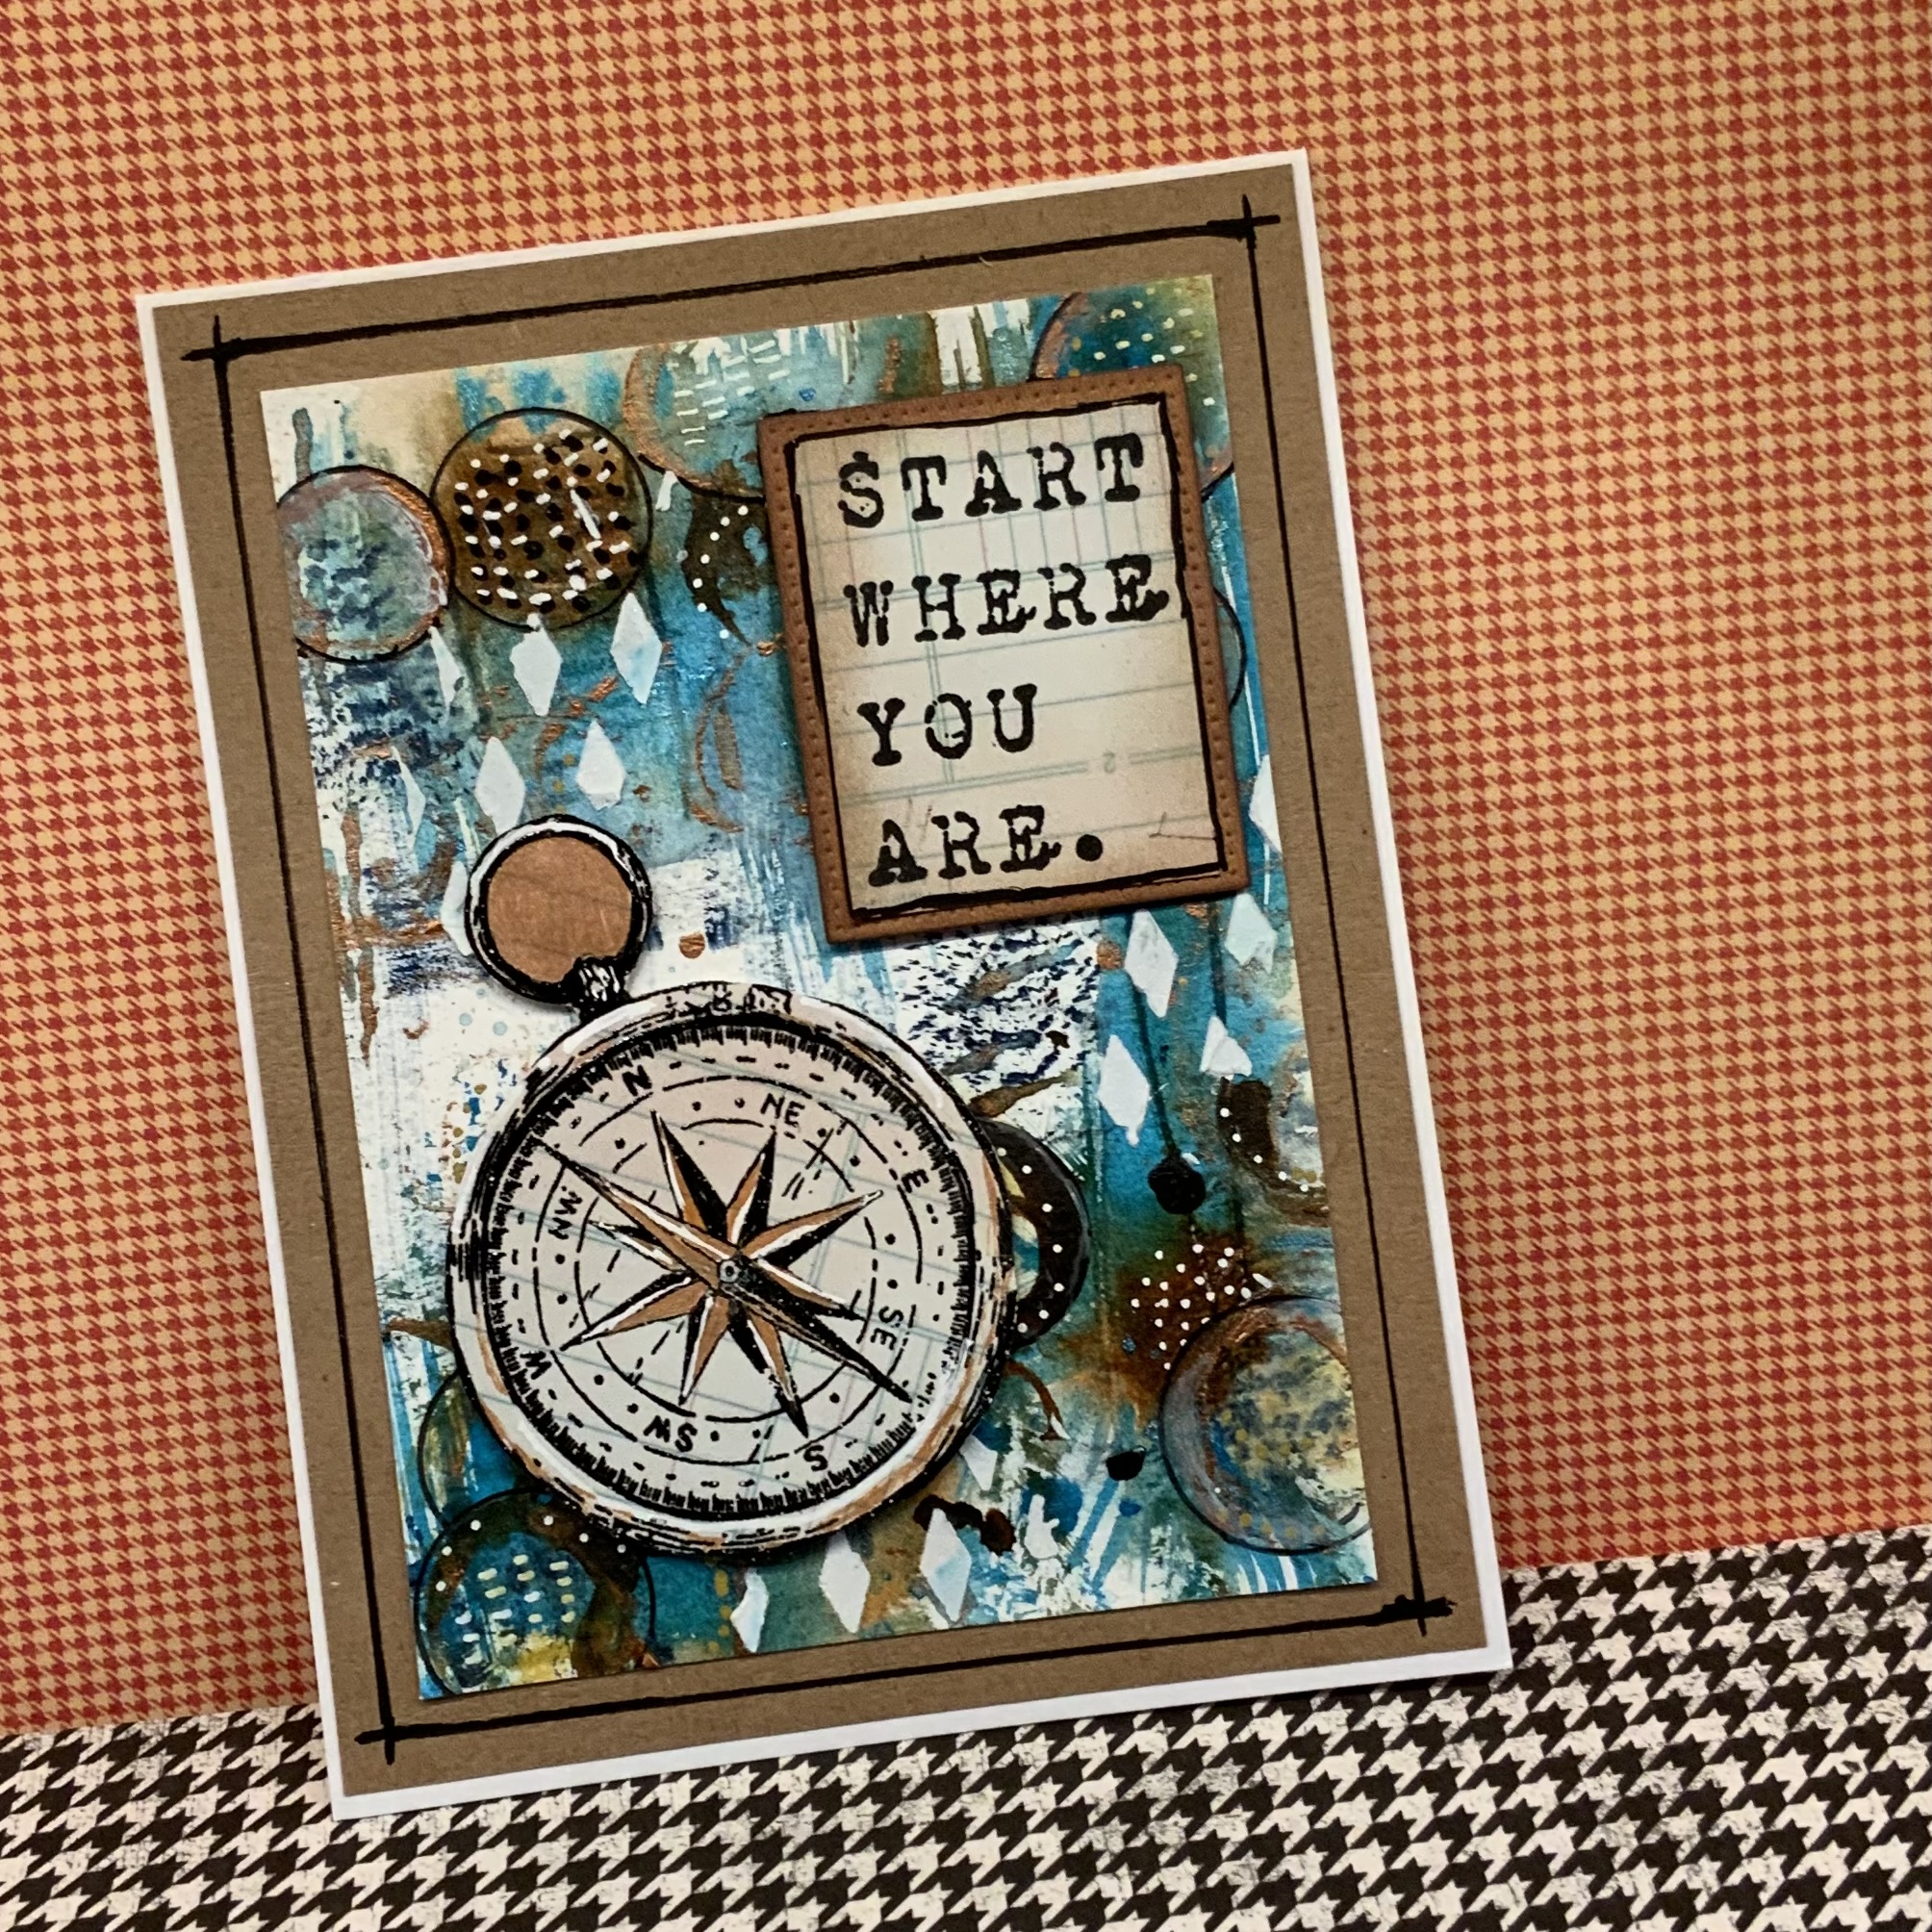
Now, I already had some of the supplies from subscribing to the Sketchbox monthly art subscription a few years ago … graphite pencils, crayons, inks and gold mediums. Using just acrylic paints, I created these first… as backgrounds for ATC’s. Used Unity’s stamp kit, Open Sky, Deep Ocean, from 5/18, for this one.


Since I wanted finer lines and more blurring of colors, I tried some watercolor inks I also had in my stash. This was my second attempt. I found the watercolor inks too loose and didn’t leave enough white space. The colors were pleasing though.

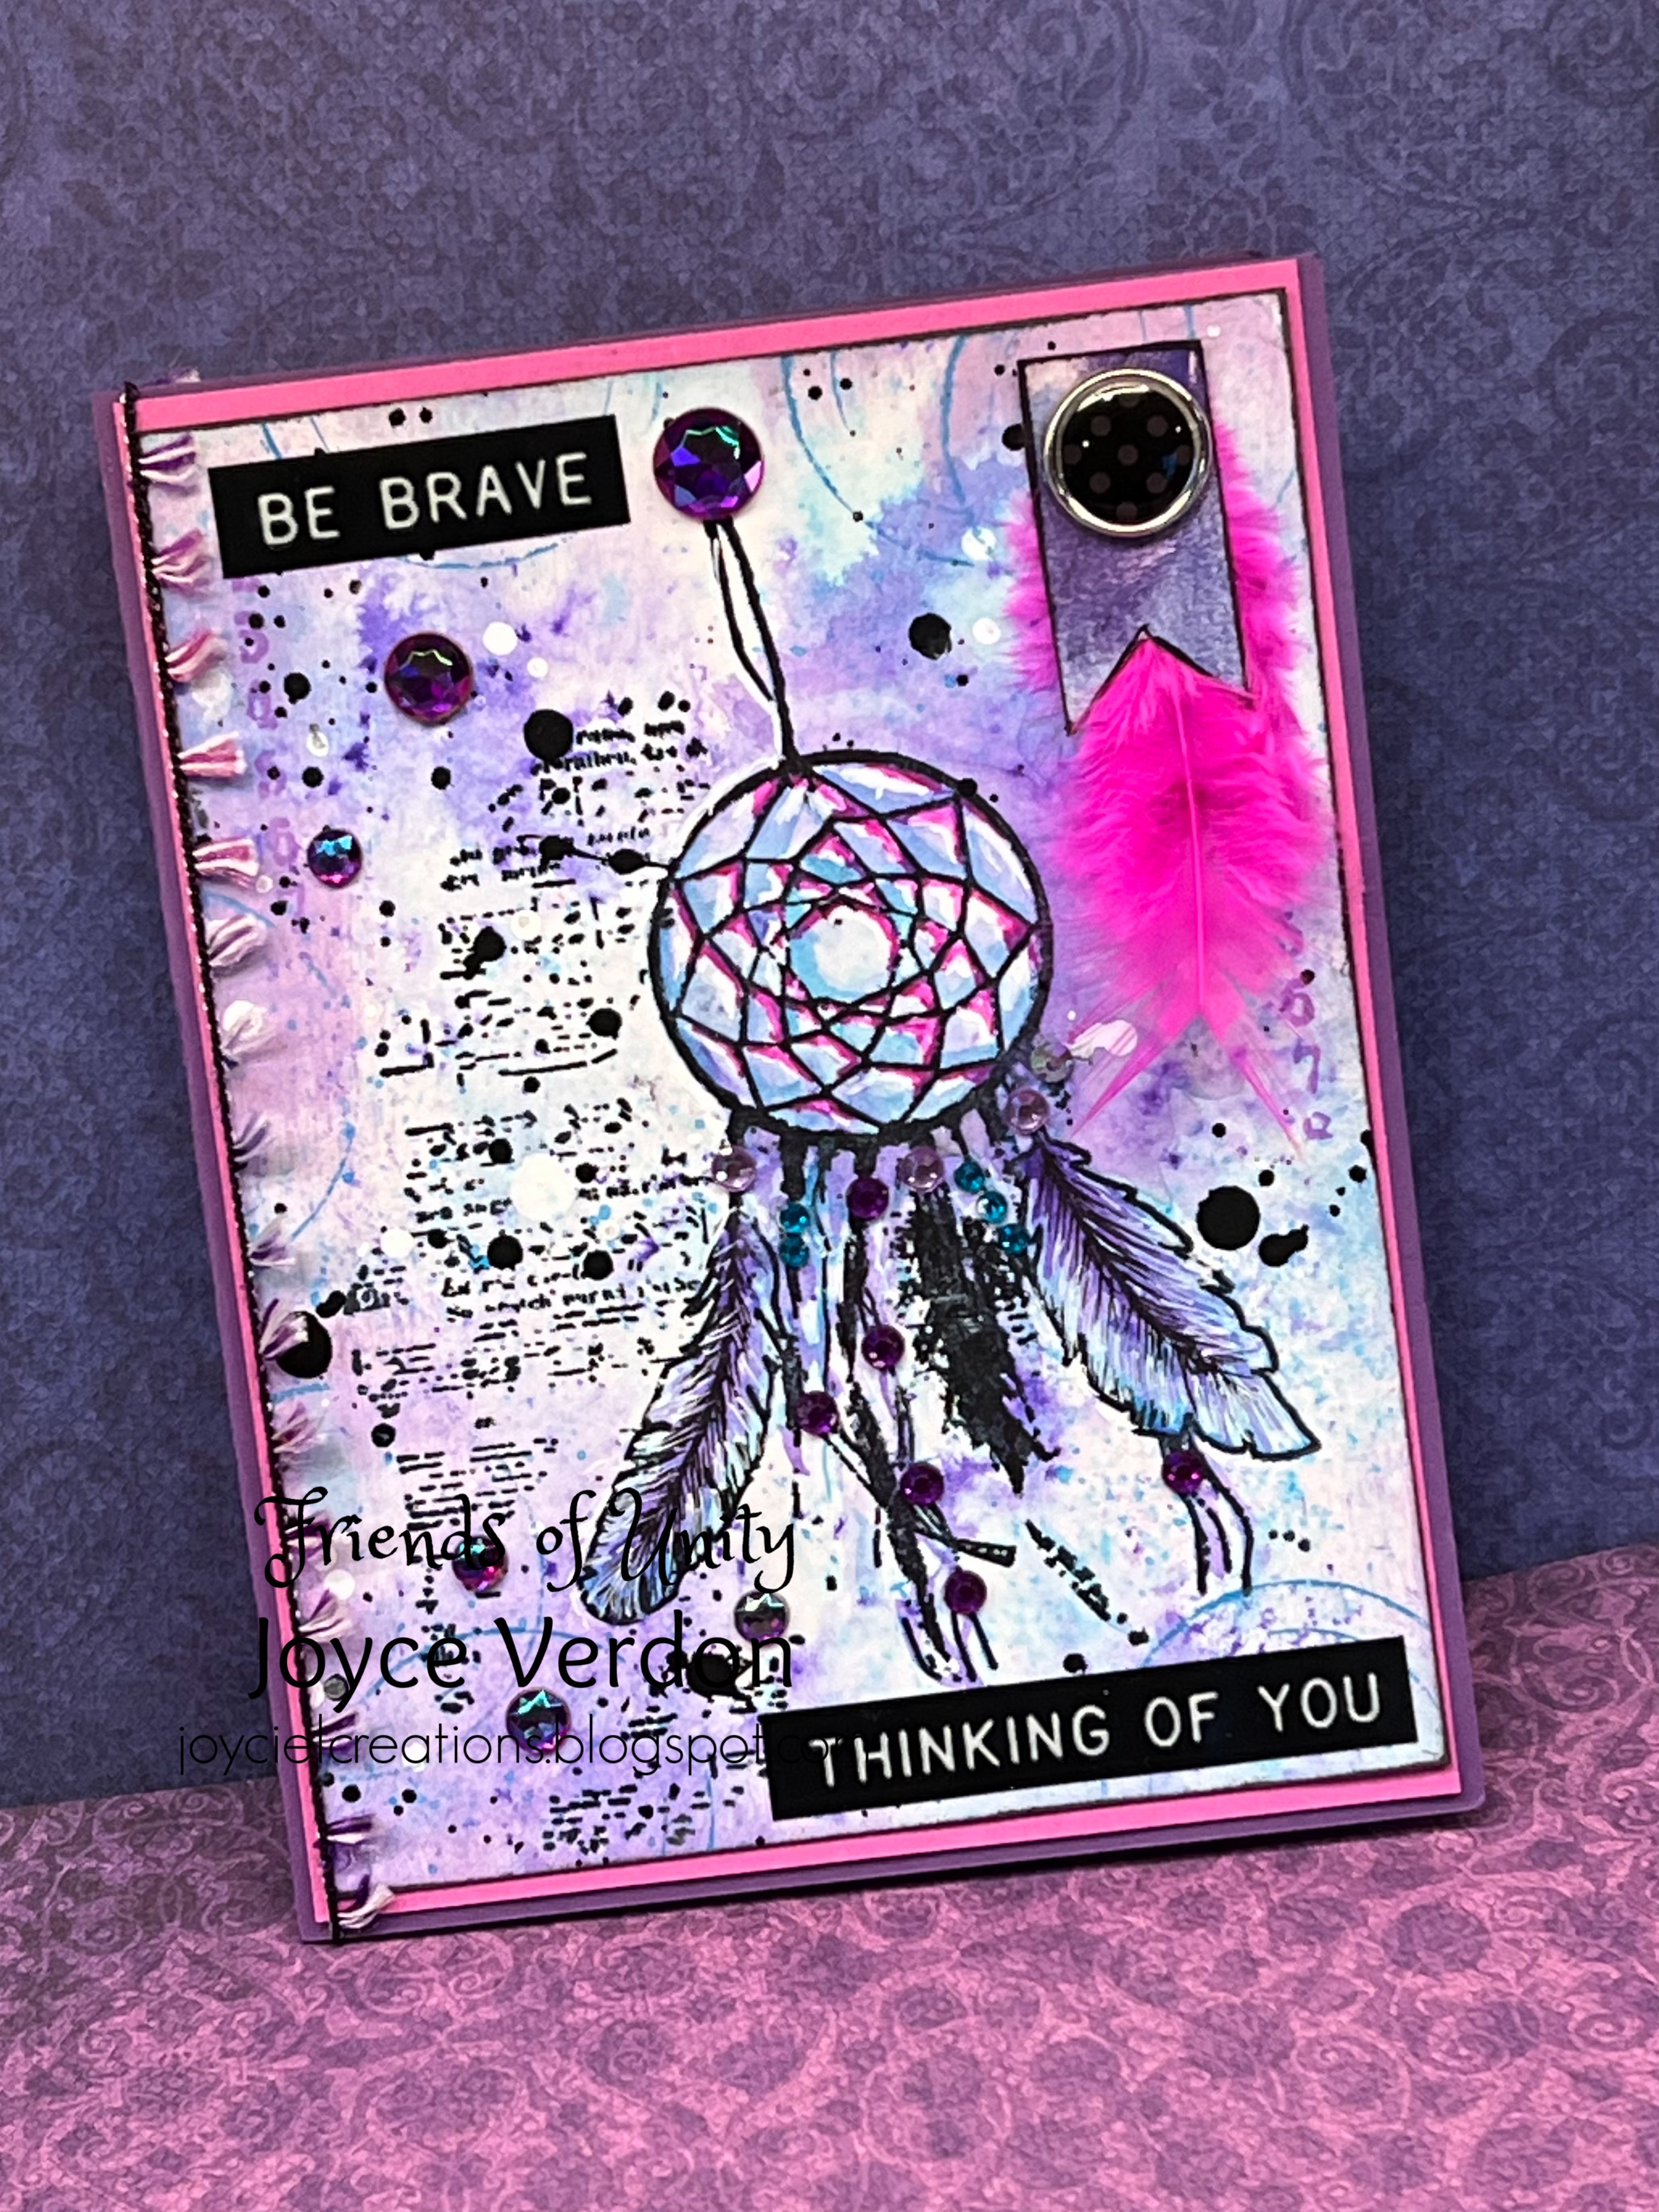
I ended up using a Dina Wakely cutout chipboard, I picked up from who knows where and a sentiment strip from a booklet. I used a paper pack I picked up from Tuesday AM a long time ago and stamped all over it. I also used a stencil to add a blue glaze and on top of it white embossing paste.

I ended up with this funky card! I added the gold butterfly from an ephemera pack.

And yes… it’s over the top… but I’m playing.

Here’s my latest attempt after picking up a couple Daler Rowney acrylic inks. I made this first…

I then added some stenciling with embossing paste and circles using a stencil. Note I pulled out an old mettalic gelato! Worked great and gave it shine. I ended up using another Unity Kit to create this card.

So, while none of these turned out “great”, they all fulfilled a few goals of mine… use up supplies on hand that I’ve never used before, have a ton of fun in the creation process, try something new, get out of the current slump I’ve been in, build new skills… 

A happy surprise outcome… I love those Dina Wakely cutouts and the use of paper on top. I need to do more of that. Next step…simplify backgrounds… make them less busy, more white space. 

Well… hope this inspires you to take a look at some new techniques. Feedback and suggestions are always welcome. Take care, and until next time, happy crafting!

Tuesday, June 20, 2023

{BYSHC} Sketch Challenge 34 - Gnome Better Holiday

Created this cute gnome card using Simon Says Stamps, Gnome for the Holidays and the PolkaDoodles paper collection, Ho Ho Gnome. I used the Sketch Challenge 34 on this one!


 After looking carefully at the paper, I decided to go with the tree gnome, matching the greens and greenery in the paper. I stamped the gnome onto sketching paper used for pencils, knowing I wanted to used my colored pencils. After coloring it in with my Prismacolor pencils, I adhered the flimsy paper to another piece of scrap paper so I could fussy cut the gnome out without tearing the image. I knew I needed a background so I created one by embossing a couple trees from the stamp kit and a sentiment. I adhered the gnome using foam squares. I then made the rest of the card using the sketch as a blueprint. I finished the card with a few enamel dots and a puffy gold star.


Must admit it came out cuter than I expected! I also have to say that these sketches have really inspired me to try new card making styles and am just having loads of fun with them! Well, thanks for stopping by! Till next time, happy crafting!

PS our next holiday Linky Party is coming up… with loads of sponsors and giveaways… save the dates!


Sunday, June 4, 2023

{BYSHC} Sketch Challenge 34 - Magical Mackenzie Christmas

 Had fun creating this Mackenzie-Child’s inspired holiday card! Used LDRS Creative’s Mackenzie Christmas paper pack combined with Unity’s Magical as Snow stamp kit with {BYSHC} Sketch 34 to create this card.

After stamping and clear embossing the image on Bristol paper, I used my watercolors to fill in the image. I fussy cut it out. I then stamped and embossed the sentiment on a paper from the collection and used foam tape to add the image. I did use pens on the hat for added texture. I then cut down more papers to create the sketch shapes. Finally, after assembly, I added string and crystals to complete the card!


Hope you enjoy this pretty simple card, with festive papers!

Friday, May 26, 2023

{BYSHC} Sketch 33 Challenge - Craft O’Clock Paper Collection

 For some reason, this sketch just called me to fussy cut and piece together little images from pretty papers.p to create a scene!


I’ve been pouring through some old papers and found an ephemera set that included cute candles. I thought I could trim them down and create a holiday scene with them. I found a beautiful paper collection from Craft O’Clock called Warm and Peaceful, I thought I could use for background papers. I ended up cutting down a piece of the paper I could use for the scene, using the foliage part as the base. I cut into that with a blade so I could slip the lantern and one candle behind the foliage. I added foam behind the 3rd candle to raise it up a little.

Must admit I love playing like this and the paper was perfect! I then stamped the Gina K sentiment using Gina K green ink. I cut down all the background pieces for the sketch, except for the strip across. I ended up using a ribbon tape I picked up years ago that I never knew what to do with. Luckily, it matched and I used 2 strips of that to make the horizontal band in the sketch. Once assembled, I added enamel dots, and another fussy cut piece from the paper, and called this one done!

Hope this inspires you to try something different! Thanks for stopping by!


Saturday, May 6, 2023

Friends of Unity May Blog Hop

 Hello, I’m back for another Friends of Unity Blog Hop! May’s theme is…

Before I start, I wanted to remind everyone that giveaways are always part of our hops each month. We are not sponsored by Unity, but they are supportive of our efforts. Design team members give away prizes from our personal stash. Winners are randomly selected from the blog commenters. I skipped last month’s hop, but I did promise a giveaway from March’s hop. So, I’d now like to congratulate my winner from March:

Beatricemi

Please PM me, your name and address and I’ll get a package out to you! As a reminder, it’s helpful if you could remember to leave your name in the comments section.

So, on to the first card, my inspiration for this month… Unity’s Show and Tell Facebook group’s monthly challenges. Last month the challenge was Grunge and I just had to create this grungy card! Unfortunately, I was too late to the party! 

I used Bristol paper, Primary Elements pigments and a 2018 Unity SMAK kit called Stay Close to Your People. After sprinkling powder and spritzing blue and purple pigments, drying in between, I stamped the image using Stazon ink. I used both pigments and pens to add more depth to the image. I also used an empty tape roll to add circles to the image with a blue oxide ink. I then added another small numbers image from Prima with a purple oxide ink. I cut down the paper and found coordinating paper to back the image. I decided I wanted to add more embellishments. So, I pulled out a fancy black brad, a Unity freebie feather, and some leftover Unity scrap paper. After cutting down the paper into a tiny tag and punching a hole in the paper, I added my new embellishment. Finally, I added back to the card edges.

For a sentiment, I used several prepared typewriter look alike sentiments (these may have come from Unity). For more color, I added a pink pen to the wind catcher image, a ton of crystals and a fancy multi colored string. I guess this is a fanciful grunge look!

Now, just so happens this month’s challenge is Floral + Watercolor! Oh my, one of my favorite mediums and subject! So, I pulled out a Canson watercolor paper and Unity’s Listening kit and began stamping while masking, multiple floral images in the corners using Antique Linen oxide ink.

I then watercolored the image, section by section. One of my best friends just lost her 14 yr old adorable Cocker Spaniel, her baby. Was thinking of her the whole time (as a matter of fact, both cards were created with her pet’s health struggles in mind). 

I found the perfect sentiment to pair with the image in the wonderful Unity’s Anemone Greetings kit. I found coordinating papers and used that for both the sentiment and the image. To finish off, I simply added enamel dots.


Hope you enjoy the ideas here! Thanks for stopping by… always appreciated!

Now onto the rest of the hop, filled with inspiration! Enjoy! And remember to leave comments with your name if interested in the giveaways!

You may have come here from:


Continue on to:


Or you can start from the beginning with: