Friday, February 24, 2023

Growing in Unity - Day 5

 Oh my, the last day! It’s been fun and a challenge! So, here’s my last card. I’ve been wanting to copy a style of one of my favorite artistic cardmakers, Debbie Hughes. Not a clear hit, but was fun to try. This card was created with 2 Unity stamps, Strive to Be and Anemone Greetings. I also used a Simon Says Stamp die, Eucalyptus Leaves. I paired these with Mintay’s Blissful Time paper pad.

I started by stamping the image with Antique Linen oxide ink on Arches watercolor paper. I then proceeded to watercolor the image, trying to replicate colors in the paper. I created the foliage colors by mixing orange/rust with green (should have created a nice brown but I retained more of the green). Probably should have used a blue instead and it would have been a more cool brownish tone, but, I wanted a little more contrast. Anyway, after completion, I used a spritzer with white Perfect Pearl powder mixed in. I then used a toothbrush…a little too enthusiastically, to spatter white Winsor and Newton gouache all over. 

I used a Unity die to cut the paper down and embossed the sentiment with Aged Mahogany oxide ink. I used 2 papers from the pad as backing and card base. Then I die cut leaves with another paper from the pack. I added a little green color lightly with my finger using a cool toned green Memento ink. I then cut down and added the individual leaves with glue.

To complete the card I added enamel dots and twine.

This was a fun experiment that I want to try again! Let me know what you think… and remember to leave a comment on each of the days to qualify for the random draw. Leave your name as well! 2 lucky people will receive $20 of store credit. Thanks for all the support as well, as I still get anxious when put in the spotlight like this!

Have a great weekend and happy crafting till next time!

Thursday, February 23, 2023

Growing in Unity - Day 4

 Okay, I’ve reverted back to a more vintage style, because, let’s just face it, I get bored doing the same style twice! (I think that’s why I gravitated toward management in IT… never a dull moment and the constant change in technology.) So, the stamp sets I used this time were: Soul MailFrench Kiss Life and Let it Go and Focus.

I started with the paper pictured in the photo. I used 4 different tan/rust colored oxide inks to stamp around the ends. I also stamped a few green dots.I then stamped the vase and used a combo of watercolors, pencils and pens to color in the vase. I wanted to match the old Bo Bunny paper I’d use as a background, called Love Lace, that I had in my stash.


I liked adding the rose stamp from French kiss around the paper to match the rose in the vase. I then decided to add interest with a frame around the rose. I embossed the chipboard twice, first with Rusty Hinge and then with Aged Ivory. I attached it to the paper with Aleene’s strong tacky glue. I distressed all the papers. As I was looking for another embellishment, I realized I had some ephemera from that paper pack. I cut a tag down and added the matching patterned chipboard button with twine to the corner. Finally, I embossed the sentiment, backed that, and called it done. Again, I know, not everyone’s style, but I’m a vintage fan!

Remember to leave a comment with your name on every day’s post this week for a chance at 1 of the 2 $20 gift cards (credit), Unity Stamp Co. is offering! Thanks for stopping by and have a great day!

Wednesday, February 22, 2023

Growing in Unity - Day 3

 Hey… happy Hump Day! On a side note…my last boss’s name was Mike, who was a very effective and productive leader, and who I really liked and highly respected. Every time I had an important or tense meeting on a Wed., I so wanted to say, “Hey, Mike, Mike, Mike, Mike, Mike, guess what day it is?”. 🤣 Sorry, I digress and had to chuckle… loved that commercial!

And no, this card has nothing to do with camels🤣. 

Instead, I used the beautiful Linen Flowers from Unity. Because the stamp lines were so delicate, I wanted to retain that look, but stamp using individual colors for each area. This reminded me of a class I took with AI (Art Impressions) stamps. And then I remembered, I still had those same 3 Tombow watercolor markers from that class from 4(?) years ago.

I pulled out a Canson watercolor paper and my Misti and proceeded to use the markers carefully on each bit of the stamp. I’d color a few leaves, then stamp, then repeat. Then move onto the next section when I was happy. I didn’t bother with misting the stamp pad with water, as I didn’t want to dilute the colors.

When finished, I first used a delicate brush to pull colors from the outlines slightly through the petal or leaf. As the markers were water based, this was easy to do. Then, I added a touch more color using my watercolors (green and yellow). After die cutting the paper, I found coordinating paper for the background, embossed the sentiment from the stamp set, and added crystals. And (jaw drop time) I realized after assembling, I had created a CAS card, oh my!

Loved how this one turned out! 

Remember to leave comments on each day (be sure your name is included) for a chance at winning one of 2 $20 gift cards!

Thanks for stopping by and have a happy Hump day yourself!

Tuesday, February 21, 2023

Growing in Unity - Day 2

 Welcome back to my Growing in Unity Week! So, this card is a little more artsy and “angsty”… I do go on these tangents sometimes. I used Mend Your Heart, an old SMAK kit, Let Life Unfold, and Unity’s paper pack, Cozy Textiles. Love the fabric and sewing details in all of these items!

I started with the paper selections, and then coordinated colors from there. I used several browns to create the lace texture shadows… which is what is stamped. Isn’t that cool? I then stamped the needle on the lace and added stitches by pen. I die cut it and distressed the edges and middle seam.

I stamped the thimble using a combo of blue, brown and black to give it dimension. I then stamped the sentiment and fussy cut them both out. I backed the sentiment with more paper.

To pull the card together, I used a ribbon, a button, twine and enamel dots. Not a common card to use, but it’s there in my stash if needed. Unfortunately, we all face heartache at some point or another. Hopefully, this one acknowledges, commiserates, and reaches out to help.

Thanks for stopping by and remember to leave a comment for a chance at Unity goodies!

Monday, February 20, 2023

Growing in Unity Week - Day 1

 Hey there! Welcome to my first day of my Growing in Unity (GIU) week! So excited to be participating this year! 

For my first card, I used a couple of Unity kits, Delightful Little Things and Everything is Wonderful. I also used pretty papers from Kaisercraft, called Greenhouse

I used watercolors, pencils and pens for the succulent image and fussy cut it out. I stamped and clear embossed the sentiment on another paper using a Momento ink and added soft watercolors to blend with the palette colors in the paper.


I created several card layers, distressing all the card edges. To finish the card I added enamel dots, a button and twine.

As usual, I love pretty patterned paper, soft colors, collage style cards... While this card fits my aesthetics, I know it’s not for everyone…it just gives me “feel good” vibes! Thanks for stopping by - remember to comment on this card and my cards for the rest of the week for a chance at Unity goodies! Be sure to leave your name!

Till tomorrow, happy crafting!


Secret Santa Thank You Card

 Created a card with items included in the Secret Santa stash I received from Heather Wint! Thank you so much, Heather! This was so much fun to participate in this event last December. You can find several other participants sharing cards created from their Secret Santa stash in an Instagram hop with this picture (@j.verdon):

I used the cute Hand Penned Petals set and coordinating papers from Stampin Up. 

I started by stamping the flowers all over on watercolor paper. I then used my Schmincke watercolors to paint the flowers loosely in blues and oranges. I also used Ken Oliver’s Sparkle Pearl ink.  then painted additional foliage to fill in empty areas. I added paint spatters and stamped the sentiment.

I decided to add sparkly copper glitter to the flower centers with glue. Finally, to complete the card I added several paper layers and a lace ribbon. I like the ethereal look the whole card has.


Hope you like this one! Thanks for stopping by!

Wednesday, February 15, 2023

Unity Hearts Galore

 So, made another Valentine’s Day card using a bunch of Unity heart stamps and a sentiment from 3 different membership kits: Best Friend Till the EndTwinkle, and It’s Going to be Beautiful

I started this one with Brutus Monroe’s Gilded Gold embossing powder and a pretty large Couture Creations embossing folder. I used a grainy white paper, spritzed it with water and dry embossed it. I then took an embossing pad and lightly went over the raised edges and heat set the powder on the paper. I then used a large fancy die cut on the paper to enable creating a 5x7 card.

I then found 3 random papers (2 from a Dress My Craft pad Whispering Love pad) and a matching darker colored patterned paper. I gold embossed the stamps onto the paper. For the floral heart, I added coordination marker colors to the design. I fussy cut 2 of the hearts and used a heart die for the 3.

To pull the card together I found a mint colored shimmering paper pack and and used that for both the background and background die cut hearts. I used 2 ribbons and crystals. Finally I embossed the sentiment and the edges of the sentiment strip. I adhered the stamped hearts to the background hearts. Then, I used foam dots behind the top of each heart set and just sticky tape for the bottom and overlapped each set. 


So, I really loved the embossing of the hearts on patterned paper… so cool. Just wish it was all a little more contrasting in colors. But… since I was in a hurry… procrastinator till the end… no do-over was possible.

Thanks for stopping by… happy crafting!

Friday, February 10, 2023

Sketch Challenge 30 - Unity Nut Cracker

 Created another holiday card using this sketch!


However, I turned it on its side for this cute Unity stamp, the Nut Cracker Holiday. For all pieces, I used Suditrol paper from Modascrap. After stamping the image using Inkon3 on Bristol paper, I used watercolors, colored pencils and pens to match the colors in the paper. I fussy cut it out. I used vellum for the sentiment and embossed it using silver powder. I rounded the edges of the paper and card base. I used sticky silver strips to adhere the sentiment and added crystals for embellishment.

I kind of like the sketch on its side! Thanks for stopping by and happy crafting!

Saturday, February 4, 2023

January ATC’s

 Created another small set of ATC’s. Inspired by a few monochromatic technique videos, both of the sets I made, while very different, embraced this color story!

The first set was created with a couple different stamp sets. I pulled out inexpensive watercolor paper and sprayed and used pigment inks to create a lush deep pink, red and violet sheet. I cut down the sheet to create 4 ATCs. I then used black ink to stamp and emboss (with a grainy black Seth Apter powder) the lace background stamp from a Stampendous stamp set, called Ornate and Lace. I die cut some larger hearts from the same paper and used the ornate part of the stamp to emboss another image onto those hearts. I decided to add a little sparkle with white glitter by adding small circles with a glue pen on one side of the heart.

I then found another heart stamp set, Love Rocks by Dina Wakely. I knew I was going to use some cool pink glitter hearts on the ATCs, so I wanted to pull more purple in. I pulled another sheet and used Wisteria Colorburst and red inks to create a smaller set of hearts to add to the ATC’s. I fussy cut those out. And then finally, I found a magazine scrap and a patterned paper scrap and cut out more hearts. To add more sparkle I embossed script from, I think, a vintage typewriter stamp set, using silver powder on the larger heart. I  used an old Stampin Up sentiment on plain pink paper, cut it down and inked the edges. Finally used glue and foam tape to create a layered effect and called them done!

Happy Valentine’s Day, everyone!


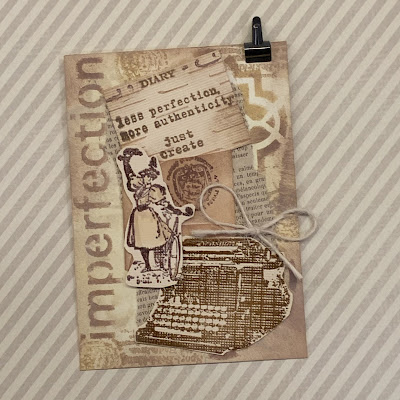
For the second set, I reused the typewriter set, pictured below, a lot. First, I started with Bristol paper and 2 stencils. I pulled out a variety of tan/brown inks, including archival, oxides and Memento inks and went to town. I used ink blending, stamping, and multiple inks on one stencil to add a variety of shades and texture looks to the background. 

I embossed the typewriter image and fussy cut it out.  I remembered I had picked up some little envelopes at Tuesday Morning. I ink blended the browns onto the white envelopes and stamped an image on it. I had decided to simulate a typewriter created message. So I took a grainy tan paper and stamped the little sentiments closely together. I cut out the pieces into rectangles, inked the sides and with a brown pen, added lines. I then embossed the lady image and used watercolor and a little clear sparkle ink to color her in. 

To pull the ATC’s together I tore an old vintage book page up to use as a backdrop for the individual pieces. I then added a string and a tiny Tim Holtz clip to finish them off. 


I love these for a variety of reasons…first, my mother, for one, she was an administrator, she typed up all my last minute high school projects till 3 in the morning, and she, herself was very creative and artistic. After retirement, she was very handicapped with severe rheumatoid arthritis, but still took up oil painting… she made some fabulous paintings despite crippled hands. Second, it’s so petite and reminds me of miniature stuff… which I love. Third, it’s just a great message for all of us! 

Hope you enjoyed these! Thanks for stopping by!

Friends of Unity February Blog Hop

 Wow, it’s already February and I’m back with another Friends of Unity post! This one had me a little stumped until I decided what the theme meant to me! The theme this month is…

To me, this theme was all about ensuring the card expressively emoted the feelings meant by the sentiment. And it was also an opportunity to find and use some special sentiments.

Before I get started, I wanted to remind everyone that my friends and I do random giveaways every month from our own stash. All you need to do to be eligible to win is to leave comments on each post… including your name! Last month, I announced I would be doing a giveaway, so based on comments received, the random winner is 

Becca Yahrling

Becca, please PM me with your address and I’ll be sending along a package to you shortly!

The first card was created to inspire the recipient to find some joy in rising above whatever hardship is bringing them down. So, I deliberately made it as festive and colorful as I could. I used a very loose style to use stamps from Unity’s My Heart is With You. I used oxide inks to stamp the dress, flowers and stems. I added added watercolor and pencil to match the background paper colors from the Polkadoodles Country Friends paper pack.

I die cut a frame, added foam tape and a sequin mix to create a shaker card. I stamped and embossed the sentiment from the kit using a Wow green powder, added a metal embellishment, fancy string and called the card done. I tried to de-emphasize the images to make the sentiment the primary focus. 

For the second card, I used a gift bag sentiment. I created my own background. First, I used a combination of oxide inks with the smooshing technique - 3 pinks and Speckled Egg blue. After stamping Worn Music in several areas, I embossed those areas using a soft blue Seth Apter powder. Using gesso, I covered the paper and added pieces of torn patterned papers. I then used random heart stamps all over using the same inks. I pulled out a pink acrylic paint and blended the background together. For the final touch, I used a stencil and paste to add texture and white touches. 

On Bristol paper, I embossed the old phonograph image from Better With Age using the same blue powder and cut it out. I then took a small tag and blended the oxide inks all over the tag. I embossed the sentiment on the tag, added heart stamps and used the same stencil and paste. I used a silver ribbon, a silver puffy heart and inked the edges of the tag. 

I die cut a doily using a Couture Creations die and gray paper scraps. I then ink blended the blue oxide all over it.

To complete the card, I die cut the background paper I created, added the phonograph, doily, tag and clear crystals. Again, I’m hoping the sentiment is standing out and is enhanced by the rest of the card. 

Must admit I do like the background paper I created… (dare I say it, more than the card 🤭🤣). Another side note… my husband and I are huge music fans; another reason why I chose the sentiment!


Thanks for stopping by! Be sure to check out all the blog posts in the hop and leave comments, including your name, for your chance to win some Unity goodies! You may have come here from:

Gaylynn’s blog

Or you can start at the beginning with:

Crystal’s post

Wednesday, February 1, 2023

{BYSHC} Sketch Challenge 30 - Tattered Angels Card

 Hello again! Only 11 more months to go to create your holiday card stash! Here’s the new sketch

for February’s inspiration…

I dug deep into my supplies and found an old Tattered Angels stamp set and a more recent Couture Creations paper collection.

After using a gold pen pens and watercolors to color in the embossed image to match the paper, I spattered the paper with watercolors to tone down the stark white background. I decided to use gold ribbon and gold paper to help spruce up the card. I ended up gold embossing the sentiment on a pretty piece of the patterned paper as well.

Pretty easy card to make! Check out the {BYSHC} blog post for more inspiration! Thanks for stopping by!