Tuesday, October 22, 2024

BYSHC Card 4 + Sketch 50

 Created another card for the BYSHC Falling for the Holidays 2024 Linky Party! Things got pretty messy with this one🤣! Details below! 

But first, a reminder, you, too, can join in the fun and enter your cards for a chance at winning a prize from one of our sponsors! Plus, many of the sponsors are offering discounts and percentages off their products during this Linky party season… check out the website for more details!


So , I first started out with an embossed image created with Sizzix’s Jeweled Snowflakes embossing folder on white paper. I ended up painting (as sprayer was clogged😡😝) Altenew’s Cosmuc Shimmer spray, but the continued to use a variety of other sprays and powders (Primary Elements and Magicals) to get a dark varied blue and gray background. I then used my finger to add a light pearlized Cosmic Shimmer paste over the top.live all the variations.


A good crafting friend recently gave me a box of snowflake chipboard pieces in a swap. I used Brutus Monroe sparkling silver and clear embossing paste to cover 4 of them… to give them a metallic look. I cut down the paper and added a purple strip with the clear pretty Happy Holiday paper over the top. I mounted the paper on a navy cardbase and added aquamarine snowflake embellishments that matched perfectly…go figure!


Thanks for stopping by…till next time, happy crafting!

Monday, October 21, 2024

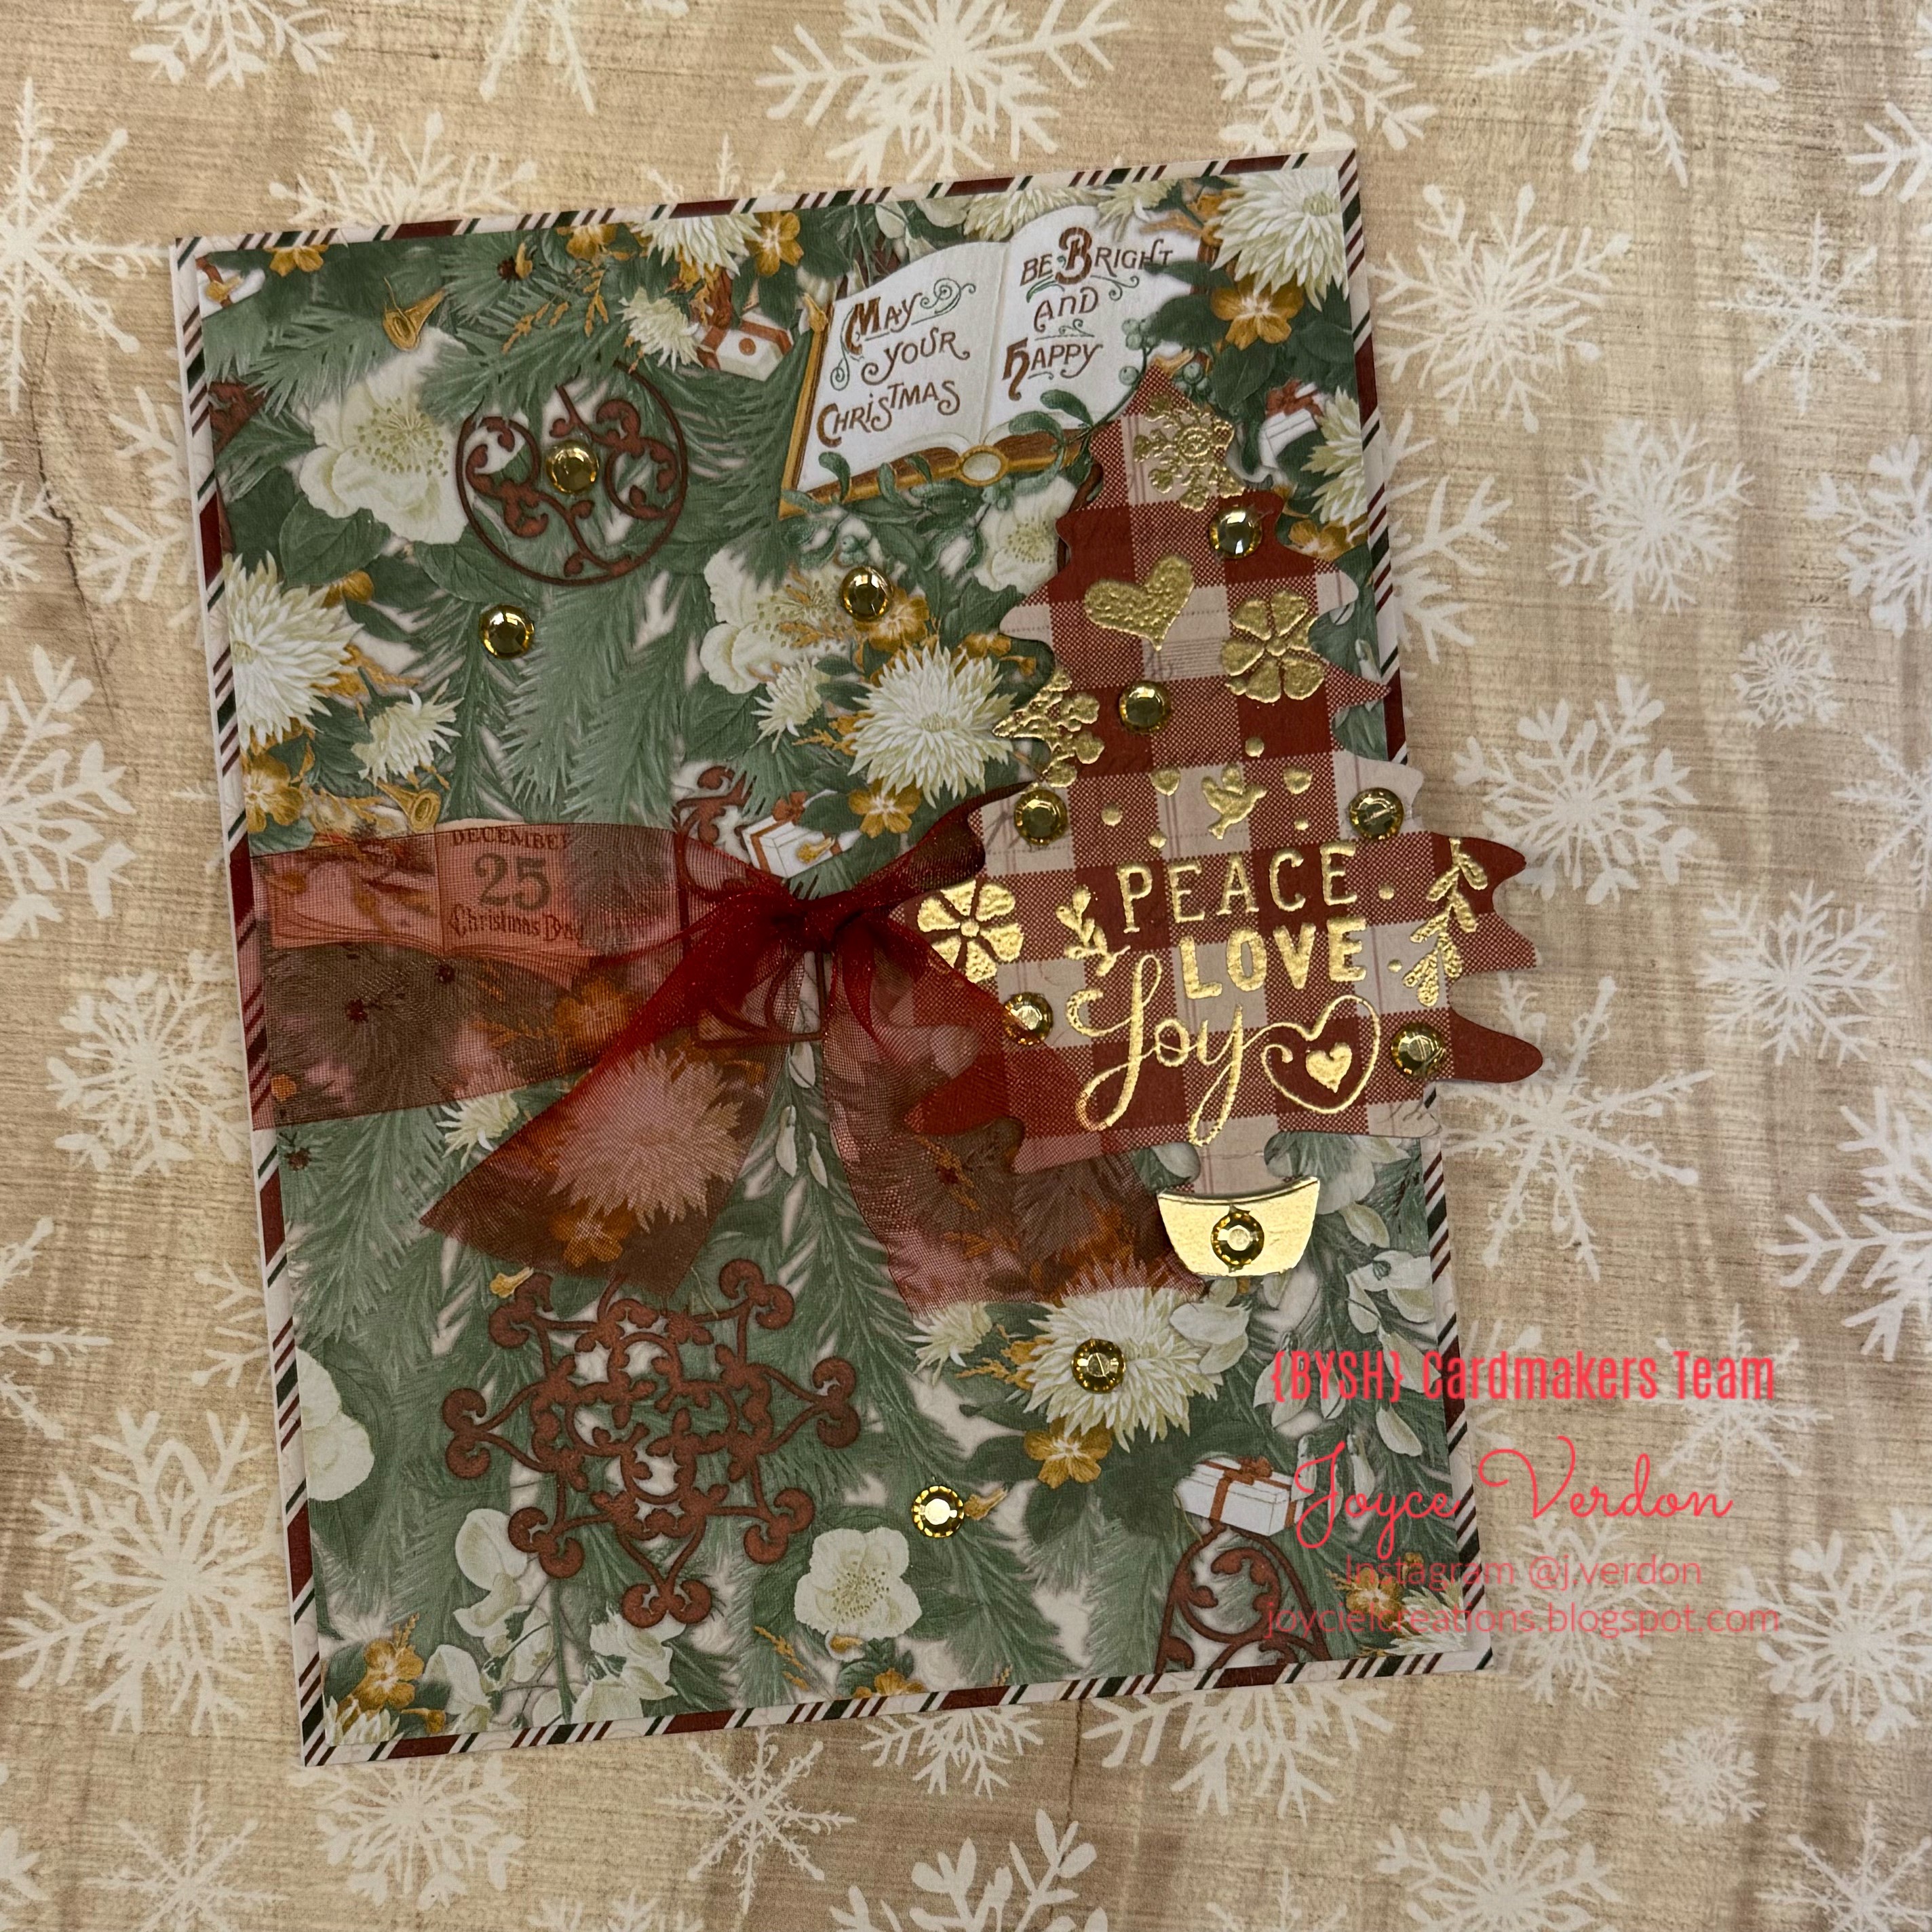
BYSHC CARD 3 - Unity + BoBunny

 Created another quick but different card for the Linky Party using an old BoBunny Yuletide Carol collection and Unity’s Winter Regards stamp kit. Join in the fun creating and linking up your holiday cards in the BYSHC Falling for the Holidays 2024 Linky Party!

I had an ephemera pack from this collection I’ve never used, so pairing it with the paper, I decided to try my hand at creating a card. I used this month’s Sketch 50, too!


I used Unity’s stamp set with gold embossing powder to embellish the tree ephemera piece, in essence adding the sentiment. I added gold crystals, a gold base for the tree and red ribbon to complete the card! Pretty easy to pull this one together!

I’ve always loved this paper pack for some reason, so it was fun to try to use it in conjunction with the sketch! And, I kind of like how it turned out! Well…thanks for stopping by and join in the fun!

Sunday, October 20, 2024

BYSHC Card 2 x Sugar Cookie Christmas

 Had fun creating this second card for the BYSHC Falling for the Holidays 2024 Linky Party! Join in the fun and link up your cards! BTW the website now has a video showing how to link up your card in case you needed this info! Pretty easy peasy to do!

For this card I pulled out an old 8x8 Prima paper pad, Sugar Cookie Christmas. I decided after picking out the bottom and top paper layer, I went looking for a die set I could use as embellishment. I found an old Momenta holiday cookies Mason Jar set. I distressed all the layers of paper and found matching pink and blue papers I could pair with the patterned papers. I die cut out the Christmas cookies, stars and gingerbread men pieces out of matching solid colored paper scraps. I added white and tan pen details and inked the edges. I embossed a sentiment from a Powerpoppy stamp kit, and used pink twine and Prima crystals to complete the card! This was a fun card to pull together…always a treat when I can pull together a hodgepodge of products to make a completely cohesive card!

Hope you like this one! Remember to link up your cards for a chance at winning a prize from one of our many sponsors!

Fun Fall Artist Trading Cards

 Had fun creating this set of ATC’s focused on my fav season! 

The first ATC was inspired by a brand new beautiful Recollections paper pad set called Mystic Muse! There’s a small pad with some really pretty holographic papers and ephemera and stickers in the set. I really didn’t need more paper but couldn’t resist after wandering into a Michael’s store for the first time in a long while! I used papers and ephemera from the set, Tim Holtz paper dolls p, a Unity Lace stamp and a fun Whimsy die, Foolish Mortals! I’m heading to Disneyland in a week and I just love the Haunted Mansion ride… so… I just had to create these!


For the second set, I just wanted to watercolor some pumpkins free hand. I started by taping down a watercolor paper dividing it into 4 rectangles the size of ATC’s. I then used a pencil to create the design. I really didn’t want to spend a lot of time on these…just enough to give the illusion of a pumpkin and leaves.


 I used a Unity sentiment on these, A Season of Change.

That’s it… just thought I’d share! Thanks for stopping by!

Friday, October 18, 2024

Sketch 50 BYSHC Sizzix Jeweled Snowflake Folder

 Here’s a simple card using a simple sketch from the Build Your Stash Holiday Cardmakers group!

This card was made with an older Sizzix 3D folder called Jeweled Snowflakes. I just used a gold paste over the raised edges to make the details show up! I die cut gold glitter paper using Simon Says Stamp’s Dancing Snowflakes wafer die. I added a sentiment from SSS’s Making Spirits Bright stamp set and gold crystals to complete this one!

Try your hand at this easy sketch to create some simple holiday cards! Thanks for stopping by!

BYSHC Falling for the Holidays 2024 Linky Party

 It’s time for another Linky Party! All you have to do is create a holiday card and link it up for a chance at winning a prize from one of our wonderful sponsors! See the graphic below for the blog site to link up your cards!

For this card, I used Altenew’s Classic Pinecones embossing folder on white paper. I ink blended 2 brown and 2 green distress oxide inks onto the pinecones and needles. I then rubbed a gold paste over the tops of the raised edges. I added white and gold spatters over the top. I die cut out the pieces of the ornament using a Memory Box Millbrook Ornament die. I added gold sticky strips to the ornament and to the background paper. I outlined everything for shading using a black Stabilo pencil with water. Finally, I added a sentiment from an old Sunny Studio kit and sone sequins and dots.

That embossing folder is the bomb! Remember to link up your cards for a chance at winning a prize!

BYSHC blog linky party link: https://byshcardmakers.blogspot.com/2024/10/falling-for-holidays-2024-byshc-linky.html

Saturday, October 5, 2024

Friends of Unity October Blog Hop

 Welcome back to another Friends of Unity Blog Hop. So, we have a new to us different theme this month…

The thought process behind this one is you get to “case” a fav creator of yours! This one should generate quite a few different styles amongst the designers. Must admit, as much as I try to case others, my style still heavily shows through! Oh well… it’s the thought that counts, right?

Before I begin on my fav creator, I thought I’d remind you that the Friends group does random giveaways each month from our own personal stash. To be eligible to win, you just need to leave comments on the blogs!

So, my fav creator, yet to be really CASEd by me, is Debbie Hughes… a glorious watercolorist whose many cards and styles can be seen on Instagram (and on Simon Says Stamp site). I’d like to be her when I grow up! So, obviously, I delved into watercoloring again!

The first card was created with 2 kits, the floral image from Sweet as Honey with a sentiment from November Chrysanthemum. After watercoloring, I spattered the image with white and gold acrylic ink. I paired the image with coordinating papers from an old Kaisercraft collection, added the embossed sentiment and affixed enamel dots. I have such a hard time creating the minimalist look Debbie achieves!

 
For the second card, I pulled out Season of Inspiration. Must admit, I love painting pumpkins! I started with a Studio Light patterned paper that I stamped the branch image on using multiple inks. I ended up embellishing it a bit with pens. I then watercolored the pumpkin on watercolor paper and fussy cut it out. I added a ton of gold, white and copper spatters. I then fussy cut out a coordinating Studio Light mushroom. I pulled the card together finally adding the sentiment and enamel dots.

Well, that’s it for my inspiration… wonder what style you’d like to Case? Technique, medium, style, layout… ? Be sure to check out all of my Friends’ wonderful creations and remember to comment for a chance at winning a prize!

And now on to the rest of the hop… 

You may have come here from:

Rachel’s blog

Or, you may start from the beginning with:

Crystal’s blog

Thursday, September 26, 2024

BYSHC Sketch 49

 What a lovely sketch the Build Your Stash Holiday Cardmakers group launched this month:

After looking through my stash, I found an old craft magazine paper pad I decided to try creating something with. I used a couple sheets and paired them with some Tim Holtz items. Tim Holtz. As a background I spruced up the card with silver holographic paper. I colored the cut out paper doll with markers. I added a die cut tree and sentiment. Finally, I finished the card off with Tim Holtz sentiments, stickles on the tree and enamel dots.


For the second card, I pulled out an old unused Authentique paper pad, which I love the colors and designs of. This was so easy to pull together by cutting out the sentiment graphic and adding braid and rosette ribbons and enamel dots. I never use cut out images like this  but I just love those included in this set.


Check out the other cute cards created by our team of designers and join in the fun… not too long now till the holidays are upon us! Thanks for stopping by!

Monday, September 16, 2024

Spook Up Some Fun

 Played around with Simon Says Stamp’s Spook Up Some Fun kit for a little Halloween crafting. My husband and I have been busy decorating for my fav season with fall and Halloween decor! And I’ve started watching my fav Halloween movies to get in the mood!

For this card I pulled out a very old, probably one of my first crafting purchases, Bella Blvd Spootacular paper pad. I had some Pre-Cut green and black form shapes I thought I could use for Halloween, because of the colors. Because I wanted a little green in the background and I obsess over color matching, I colored in the white eyes of the spookier characters floating around.

I thought the witch would go fine with the background and I could use the pad for paper piecing her outfit! I did use a combo of markers and pencils for her legs, shoes and hat too! I pulled a Creative Expressions die for the web embellishment and added orange and black enamel dots too! I black and white embossed the sentiments, again using papers from the pack.

Pretty easy and fun card to pull together. Must admit, I love shopping from my stash! Thanks for stopping by!

Saturday, September 7, 2024

Friends of Unity September Blog Hop

 Welcome to a gorgeous color scheme for this month’s Friends of Unity Blog Hop! Just in time for preparing for the Fall season! Fall is my favorite season, so this was a ton of fun!

As a reminder, if you add your comments along the way as you are blog hopping, you’ll have an opportunity to win prizes from our Friends group! All prizes are from our personal stash. Last month, I posted I’d be doing another giveaway, so I’d like to congratulate 

Kathy Sheely

on winning! Please PM me your contact info so I can get a package out to you! Thanks for commenting!

I went a bit wild this month creating 3 cards trying to get the colors just right! Needless to say, I used a bunch of Unity stamps in my efforts (and 1 Stampendous kit). Of course, this color scheme screams both fall and Halloween (see what I did there), so I had some autumn fun with it!  First up, I watercolored the stamp from Autumn’s Embrace. I ended up painting this stamp set, pairing it with their Falling Leaves paper pack, and black paper, embossing powder and enamel dots.


For the second card, I used a bunch of stamps from October 2023 membership kit called, Golden Glow. I used the kit to create both the background paper and the primary image. I even used the small circle stamps to create texture on the image’s clothes and in the background. I pulled in a Sizzix embossing folder highlighted with gold and copper paint to put the fussy cut image on. I used watercolors on the image and markers on the Seth Apter embossed flowers and stamped leaves in the background. I added the gold embossed sentiment, used dark brown paper underneath and added gold/copper sequins and thread to complete the card. I actually love how this one turned out! 


For the final card I pulled out some Tim Holtz Halloween themed Mica sprays to create a background. I then found an old Unity distressed fence stamp with a bird on it from a retired SMAK kit and black embossed it onto the sprayed background. I used markers to add color to the fence. Here’s where I used a random bat stamp to augment the background. I coupled this with the watercolored pumpkins and a sentiment from August 2023’s Phases Kit. I created a shaker card using random stamps to create the window frame. I added black dots to complete this one.


Thanks for stopping by for a little seasonal inspiration! This month Friends are setting up this particular color challenge in an album in Unity’s Show and Tell FB group…where you’ll have another opportunity to win a Prize! So join in the fun!

Now on to the rest of the hop - 

You made have come here from - Tammy’ s Blog

Next up is - Jane’s Blog

Or, you can start from the beginning, here at - Crystal’s Blog

Sunday, August 18, 2024

Artist Trading Cards Summer 2024

 Got back into having some fun creating Artist Trading Cards for a small group I trade with. Love my small group as we have agreed to be free to create whatever we want, using whatever skills, techniques and products we want, and on whatever schedule we want! No stress just an opportunity to share and receive vibes on a whim!

So my first ATC set was created using an old retired Unity March 2020 SMAK stamp set, an old Prima paper pack, called En Francais, Washi tape, a Divinity Designs stencil, Tim Holtz sentiment strips and Brutus Monroe sequins. After using watercolors on the image, I paper pieced clothing using paper from the pack. I always add shading to paper pieced items. I added cut up ephemera pieces using images from the paper and also cut up pieces of the Washi tape to add to the design. It was so fun finding Washi tape that color matched. I used more stamps from the kit for background effects, filled in with stenciling and added background shading to the image. I love how the sequin and cut up Washi tape created a little dream catcher effect. I added paper strips at the bottom and sentiment strips to complete the cards.

For the second set, I started with creating a watercolored background that I could add a stamped grass image to. Using green and purple oxide inks, I stamped a tiny Nellie’s Choice Blooming Grass clear stamp that I had picked up at a stamp expo. To create the foundation for the stamp I tore up and glued together coordinating scrap paper strips. I added to the background watercolored stalks and stamped sentiments from Hobby Arts Greenfingers sentiment stamp set. To complete these ATCs, I added twine and clear crystals. I love the sentiment on these as I have dozens of flowers in my own gardens that I enjoy daily.

So fun and freeing to try to create tiny cards with impactful messages. Thanks for stopping by!

BYSHC Sketch 48 Holiday Cards

 Got back into the swing of card making, after a short break, with this interesting sketch from the Build Your Stash Holiday Cardmakers group - 

For the first card (and second), I used an old pretty pack by Craft Smith, called Say Freeze. I ended up using one of the papers and layering on cut up plaid strips from another paper from the pad to form the background. I stamped and colored (with watercolors and pens) the image from Unity’s Angie Blom’s Planner Girl: Cold Outside on bristol paper. I ended up paper piecing cut up clothing stamped onto papers from the same pack. I added snow effects using a Posca pen. I used a Sizzix embossing folder to die cut a circle background and matched the diagonal slant of the sketch. I used a cut up sentiment from the pack, enamel dots and ribbon to complete the card.


The second card was so easy to pull together with just the use of this pretty paper pack. I cut down the background from the paper pack on a slant. I then fussy cut the image and sentiment from the paper pack, and added matching shiny green/gold ombré paper to complete the card.

Thanks for stopping by and hope these cards provided a little inspiration for cardmaking using simple methods and limited supplies.

Saturday, August 3, 2024

Friends of Unity August Blog Hop

 Hey there… long time no see! Back after a break and getting back into the crafting mind space! Here for another Friends of Unity Blog Hop, this time, focused on friendship!


So, a reminder - comment on blogs in the hop to be eligible to win some Unity goodies from our stash! My last FOU hop was in May and I promised to do a giveaway that month. Since I’m just back participating, I’m going to now announce my May Winner…. Congrats to

Jodie Powers

Pm me and I’ll get out a package in the next 2 weeks! Congrats again! I will be doing another giveaway this month as well…so be sure to comment!

My first card shows off my rusty skills along with a yearning to try out my old collage skills. For this card, I used March 2024’s Love and Good Vibes kit. I ended up using a combo of watercolors and markers on the image. I pulled out a very old Prima paper pad, called Romance Novel for the background and ephemera pieces I cut from the pad. I stamped the sentiment from the kit on scrap paper and distressed all the paper edges. I randomly cut and adhered paper scraps to the cards background. To complete the card, I added twine and enamel dots. I think it came out okay and somewhat interesting.

 
 On the second card, I used Unity’s Hello Fresh Start kit. I stamped the image using a Hero Arts Contour ink on Kraft paper. I then found and pulled out a pretty random sheet of paper from my stash, that I decided to use as color inspiration and a background. After finding some Netflix pics, I proceeded to color it in! Okay, it took awhile as it was a lot more detailed than I was prepared for… but I finally finished! I did end up using a little brown pen for detailing the image.


I decided I wanted the background paper to show through, so I fussy cut the image down. I then found a Simon Says Stamp Privet Branch wafer die I could use to augment the card. I found a coordinating navy sheet I could as a base on the ivory card base and for die cutting. I also used Kraft and tan paper scraps to add more branches for variation. I white embossed the sentiment and finally added lace and navy sequins to complete the card. Ended up creating a busy card, but hopefully pleasing to the eye! I at least got to practice coloring and die cutting!

Hope these cards provided some ideas for friendship cards! 

Thanks for stopping by… reminder to comment on blogs for a chance to win goodies (especially mine😊)! Now, on to the rest of the hop!

You may have come here from:

Tammy’s Blog

Next up is:

Rachel’s Blog

Or, you can start from the beginning with:

Crystal’s Blog