Saturday, December 31, 2022

Santoro London Purrrrrfect Love Card

 So, I just recently joined a crafting group and was inspired by someone pulling out a Gorjuss girl! I remembered when I first started crafting, I picked up a couple of these… never used them! I always thought this one would be perfect for Valentine’s Day… it’s so cute!

 I stamped her on a piece of leftover Arches watercolor paper using a tattered rose oxide ink. I then watercolored the image, matching colors to an old pretty scrapbook paper from DCWV. I ended up white embossing a Unity sentiment from the You Are My Person kit onto a piece of matching scrap paper! I fussy cut the image, added string, enamel dots and crystals and called it done!

Thanks for stopping by! Happy crafting!

Wednesday, December 7, 2022

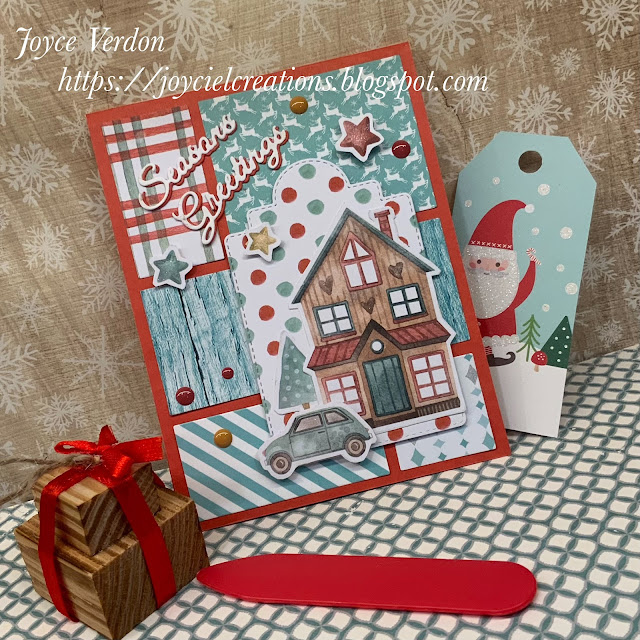
Studio Light Christmas Card

 I’ve really become a fan of Studio Light papers, especially the lovely new collections. This one, from a few years back, was more simple than I originally thought when I picked it up. It has simply designed papers, pages of ephemera, and some Christmas sentiments on vellum in the back of the pad. Since I still had paper scraps from recent cards and a new used die I picked up that I thought would work with those scraps, I thought I’d give it a whirl - since the colors matched so well.

So I started down this path after getting a mystery box collection and this full A2 die. I started die cutting the odds and ends paper pieces with the patchwork type die. I carefully adhered them to an orange red card base to match the colors in the paper pad. To make the ephemera standout, I decided to use a tag die as a background, using another paper from the pad.

I fussy cut the ephemera out, and added them to the tag and card base. I then found another die in my stash and cut out 2 sets of sentiments, one in red and one in white. I pulled the card together by adding sequins and just a few glittery pen highlights to the hearts in the house, car windows, and stars.

Must admit, I’m really enjoying playing with ephemera and this die. I may try the die again using a couple sheets of double sided paper... another day! That’s it for today; thanks for stopping by!

Happy crafting!

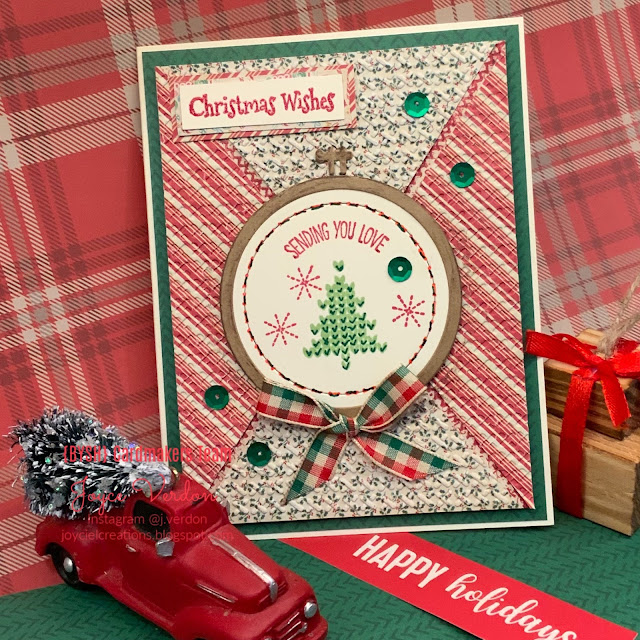
Sketch Challenge #29 - Shop Your Stash

 So, I’m hoping to inspire some of you to go back in time, looking through your stash for some of the oldest items you have! Now, I must admit, I’ve not been crafting as long as many of you, but I still have some relics. When I started out, I picked up this Authentique holiday paper pack, which I am very close to de-stashing because the style is so out of date… very tiny images, looks aged (as many old Authentique packs did), and not very artistic. I also had picked up this magazine kit, because I loved the look of it. (After making this card, I think I’ll still keep the cross stitch kit …it’s cute, and scrap most of the Authentique paper.)

To make this card, I took a sheet of the paper, spritzed it with water and embossed it. Love the fabric texture it gave the paper. I then cut it into 4 pieces to form the basis for a {BYSHC}Sketch Challenge 29 card style.


I then took another sheet and used a pencil to draw the vertical lines. I used a stitch stamp from 49&Market and stamped along the vertical lines and attached the 4 pieces. I then cut out the sewing frame from cream and Kraft card stock. I stamped the images from the kit, and added green and red ink “stitches” and a little shading to the tree. I stamped another sentiment from the kit, clear embossed it and added backing from the scraps. To complete the card, I added a dark green paper with fabric texture, a rustic bow and sequins.


Well, I this one turned out kinda’ cute as I love the cross stitch look. I do love cross stitching even though I haven’t done it in awhile. Well, hope this encourages you to shop your stash! Thanks for stopping buy!

Saturday, December 3, 2022

Friends of Unity December Blog Hop

 Hey, have you heard? Friends of Unity (FOU) are celebrating 5 years of blog hopping with the Unity Stamp Company family and friends! Such a great community and such a big anniversary! 

To celebrate, Unity Stamp Co. is giving away not 1, not 2, but 3 $25 gift certificates. Winners will be randomly chosen on December 10th from those who comment on every blog in the hop! Winners will be announced December 11th on Crystal’s blog and in the USnT FB site. 

Speaking of giveaways, I also will be doing a giveaway… all you have to do is leave a comment, making sure you leave your name! I’ll announce the winner in my post next month!

So, speaking of years of FOU blogging, there are tons of inspiration buried in these FOU blogs. Since Unity rarely retires stamps, the benefit is just unmatched in the cardmaking business. A card sample from 3 years ago is just as valuable as one made yesterday, as you can still nab that stamp set …just a thought! For example, here’s some holiday cards from years past…

And…some non-holiday examples…


Moving on, our theme this month is…


And I’m all over this one🤣! So the first set of cards was inspired by all of Unity’s wonderful poinsettia stamps and demos and a watercolor painter on YouTube. I decided to try painting my own background on a large 9x11” watercolor paper. Clearly, not going after perfection here. After painting the poinsettias, I outlined them using opposing pen colors. I then added stamped images of a “Holiday Cheer” sentiment (Cheer and Joy) and an ornament (Elements of the Holidays). I also lightly stamped the background stamp from Change and Direction. I ended up embossing the stamped elements with sparkling embossing powder and adding some penned gold dots.


I cut the paper into four sections and die cut those. I die cut some tags in matching colors, found matching background papers and embossed the sentiment using sparkling embossing powder again. I added shiny Washi tape and string to the tags and coordinating crystals to the poinsettias.


These turned out better than I expected as there’s so much going on, imperfections are lost (thank goodness).

For the next cards, I decided to play with my sparkling pigments. I knew I was going to use snowflakes and I wanted a blue background I could stamp on. So, I took a 6x4 mixed media paper and started to sprinkle blue toned Primary Elements pigment onto the paper and spritzed it with water. After drying, I wanted to change the blue tone a little, so I added blue Nuvo pigment powders and repeated the same process. Finally, still not satisfied, I added drops of ArtC blue glitter ink and did a repeat. (Clearly, playing here.)

I then found a perfect paper background I thought would complement the blue paper. I also went looking thru a DCWV glitter paper pad and found a matching blue paper and a scrap piece of acetate. I then decided to make 2 acetate windows with stamped snowflakes on the bottom peeking thru a stamped snowflake on the acetate. 

Using 5 snowflakes from the kits mentioned above, I stamped (and embossed) the images all over the now sparkling mixed media paper. I used a variegated blue Seth Apter powder for these flakes. I then stamped the largest snowflake on 2 pieces of acetate and used Brutus Monroe Sterling Silver powder for this. I cut the sheet in half, made window panes of the blue DCWV glitter paper and combined the 3 layers together. 

I used several Unity sentiments for the cards, stamping in Tumbled Glass Oxide and then clear embossing them. And I varied the layout of each, adding another panel with white glitter paper and patterned paper on one. I also used different embellishments on each card and dies on the 2nd. Must admit… the glitter and glitz on these 2 cards can be seen across the continent.


So that’s it for me… now onto the rest of the hop! Thanks for stopping by and remember to comment on each blog for a chance at some goodies.

You may have arrived here from:

April’s blog

 Next up:

Alaine’s blog

Or, you can start at the beginning, with:

Thursday, December 1, 2022

{BYSHC} Sketch Challenge #29

Welcome to a new Build Your Stash Holiday Card Sketch Challenge… #29!


For this challenge, I took the opportunity to use up some odds and ends I collected over the years. I had some leftover My Mind’s Eye Sugar Plum paper and ephemera, a holiday DCWV 6x6 Washi tape paper set, some paper I received from a magazine that I liked and a leftover 12x12 paper sheet. After placing the Washi tape onto cream card stock, I cut down all the pieces. Because I used random paper pieces, I couldn’t take the easy way out in cutting the triangles. So I had the first the sheet corner to opposite corner to make first triangles. I then held the 2 pieces together, and made the second cut…cutting through both pieces, making 4 triangles. Not perfect, but I think it worked okay. To place the pieces onto the base I created for each card, I used Washi tape to hold down and arrange the piece. I then would lift up one end and glue it, then the other end of each little triangle. This worked pretty well!

I then paired papers with ephemera pieces and  made up all the cards. To make the cards more festive, I added sparkly embossing powder, random die cut pieces, and brads, crystals and sequins. 

I also decided to use a scrap paper to create a shaker card with this sketch using a pretty sparkly sequin mix. In this case, I also used gold sticky strips. 


Must admit, it was very satisfying pulling random pieces together, using up cherished scraps, and ending up with an additional 5 holiday cards! I think this sketch boosts the look of sometimes plain ephemera! So fun! Check out this blog post for more information and Crystal’s easy way to create this sketch using pretty 2 sided papers!

Thanks for stopping by… till next time, happy crafting!