Thursday, October 28, 2021

September ATCs

 What to do with your huge collection of unused paper ephemera?… here’s my answer! Had so much fun creating these and each one is unique! Had 2 different themes going…  the first one using a Beautiful African based collection that I received in March’s Art Journal Junction’s Mixed Media Subscription package. I am having a lot of fun with this subscription, been receiving new inks, paints and sprays, pads, ephemera, and a bunch of other stuff. You can check out some of their inspiration videos on YouTube. By the way, they are having a giveaway to their membership, valued at over $500! 

Enter HERE!

To create the background base for the ATCs, I used a combo of the new beautiful Tim Holtz Halloween Mica sprays on mixed media paper. I then used a couple Unity background stamps, with brown and Mahogany archival inks, one from Progress and Change and the other - Brave Spirit Diamond Stripes, to augment the motif. I cut the paper down and added a white and gold blend of modeling paste with a stencil. I then split up all the ephemera, added a few more from my stash, added Washi tape and sequins and crystals to complete the cards. I added a portion of a Unity sentiment from All About the Journey as the final step. I know a few people who, pre-Covid, travelled to Africa and shared beautiful pictures of this fascinating continent. The people, the culture and the animals are just fascinating! These ATCs while not accurate, probably, remind me of those stories.


The second set were created using a variety of ephemera from my stash. I started this one using a neutral colored patterned paper on which I stamped and white embossed the dots from Unity’s Polka Dance Background. I then used oxide inks to add color around the dots that matched the ephemera. I worked with the ephemera to create harmonic ATCs that while unique carried the same theme. I distressed the edges. I platinum embossed a sentiment from Wayward Flowers on to vellum and fussy cut those down. To complete the ATCs, I added enamel dots, crystals, a coordinating small paper flower and a matching brad.


Hope you enjoy these, again, non traditional, almost min card ATCs. 

Till next time, happy crafting!

Painted Poinsettia Card #1

 I’ve been inspired by all the wonderfully talented crafters who are doing their own paintings for cards and decided to try my hand at making a home made card myself! Because this was a test run, I used a cheaper watercolor paper to hand draw the imperfect poinsettia image using a Derwent yellow watercolor pencil. I then used my watercolors to fill in the image pretty quickly, thinking I needed to see if I could make a quite a few of these in a decent amount of time. I used a Derwent black pen to add some definition to the image. I then went over some areas with my Prismacolor pencils. I decided to add a little stamping detail to the background using a stamp from an older Unity Kit of the Month (Halo Dirty) and a red Archival ink. To complete the image, I used the sentiment from Unity’s Conspiracy of Love kit using Black Versafine ink. I love this sentiment, from Unity, as it so clearly expresses the feelings I have when sending cards out. And the format is very elegant!

I really didn’t spend any time fixing problems or improving the image. So, instead to minimize the quality issues, I just sprinkled, using the top only, Dina Wakely’s Gloss spray in Gilt onto the card. I ended up with a huge glob of paint and decided I kind of liked it and created 4 more globs (kind of mimics use of sequins or crystals as gloss sprays are shiny). And then I used a Dylusions white spray to do the same over the image. I die cut the image and found a paper pack, Simple Village Rustic Christmas by Simple Stories, that I could use to back the image. 


Overall, it didn’t turn out too bad. I definitely need to work on watercolor skills again as I am rusty after taking such a long break because of wrist surgeries. Also, I’d like to fine tune my use of pens… a little less heavy handed. Appreciate any other advice you could give!

Well, enough on this one… stay tuned for another post on ATCs!

Wednesday, October 27, 2021

A spell card I couldn’t resist making!

 Okay, must admit I’m a horror movie fan (wonder if it’s related to my love of roller coasters and being an adrenaline junkie) and, therefore, Halloween is a favorite holiday of mine with all those ghouls, ghosts and witches! I usually love to decorate and have been limited this year due to a major remodeling effort. Therefore, I have been relegated to decorating using paper crafts. (Check out my next Friends of Unity post for some really fun decorations, after the fact, but still fun…including a sneak peek here for you … ).

Here’s a fun creepy grungy card I created using a few Unity stamps, Halloween papers and ephemera! I started by stamping the spooky doll from Voodoo Vibes onto a variety of Tim Holtz Halloween papers to get an idea of what I wanted to do. I then played around with stamping and embossing the Dinged Dots background stamp onto tan paper using a combo of embossing powders. I also found an old really great Bo Bunny collection in my stash, called Wonderfully Wicked. It contained some interesting printed vellum papers. I decided to use one of those to emboss my doll on. I then fussy cut it and paper pieced the doll onto it. I then placed all of that onto my Dinged Dots paper and fussy cut that out.

For the background I used Halloween papers and ephemera. I distressed and tore edges and inserted other distressed papers behind the torn areas. I stamped the sentiment from Toil and Trouble onto tan papers, distressed the edges, die cut it using a Tim Holtz die and added a little orange color. To complete the card, I filled in the buttons on the doll with metallic pens, added sequins, black mesh, corrugated paper, and black twine. 


Spooky enough for you? Didn’t want to get too dark on a card as I know not everyone enjoys this holiday or the fear factor.

Hope you have a good holiday weekend! Happy crafting till next time! (If interested in getting this spooky card, PM me!)

Friday, October 22, 2021

Fussy Cutting With Mintay Papers

 While cleaning up craft supplies, ran across this beautiful 6x6 Mintay Papers paper pad, called Woodland, I picked up a year or 2 ago. Their papers are so delicious in detail! I also recently watched a YouTube technique video featuring similar Ciao Bella papers, another one of my favorites. Not in English, but I experimented with measurements after watching this fun lovely video! My version can’t compare, but I think my just turning 3 years old grandson won’t mind the imperfections! I decided to share it in case I could inspire others.

I found a coordinating paper I could use for the accordion folds that make up the frame of the shadowbox style card. I knew I didn’t need to fit a normal card envelope as it would be too thick, so I was free to pick and choose the size I wanted. I picked Kraft card stock for the base and used my Scor-pal to create about a 3/4” back. I started by folding the paper with 1/4” folds. I’d say for this first experiment I used about 6 folds. I cut 2 about 5 1/2” strips. I did this again for the top and bottom of the frame, this time, I believe the size was more like 4 1/2” size. I then carefully meshed the ends of a short strip and a long strip together. Continuing to gently nudge then tightly together, then gluing the top and bottom of both sides. (Again, the talented artist in the video was much better than I at this, but I tried hard… here’s the video… https://youtu.be/MXVFb3ZYa9w). I did this same process on all 4 corners.

Once completed, I adhered it to the paper I used as the bottom layer. I then added a top layer using paper from the same pack and made sure I created a mitered corner look. I adhered it to the card base and added papers to all sides except the back.I then started fussy cutting! My little guy is getting into “qurrel” (squirrels) and “bur” (birds), etc! So I wanted to capture as much wildlife as I could. Basically, you use the folds in the accordion frame to create different elevated heights of the cutouts.

The only stamp I used was from a Unity stamp set for the cover. I ended up spritzing everything with white paint and Perfect Pearls. I also sprayed a couple fake flowers to match the colors in the kit so I could tuck them in as well. To complete the storybook, I added ribbon, a metal leaf and Nuvo drops.


Must admit, this was a very fun experiment and for a first try, it didn’t turn out too bad. In reality, ephemera pack cutouts or cutouts from a 12x12 collection pack would have made larger more visible images. But I still had a heck of a lot of fun putting this together. I had been considering using stamps to create the images to insert, but that’s a much more complicated effort, and then you have other considerations…such as, finding coordinating stamp sets with similar sized images, styles and perspective. 

Hope you enjoy this idea and give it a try! 

Thanks for stopping by! Happy crafting, till next time!

Saturday, October 2, 2021

Friends of Unity October Blog Hop

 Hey there… time for another Friends of Unity Blog Hop! This month is all about technique!

Before I start, I wanted to congratulate Jan Vint on being my giveaway winner from last month’s hop. Congrats! Please PM me, Jan, with your address to claim your prize and I’ll send out your goodies as soon as I’m able to! Reminder, my friends and I regularly give out new Unity goodies from our own stash. To be eligible, all you need to do is enter a comment on each blog! 

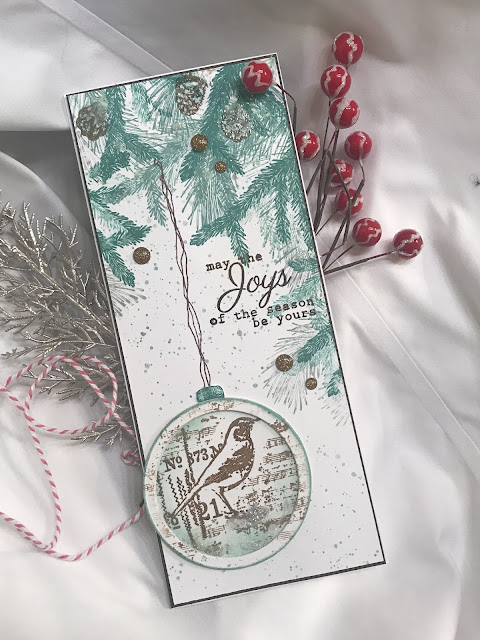
For this exercise, I created 2 different Christmas cards… yeah, I know, I’m either too early or too late. These are my first for 2021! Anyway, for the first card, I unapologetically plagiarized a card from one of my favorite crafters, Tracy Evans (see Youtube video https://youtu.be/MsG_gkX-u2g). I can listen to her voice all day long. Anyway, she reminded me of one of the classic techniques, second generation stamping. In my case, I used branches from the Beauty of Life kit and oxide inks. She also used the cool technique of using circle dies to create Christmas ornaments and a frame. I decided to put a bird on my ornament as well and used the image from an old KOTM, Love the Little Things. I also used a music script from another kit to add further embellishment to the ornament and frame. I had received an ornament topper stamp from Unity to pair with their pattern stamps. I stamped that out to put at top of ornament. I also drew lines in. I first made a simpler version of the card, then changed it up by hand drawing berries in and adding color to the bird. You can let me know which you like better. I may make more of these. To complete the card, I backed with brown paper and added sprinkles and crystals.

Here’s the original:

Here’s the modified version:


For the second card, I used different favorite technique I picked up from Gina K, another talented lady. I used the September Kit of the Month, Looking Forward for this card! Ever since I saw this technique demoed bu Gina, I seem to make a holiday card every year using it. It’s quite simple - first start by white embossing the image and sentiment. Then using 3 coordinating inks, add color, using a blending tool, to the image, starting at the outside edge with the lightest color and moving toward the center with the darkest color. I them went back and added more to the leaves and the berries using a paintbrush. This time I used red to pink colors. This creates a very soft look and is easy to do. To complete the card, I backed the panel with a soft green glitter paper and a patterned paper, and added twine and crystals.

Hope you enjoy trying these “borrowed” techniques! I really cannot do either of them the justice they deserve! Remember to leave a comment! Now on to some fabulous cards from my crafty friends! You should have come to my blog from:

Dawn’s Blog

To continue, check out:

Alaine’s Blog

To start at the beginning, visit:

Crystal’s Blog