Tuesday, December 31, 2019

Honey Bee Winter Anemone Card

Into painting florals lately, so I pulled out Honey Bee’s Winter Anemone stamp sets and die cuts thinking it might go with this time of year. I stamped the main floral image, a flower and 2 leaves using Inkon3’s Fadeout No Line Coloring Detail ink onto a piece of Arches Cold Pressed Watercolor paper. I took a cheaper watercolor paper and sprayed 2 green Tattered Angels Glimmer Mists on it, thinking perhaps I’d make my own background. I let that dry while I watercolored the anemones. I had pulled up images of anemones and found a white one I’d try to emulate.

After lightly watercoloring the images, I pulled out my Prismacolor pencils and some pens to provide a little more definition. I left the image much less defined than I usually do. I’m interested in any reaction, including suggestions on how to color stamped white images. I took the spray painted sheet and used a stencil and spread Nuvo Embellishment Mousse Mother of Pearl lavishly over the paper. The spray painted sheet still turned too green, so I added blue watercolor over the top. The design, while very pretty competed too much with the florals, so I ended up only using it to back the sentiment.

I pulled together an A6 size card with a magazine paper backing the image (what can I say... I love any kind of patterned paper), and a white embossed sentiment from Honey Bee’s Everything Wonderful Kit. I left it at that as the florals are busy!


Well, enough for today, ... Happy New Year everyone! Wishing you all the best and a great crafting (and otherwise) year ahead!

December Artist Trading Cards

Had fun this month with some mixed media and collage cards. For the first set, I used some 4x6 file folders from a set called Canvas Corps Farmhouse Christmas. I started by cutting up and collaging on images from the folders onto ATC sized paper and when possible adding verbiage from the image. I used the plaid card pieces as filler to fully cover the ATC. I then used my Gansai Tambi red watercolor to add a little color to the image. I then antiqued the background by applying a water downed stain and lifting it off with paper towels. I went around the edges with Barn Door Oxide ink. I stamped the girl image from Unity’s Be Very Merry 9/19 SMAK kit onto scrap paper, added color to her cheeks and hat and fussy cut her out. I took Pine Needles Oxide ink and Unity’s Holly All Around Stamp and after covering some scrap Kraft paper with holly, stamped the girl image again all over it. I then fussy cut out the coat part and attached it to the girl. I stamped the sentiment from Unity’s Tags, Glorious Tags Kit onto red paper and cut that up. Finally, to complete the ATCS’s, I added red crystals to the coat and ribbon.


Had even more fun with the second ATC! I started by layering patterned Christmas paper and ephemera over mixed media paper using gel medium. I then went over everything with gesso. I stamped all over the paper with green and brown Stazon inks using a Unity script stamp and another stamp from the tags kit above. I then mixed 2 Art Anthology painted together to get the green color I wanted and used a palette knife to layer them over the paper. I then applied white gesso again using the same technique to ensure the shiny glimmers of green would show through. After drying, I cut the paper into ATCS. I then stamped and embossed, using a green Zinc powder, the forest image from Unity’s Winter Wild 10/17 SMAK KIT. I darkened one side of the trees using charcoal pencil and a black Derwent Inktense pencil. I used a glue pen and added glitter to the other side of the trees. I distressed the edges of the cards with a light stain. I then stamped the deer and white embossed the sentiment from the All Kinds of Holiday Love 9/19 SMAK kit onto Kraft paper and cut them out. I added white string and called this one done.


Must admit, ATCs offer an excellent opportunity to just play! Luckily, the group I exchange with play just as much, have fun doing so and are very supportive. Well, till next time, happy crafting.


Sunday, December 29, 2019

Penny Black Berries Delight Card

Early this morning, for a complete change, I decided I wanted to paint a quick floral card. My eyes just happened upon the 2017 Penny Black Kit, called Berries Delight, that I had used a sentiment from on yesterday’s card.


I started by stamping the small vase image on a paper I could use as a mask and fussy cut it out. I then stamped it on watercolor paper using InkOn 3 Fadeout Noline ink. I masked that area and stamped the spray “behind” the first image. I then watercolored the image using my Schmincke watercolors. I used a loose style of watercoloring keeping to a yellow/green/brown palette... a big needed change from all the Christmas cards colors and larger floral images. Once done, I lightly spattered yellow/gold and green paints on the image. Pulling out my Perfect Pearls, I added small gold spatters. Finally, I added Dylusions white spatters.


When all the paint was dry, I stamped and clear embossed the sentiment using Versafine Clair Pinecone ink. I die cut the watercolor paper and found a great matching patterned paper from the My Mind’s Eye Wander pad (came in a Simon Says Stamp! year end mystery craft box). I never would have picked this pad because of the images, but the colors are great! I used the leftover patterned scraps inside the card. To complete the card, I added sparkly crystal dots.


Thanks for stopping by! Hope you enjoyed this change as much as I did! Remember, if you are interested in following me, there are 2 ways: add your email address or click follow! Have a great day and, till next time, happy crafting!

Saturday, December 28, 2019

Heart to Heart Background Card

Fell in love with a new background stamp from Simon Says Stamp! (SSS), called Heart to Heart. Figured this was a good opportunity to test out my new Altenew’s 36 Pan Watercolor Set.

I started by stamping the image on Arches Hot Pressed Watercolor paper using Worn Lipstick oxide ink. After being inspired by a Pinterest post, I decided to try spattering Masking Fluid all over the paper to create a paint spattered look. Masking fluid is watercolor resistant; once your painting is dry you can lightly rub it off leaving unpainted areas. The only downside is you need to complete the painting project within about 24 hours to avoid issues with the paper. Also, you either need to use a brush you don’t care about or drag your brush over a wetted bar of soap to cover the bristles with soap making it easy to remove the rubbery like substance (once done applying the masking fluid). The brush should be cleaned immediately when done and the fluid left on the paper needs to be dry before starting to paint.


Once done, I started painting using 3 reds to paint the hearts, adding a wash and using a paper towel to lighten areas, lifting off paint. Again, I painted non adjacent hearts with one color and then let that dry before applying the next color over more non adjacent hearts. At this point, you “glaze”, i.e. paint, over unpainted and dry painted areas. Finally, I decided to add a 4th color, a light gray. Once the painting was done, I used colored pens to delineate the layering of hearts on top of each other. I used a metallic Brea Reese silver brush to fill in the empty space. I added a watered down layer of silver metallic ink to the gray hearts... just darkened them a little, not sure if worth it.


To add a little more depth to the painting, I pulled out a Winsor and Newton White Gouache tube (opaque paint) and added subtle white highlights with paint and water. I then removed the masking fluid and finished painting by darkening the edges of the hearts, adding some shadows and finally adding a Perfect Pearls Pewter spatter.

I decided to use an A6 card base and backed the die cut image with silver paper. The SSS die set, called Small Heart Doily, seemed a perfect complement to emboss a simple sentiment on. I found card stock scraps in pink and light silver glitter that I used to create the heart doily and embellishments. Finally, I finished the card with matching Pretty Pink Posh sequins.


The creation of this card didn’t flow easily, but hopefully, the end product doesn’t reflect that too much! As usual, I did enjoy painting... always a calming process. Let me know if you have questions. Thanks for stopping by and happy crafting!


Thursday, December 19, 2019

Joy! Joy! Card

Today, I wanted to try my new Nuvo Mica Mist Spray, in  Beryl Swirl, that I picked up recently. And I also wanted to try out Brutus Monroe’s Falling Snow Glitter Glaze. So, I grabbed a piece of watercolor paper and saturated it with the spray. It’s a very light color so to get good coverage I had to spray multiple times, drying in between. I grabbed a new Simon Says Stamp stencil, Mod Trees and the paste, taped down the paper and went to town. I was perplexed what to do with it after it was done. So, I turned to some of my crafty friends for suggestions and that spurred me on to pull out Unity’s Joy! Joy! Stamp.

M

I grabbed a cheap watercolor paper and stamped the images using InkOn 3 FadeOut Noline Coloring Detail ink. I watercolored the images loosely and used light and dark gray pens to provide a little definition. I also added Art C Clear Glitter ink to the white areas. I fussy cut the ornaments out and stamped and fussy cut the sentiment using black Versamark ink.


I found the perfect paper to back everything in the My Mind’s Eye Comfort and Joy pad. I pulled the card together with black paper backing and white ribbon.


I ended up loving this monochromatic look! What do you think? Thanks for stopping by and till next time, happy crafting!

Altenew Starry Night Card

Created another Christmas card using Altenew’s Starry Night Kit and a retired Wild Rose Studio Painted Poinsettias paper (I do know where to get a pack if interested). This stamp was a little brain challenge for me, and being stubborn, I refused to look at how others and Altenew recommend it’s use.


I started by placing watercolor paper in the corner of my Misti to make sure I could reposition the paper back into the Misti. I clear embossed the stars and dots of the tree. I used a Picket Fence Studios blender brush to add Lucky Clover, Pine Needle and Mowed Lawn oxides to the paper. After gently wiping a baby wipe over the embossed areas, I dried the paper. Being uncertain about how dry the paper was, I clear embossed again. Finally, I embossed the dots and stars using a white crystal powder. I then die cut out the tree.

I picked a paper I thought would complement the image and die cut it. I found a scrap colored paper to match and die cut that. I stamped the sentiments in Festive Berries and Pine Needle inks and embossed them with a clear sparkly powder. I fussy cut them out and added a little complementary color to the edges. I white embossed a star using the same colored paper and die cut that.

To pull the A6 card together, I used foam tape on the tree and star. I added flexible glossy red stars to the tree, Stickles dots to the patterned paper, a ribbon, and, finally, sparkly Washi tape to the top and bottom of the card.


So, all in all, it’s a sparkly, non-traditional (in many ways - colors, style, sentiment) and, I think, fun card. Now, I’ll have to go see what I really should have done and what the experts did!

Thanks for stopping by! Merry Christmas to you and yours!

Wednesday, December 18, 2019

SSS Snowflake Background New Year’s Card

What do you do when you missed the Christmas deadline? New Year’s cards! So, I recently picked up this lovely SSS stamp from a couple years ago after seeing some beautiful designs with it! Outline Snowflakes is such a gorgeous stamp! I paired it with Primary Elements Pigment, Stargazer and Derwent Inktense pencils.

To start, I embossed the image on watercolor paper using Brutus Monroe’s White Alabaster powder. I then taped the paper down and spritzed it with water. I then sprinkled the primary elements powder all over and spritzed it again. I then dried the paper still taped down. I sprinkled more powder in areas lacking color and then spritzed it again. After drying, I spritzed over areas with a heavy pigment buildup again just to give a little more movement to the color and to break down the clusters. Once dried completely... front and back (having removed the tape), I brought out my watercolor pencils. I found 2 pencils matching the colors in the pigment and proceeded to add color to areas to bring definition to the edges of the snowflakes. I did this by wetting my brush, picking up color off the pencil tip and then brushing it on the paper. I was careful not to go overboard on this because I still wanted the white to show through.


I stamped and embossed sentiments from SSS Holiday Cheer and Inside Christmas Greetings using the Alabaster powder and a navy powder onto colored card stock. I die-cut and backed the image with one of the blue colored papers. Because I really wanted to show off this beautiful design, I used an A6 card from ParkLane. Finally, I added white string and assorted crystals in clear, light blue and silver.


Hope you enjoyed and liked this card! It was very fun to make and I’m pretty pleased with how it turned out! Till next time, happy crafting!

PS if you have not already provided your email address or clicked follow, I encourage you to do so! And a special thank you to those already following me! ❤️

Monday, December 16, 2019

Garden Party Challenge - Lesia Zgharda and Unity

Been itching to try my hand at the latest Instagram Garden Party Challenge #12. I also wanted to try stamping my new Lesia Zgharda Tree Stamp, again, that I actually had shipped from Ukraine. Just love her unique coloring skills and stamps! The sentiments I used on both these cards were from this same line. Here’s my 1st attempt with this stamp!


I like it but it’s kinda wonky! I stamped the image in green archival ink and watercolored the branches using Gansai Tambi watercolors. I used an embossing pen and a Stampendous Shabby Pink powder that has gold, white and pink flecks in it and a retired patterned paper set.


For the Garden Party Challenge, I began by stamping the tree in Antique Linen Oxide ink. I then watercolored the branches this time using all the paints in the Kuretake Starry Colors set. I then spattered the darkest and lightest paints all over. Next, I masked off the tree and pulled out Unity’s Worn Music Kit, which matched perfectly in delicacy of stamp. I embossed parts of the stamp with a Sara Signature Glistening silver embossing powder and other parts just I just stamped with plain Pumice Stone Oxide ink. Next I added a little definition to the tree with light and dark gray pens.


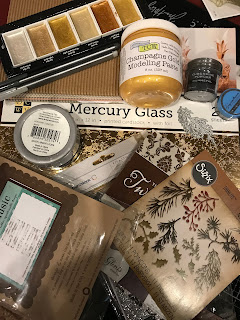
I pulled out a corrugated paper pad and tore up a gray piece. I smeared TCW Champagne Gold paste over the top and added Brea Rease Metallic Silver paste on the sides. I then decided I wanted to fussy cut one side of the tree paper and layer the corrugated paper behind it. I added Love from Lizi silver strips on each vertical edge.


To put this together I first selected glittery card stock and cut a base layer using DCWV Mercury Glass paper. I made sure both pieces of the tree card were cut to size. I then glued on the left side, then the corrugated paper, and then used glue and foam strips to add the tree part. I used a Tim Holtz Holiday Greens die on a dark gray DCWV Twinkle Glints paper (sparkly) and fussy cut strips to put behind the tree. Finally, I embossed the sentiment on acetate using Gunmetal embossing powder and added gold sparkly dots.


I like how this one turned out better! Well, enough playing for today... happy crafting till next time!

PS I think at least 8 products I used here were from Tuesday Morning! What a deal!

Sunday, December 15, 2019

Growing in Unity Blog Hop

To wrap up my Growing In Unity (GIU) week, I’m joining in with the talented September and October Growing in Unity crafters to showcase one final card! And, of course, for me, it just had to be a Christmas card! Be sure to leave a comment before you go!


This time, I used the 9/19 KOTM, All Kinds of Holiday Love Kit. Inspired by the paper in the background (from a Love from Lizi Kit), I decided to try stamping the image on a dark blue coordinating paper. I used Gina K Designs white embossing powder. I then added a little white and gold watercolor using my Gansai Tambi watercolor set. I die cut the image, and backed it with another die cut of a paler shade of blue. I cut another strip of patterned paper for interest. I stamped the sentiment from the World of Christmas kit on more blue paper and embossed it with a Zinc gold embossing powder. To complete the card, I added a paper strip, a bow, gold crystals, and a Jen Hadfield wood chip that I had added colored chalk marker to and called the card done.


This is my version of a more masculine card. Thanks for stopping by! Don’t forget to leave a comment for a chance at one of 2 prize packs! Now on to the hop:

Tammy Huber Murphy
You are  here >>> Joyce Verdon
Shanna Slater
Edelmira Rivera
Sharon Duff
Tried Julie Berg
Annie Sterner
Renee Moran


Saturday, December 7, 2019

Power Poppy Amaryllis

I love this beautiful bulb flower, if only I could grow it. A coworker of mine used to grow a dozen of these beauties on her office window ledge. I’d just stare in envy! Have tried in the past to give my husband one, to no avail (I finally had to put it down). So, instead I’m giving him a watercolored one!

Found this stamp, Amaryllis Bliss, by Power Poppy on their website on sale and had to have it. Loved painting it so much, I just picked up a few more of their cute sets on sale! They also have digital versions of their stamps! 

I stamped the large image on Arches watercolor paper with Distress Antique Linen ink. I then stamped the branches 3 times around the image. I used my Schmincke watercolors to paint it. I also used a brown and a green pen to add definition to the edges. I used a gold pen and gold Perfect Pearls on the stamens. I spattered some paint around, added a little gold Perfect Pearls spatter and some gold pen dots.

I found a paper, from Craft Smith’s Say Freeze pad, I thought would complement the colors and a DCWV distressed gold paper I found in Tuesday Morning to dress up the card along with black Gina K paper. I embossed the sentiment from the kit using a Wow gold powder. I used a dark red 5x7 card base for this one. I finally added some dark red pearl dots and a black ribbon to complete the card.


Well, he finally gets his flower and I can check that one off the list. Till next time, happy crafting!

PS if you haven’t hopped along with the Friends of Unity, click back to my last post for a chance to win a member giveaway, or a big prize package from Unity!

Friends of Unity December Blog Hop

Wow, it’s been two years, since the Friends of Unity group was formed! To celebrate our anniversary, we have some very special guests blog hopping with us and one of the original members is joining in on the fun! Our theme this month is so fittingly, All is Calm!


This month, besides our usual member giveaways (PS I will be doing a giveaway this month), Angela Ryan-Magnuson/Unity Stamp Company have generously donated two grand prizes to be randomly awarded! As always, to be eligible for any of these, please leave comments on every post in the hop!


This month, besides using some specific Unity stamps, I also dug out beautiful paper I had picked up in an after Christmas sale from My Mind’s Eye, called Sugar Plum. In some cases, their images were complemented by stamps, and, in others, their pretty soft colors were inspiration. The Unity stamps used were: A Joyous SeasonYour Season, November 2019 SMAK and Warmth of Christmas. Another common element I used and became very attached to is Brutus Monroe’s Vintage Sparkle Embossing Powder. It softens the colors it is used on so beautifully, which often was Distress Oxides.

So, yes, I had a field day/week creating these very different cards and quick tags! Hope you enjoy the variety and be sure to let me know your favorite! Enjoy browsing!


Reminder, be sure to leave a comment before moving on for a chance at a giveaway! Again, we are not formally sponsored by Unity, but, we love the company and variety and quality of stamps they offer so much, we love showcasing them monthly. Member giveaways come from our own stash.

On to the hop:
Crystal
Eileen
You are here... Joyce
Dawn B
Alaine
Kim
Amber
Jeanie
Dawn F
Robyn
Donna
Shannon
Jessica