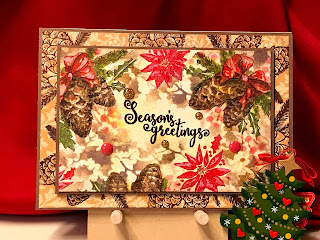
Had to do it! Inspired by Christmas in the Village paper, I created a Christmas border similar in colors and elements to the paper. I used the same Unity kit as last time, KOTM 9/15, and Tim Holtz holiday stencils. I also used primarily Distress inks, gold pen, red Art C wax paste, Yellow Prima Color Bloom spray, Brea Reese gold paste and a green Primary Element pigment powder.
To begin, I stamped 2 yellow Distress inks onto my Tim Holtz platform and sprayed both water and the Prima mist on top and placed watercolor paper onto the mat to pick up the yellow color. I did this till I had the color I wanted. I first stamped and embossed the sentiment using Gina K brown ink. Then I stamped the pine cone image in 3 spots using coffee archival ink and began painting it. Using stencils, in between painting color layers, I took the red paste and added some poinsettias. I took the gold paste, added green Primary Elements pigment to it and added leaves next to the pine cones. Once I finished painting, I took more Distress inks and a brush and added vines, leaves and berries to the paper. I ended up using all 3 stencils. I took Vintage Photo to add a little color to the edges. I backed this with brown paper.
I then found a patterned paper that complemented the colors and stamped the same pine cone image around the edges using the darker Gina K brown ink. I cut to size and added brown paper behind that sheet. To create the card, I used foam tape behind the new composition and added red and good enamel dots.
Here’s a pic showing original paper and last card.
I had a lot of fun creating this, and as usual, didn’t practice creating this, so “it is as it is”, an original! Hope you like it! Till next time, happy crafting!


So vintage looking!! Love that background you created!
ReplyDeleteSandee, thank you! One of my passions is trying to capture the essence of beautiful paper with my own stamp stash and style.
Delete