Wednesday, November 20, 2024

OMG… last one - Holiday and Winter Decor Tree

 So, I started something last year when crafting with one of my close besties that visited me from my NY home town across the country! We made Fall/Halloween decor pieces using unfinished wooden pumpkins. Since they were freestanding you just turn them around for the side you want to decorate with. 

I sent my creation home with her to my other bestie. I did love how it turned out. Well, my other friend requested I make something similar with a Christmas/Winter theme for her neighbor. Welp… that started a whole other crafting frenzy pulling out ephemera, chipboards, papers, pastes, fussy cutting scissors, sprinkles, etc… I went to Michael’s and picked up free standing 7.25” by 1” wooden trees. It’s taken me over a week to pull them all together (I decided I was having so much fun, I ended up creating 4 of them)! Now, with sore fingers (from hot glue gun burns and a lot of cutting, stamping, embossing, stenciling, watercoloring… action), I present my latest crafting efforts!

So, this is Tree 4…. Finally! I’m exhausted just writing this up..let alone fussing for hours and hours on these dang trees 😳🤨🤣  (See last 3 blogs for other trees).

So… more Stamperia paper… love that brand! See the deer in the background paper… decided to make this on a whole deer scene! I used a Stampendous swirl stamp + silver embossing powder on the paper. I added white spatters all over and a silver pen to the edge. I used the same Poppystamp birch tree die and another birch tree die I picked up in a craft mag on Kraft and white papers. I added paper strips and ribbon at the bottom and silver sticky strips on the base. I used an Impression Obsession deer die on Kraft paper. I added shading to the deer with pencils and pens. I fussy cut out the birds and squirrels. To complete this side, I silver embossed the Unity sentiment and added more swirls on coordinating card stock. I used a random frame I had and added silver thread behind it. Finally, I added a small sentiment strip at the bottom and called this one done!


So, I used Stamperia’s Patchwork Christmas collection on this one! First after cutting out the tree background paper, I decoupaged the rice paper building scene into it. I ended up embellishing the scene a bit by brightening up sone of the colors with pencils. I used the Stamperia stencil again and Altenew white paste to add snow effects. I also used a Posca pen on it. I added chipboard elements from the collection and fussy cut out a second tree. At the bottom, above the Noel is a strip of Washi tape that helped define the base. This might be my fav Christmas tree!


Okay, now - I can rest a bit! Let me know what you think of these trees… which is your fav and what do u  think of the whole concept? Thanks for stopping by… hope you can put your crafty hat on for the holidays!

PS I do have 1 more tree to do in a different size… hmmm… we’ll see if I get to it this year!

Holiday and Winter Decor - Tree 3

 So, I started something last year when crafting with one of my close besties that visited me from my NY home town across the country! We made Fall/Halloween decor pieces using unfinished wooden pumpkins. Since they were freestanding you just turn them around for the side you want to decorate with. 

I sent my creation home with her to my other bestie. I did love how it turned out. Well, my other friend requested I make something similar with a Christmas/Winter theme for her neighbor. Welp… that started a whole other crafting frenzy pulling out ephemera, chipboards, papers, pastes, fussy cutting scissors, sprinkles, etc… I went to Michael’s and picked up free standing 7.25” by 1” wooden trees. It’s taken me over a week to pull them all together (I decided I was having so much fun, I ended up creating 4 of them)! Now, with sore fingers (from hot glue gun burns and a lot of cutting, stamping, embossing, stenciling, watercoloring… action), I present my latest crafting efforts!

So, this is Tree 3 (I’ll be posting 4 blogs, one for each tree).

The winter side was made with a pretty Simple Stories vintage winter collection (papers and ephemera). After cutting out the tree background, I used a glistening white/pink embossing powder on the edges. I then added a metallic pen to the letters and added a light metallic pink Prima watercolor over the letters and a pencil for shadowing to make the sentiment stand out. I used the same one on the ephemera at the top. I layered a bunch of the ephemera, and added them… some on foam tape. I also added die cut pine sprigs. To complete this one, I added color and clear heat embossed a chipboard snowflake and a coordinating ribbon and called it done.


The Christmas side of this tree was primarily made using a Ciao Bella collection with fussy cut elements out of it. I cut the cup and coffee pot image apart and layered them. I also used some Studio Light ephemera at the top. I did “borrow” a coordinating floral chipboard from another vendor. For further embellishments, I used a gingerbread chipboard that I gold embossed and a Dec 25 chipboard that I added gold metallic pen to. I used a Unity sentiment that I white embossed onto the chalkboard looking heart from the paper collection and backed that with a diecut gold heart. I found a berries looking chipboard that I used opaque Gansai Tambi watercolors on to embellish the berries on the heart. Finally, to complete this one, I added red and white striped twine and gold, sticky strips at the bottom of the tree.


That’s it for the third one, and now, finally on to the next and last tree post!

Holiday and Winter Decor - Tree 2

  So, I started something last year when crafting with one of my close besties that visited me from my NY home town across the country! We made Fall/Halloween decor pieces using unfinished wooden pumpkins. Since they were freestanding you just turn them around for the side you want to decorate with. 

I sent my creation home with her to my other bestie. I did love how it turned out. Well, my other friend requested I make something similar with a Christmas/Winter theme for her neighbor. Welp… that started a whole other crafting frenzy pulling out ephemera, chipboards, papers, pastes, fussy cutting scissors, sprinkles, etc… I went to Michael’s and picked up free standing 7.25” by 1” wooden trees. It’s taken me over a week to pull them all together (I decided I was having so much fun, I ended up creating 4 of them)! Now, with sore fingers (from hot glue gun burns and a lot of cutting, stamping, embossing, stenciling, watercoloring… action), I present my latest crafting efforts!

So, this is Tree 2 (I’ll be posting 4 blogs, one for each tree).

I used Stamperia paper again on this one. I ended up fussy cutting a bird out. I used a Stamperia stencil to add glistening snow effects plus spatter and distressed the paper edges. I actually used a couple stamps on this one for branches and the deer in the bottom left side that I added shadows to (in my compulsory fashion). To create the foliage, I used a hodge podge of 

- textured paper leaves that I gilded

- a watercolored Poppystamp leaf/branch image at the top

- die cut coffee stained paper leaves and sprigs

- and finally, fussy cut acorns and leaves.

I used a Poppystamps Birch Tree die and shaded the image. I added Mica snow effects using around using an acrylic gel. Finally, I added the Simon Says die cut Winter sentiment made with sparkly paper. I think this is my fav winter scene.


Now, the Christmas side was made with a combination of vendors…Tim Holtz window frame, PIA (pain in the a**) wreath die, and ephemera), and Simple Stories and AB studio holiday papers. I distressed the paper edges. The rest is pretty self explanatory! Busy busy busy! I did use an acetate behind the window.


So, here’s the final look on this one!


Okay, that’s a wrap on this one…on to the next one!

Holiday and Winter Decor - Tree 1

 So, I started something last year when crafting with one of my close besties that visited me from my NY home town across the country! We made Fall/Halloween decor pieces using unfinished wooden pumpkins. Since they were freestanding you just turn them around for the side you want to decorate with. 

I sent my creation home with her to my other bestie. I did love how it turned out. Well, my other friend requested I make something similar with a Christmas/Winter theme for her neighbor. Welp… that started a whole other crafting frenzy pulling out ephemera, chipboards, papers, pastes, fussy cutting scissors, sprinkles, etc… I went to Michael’s and picked up free standing 7.25” by 1” wooden trees. It’s taken me over a week to pull them all together (I decided I was having so much fun, I ended up creating 4 of them)! Now, with sore fingers (from hot glue gun burns and a lot of cutting, stamping, embossing, stenciling, watercoloring… action), I present my latest crafting efforts!

So, this is Tree 1 (I’ll be posting 4 blogs, one for each tree).

This side is supposed to be the “winter” side. The papers and patterned ephemera are a combo of Stamperia chipboard pieces and Ciao Bella papers. What can I say..they went together well! I created 2 layers of the papers and distressed the edges. With all of the trees, to cut down the papers, I just traced around the wooden trees. I added a few plain chipboards… the darker ones have glitter embossing powder on them. I stenciled on some paste for snow and added glistening glitter to the paste. I also used an embossing pen and added glistening embossing powder over the snowy edges of the scenes. To finish off, I added pearls, lace and an icy sentiment! 


For the Christmas side, I pulled out an old Graphic 45 paper pad. I used the darker papers for the tree base and behind embellished chipboard frame. I ended up embellishing both of those with sparkly gold sticky strips. paired the papers. After cutting the base paper, I used a Sizzix poinsettia die on the bottom corner. I decided I wanted to add a bird on the center as the paper has a bird in it. I took a plain chipboard bird and used my Gansai Tambi opaque watercolors to color the chipboard. I added a sparkly pen to create the look of feathers. I die cut out gold glitter leaves and sprigs that I later used gold paste on. I added color and gilding to the bird frame. To complete the top, I added enamel dots, gold string and a Memory Box Joy die cut sentiment. For the bottom, I used the Paper Rose poinsettia die set. To complete this side, I added a ton of crystals and a black embossed sentiment strip.


To complete all the trees, I glue gunned the sides with ribbons or burlap! So, the final look of this one is here!


Now, onto the next tree post!

Tuesday, November 19, 2024

Yeah… I bought it!

 Okay, I gave in and bought the adorable Waffle Flower Postal Collage Bundle! I just couldn’t resist it, as I had bought (twice, by mistake ;-) I loved it so much ), this Scandi Christmas Stamp set from a Cardmaking and PaperCraft magazine! I had been planning to do my own version of a postal collage with it, but thus bundle is just amazing! Does all the work for you!


So, this was an experiment and I’m hoping to make more colorful and unique versions of this type card! Must admit this die could also be used with the tiny stamps/dies you can pick up from different vendors at Christmas time when they release their advent calendars! (Simon Says, Unity, Studio Light, Soellbinders…) And I have some of them I woul like to try as well!

So, with my first attempt I created a very subdued version of this type of card. I die cut a Simple Stories patterned paper from one of the Simple Vintage Christmas collections. I then used Aged Mahogany and Iced Spruce inks on the outline stencil. I then stamped using a dark brown archival ink. I used a platinum colored jelly roll to add details. I also (just cause I’m compulsive like this), embossed an Altenew heart stamp on the house image using Liquid Platinum powder. I then added coordinating colored pearl dots. For the background papers I used a foiled paper and a patterned paper from a Bo Bunny paper pad. Adds some detail and shine with the rose gold foil.


So, I’m thinking this is a more masculine holiday card! Can’t wait to create more of this type card using my varied tiny stamps! Thanks for stopping by! Till next time, happy crafting,

Friday, November 8, 2024

Stash Shopping - 6 Mixed Media Tags

 So, I did a thing… before I sent some crafty stuff to creative friends (in an effort to declutter).  I decided to create and include a little thank you card which devolved into a mixed media tag frenzy for me. I’ve been coming across a lot of very old stuff in my cleaning efforts, like…

 Old Tuesday Morning finds (from my Tuesday morning Shopping binges… you know…”wow, can’t believe these prices!”, “I’m sure I could find a use for that!”, cheap acrylic and mixed media mediums, or oh, my, retired Tim Holtz stuff!)

Or stuff picked up in mystery boxes from craft stores,

Or from mixed media craft subscription boxes!

 All resulting in a huge compelling urge to throw away, give away or use ASAP, this old stuff!

(And hey… got to make room for some new stuff!)

So, I started by getting out 6 tags, of which I have a ton of, and then proceeded to pull out red and dark green acrylic paints, white gesso, Vicki Boutin printed tissue paper, clear acetate images, clear sticky lace strips, white music paper, preprinted tags, and these 4x6 preprinted black and white cards which looked like seed packets with sentiments on them. Here’s a remnant of the 4x6 cards…


 So, I started by loosely painting and drying parts of the tag. I added white gesso covering over parts of the paint. I then took gel medium and added the Vick Boutin crosshatch and leaf stems tissue, and strips of music paper in the corner spots. I then added clear acetate Kaisercraft lace strips.

Next, I decided to watercolor the flower parts of the preprinted seed papers, thinking I could fussy cut them out and have them be the focal point of the tags. I used watercolor Graphite and Prismacolor watercolor pens to lightly add green and red colors to the flowers. After fussy cutting the flowers and some of the sentiments out, I then started arranging the flowers, picking out the right background for each flower. Then I played some more with each tag, adding randomly more clear acetate images, random Kraft sentiments I had on hand, chipboards, diecuts or stamping and adding more sentiments in spots. I added white and black spatters as needed. Then I added white acrylic paint and pen to little preprinted garden focused tags I thought could be added at the top… his copacetic was that? Here’s the results… each having a different feel and look! 


Here’s a more detailed look at these messy, busy, but hopefully fun to look at tags!


So, it felt great to be creative and artsy again… must admit my skills have eroded from lack of use. It also felt good using up bits and pieces of stuff from my stash. I ended up throwing out old dried up mixed media mediums, telling me I have to do another purge of paints, pastes and acylic mediums! 

What do you think… how’d they turn out, do you like these, have a fav? Interested in your thoughts! Thanks for stopping by!


Sunday, November 3, 2024

BYSHC Sketch 51 - 2 different takes!

 Tried a couple different styles this month with Sketch 51!


For both cards, I used ephemera and papers from Simple Stories Tis the Season collection. For the first card, I pulled out Unity’s Christmas/Over AgainMagical {Bliss and Wonder} and a retired stamp set, World of Christmas. I started by gold embossing the snowflakes and words on the background paper. I also added swirls using a Studio Light stencil. I then stamped and clear embossed the tag image in coordinating colors by blending the colors with multiple inks. I added watercolor to make the image stand out.  I then spattered it with metallic gold paint. I inked the edges of everything! After gold embossing the sentiment, I added the Unity freebie Yuletide paper, ribbons, ephemera, Crystal dots, and die cut foliage to complete the card! I know…it’s over the top, but I had fun creating it!


For the second card, I used papers and ephemera from the collection, ribbons, dots and a Unity sentiment from …Cherished Holly. Pretty easy to pull this one together! Love how this one turned out! Isn’t it amazing how 2 totally different cards, can be made from the same collection and sketch?


Thanks for stopping by… till next time, happy crafting!


Saturday, November 2, 2024

Friends of Unity November Blog Hop

 Wow… it’s November already! This year has just flown by for me! And… it’s time for another blog hop with a most time appropriate theme of… 


I had some fun with this one… some watercoloring, pretty papers and wonderful stamps! Before I start, wanted to remind you that my friends and I offer up every month some giveaways from our own personal stash. This month, I’ll be doing a giveaway and will announce the winner in next month’s blog. A winner will be randomly chosen from the all people who offer up a comment below… btw, constructive criticism is always welcome! So, be sure to offer up your feedback and stop back next month!

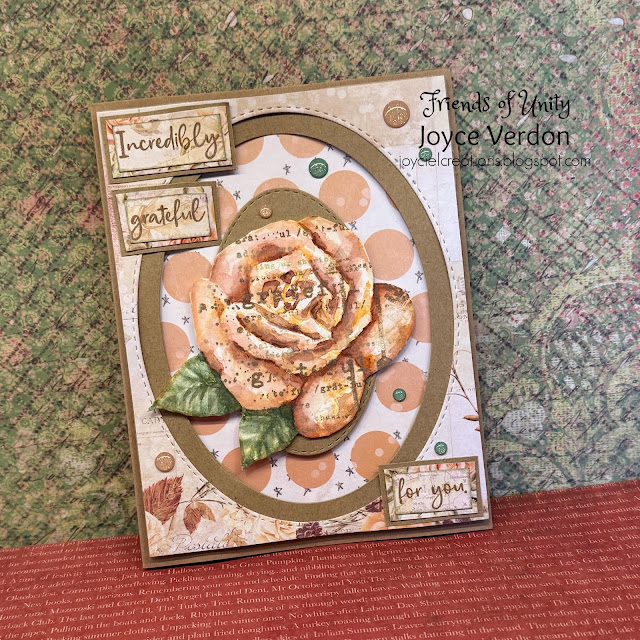
So, the first card I created was inspired by an old paper collection from Prima called Amber Moon. I stamped the image onto watercolor paper from a retired Unity Kit called Don’t Be Like the Rest of Them.


I then watercolored it matching up colors to the paper. Before fussy cutting it out, I stamped the super image from Grateful for All over the flower image. I then used oval dies to create a frame and used papers from the collection to pair with the Kraft paper. I stamped a sentiment from the Change and Direction membership kit from October 2022 added coordinating enamel dots and called it done. I like how different this one turned out.


For the second card, I pulled out another Prima pack called Pumpkin and Spice. I stamped the image from Anemone Greetings onto watercolor paper, again. I put a lot more time into watercoloring this one, again matching colors from the paper. I added white pen marks on the flowers and spattered all over with paint and watered down copper Perfect Pearls. I used some Unity frames to cut down all the papers. I ended up embossing an image from September’s 2023 membership kit called, Harvest Hues. Again, I added coordinating enamel dots to this one as well!

Must admit, it’s always good to have some gratitude cards on hand! Let me know what you think about these by commenting below …be sure to add your name so you can be included in the giveaway next month! Thanks for stopping by!

Now, on to the rest of the hop, you may have come here from 

Rachel’s blog

Or you can start from the beginning with

Crystal’s blog