Thursday, October 29, 2020

A SMAK Tag


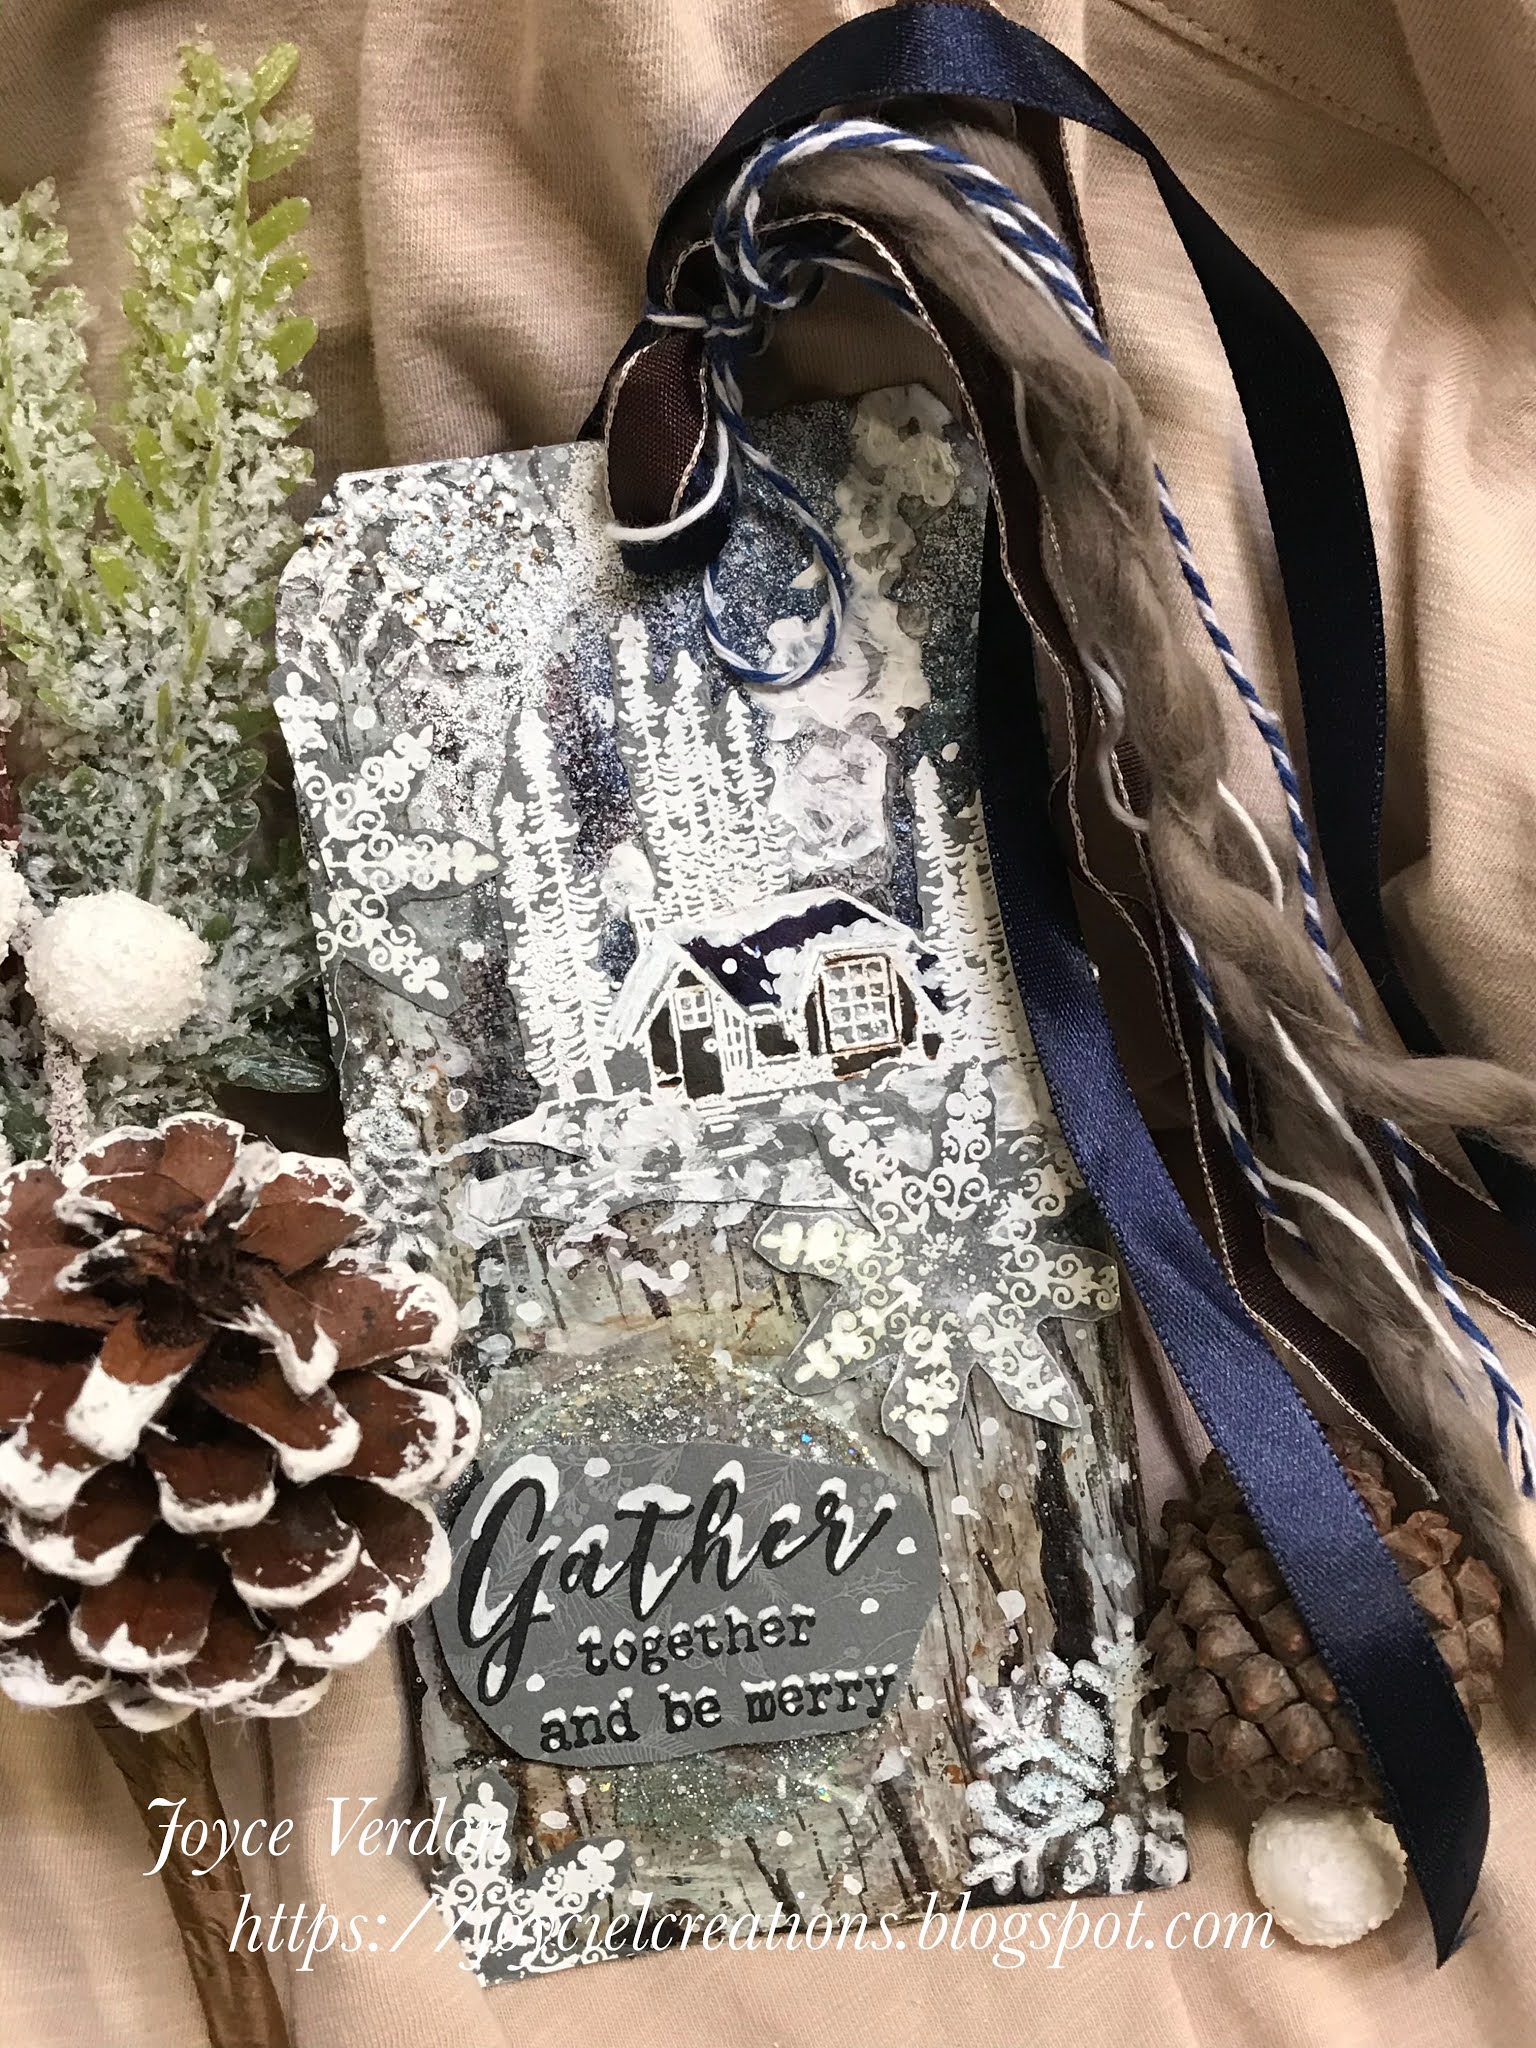
 Had some difficulties with this one, but I think it captures the mood I wanted! I started off just wanting to use the snowflakes and wood grain from October’s SMAK Kit, The Best Memories. Ended up using one snowflake, the wood grain and the sentiment and house from the All Kinds of Holiday Lov KOM 9/19 Kit!

So I started by spraying a paper with oxide sprays In Iced Spruce and Specked Egg. I then added with my finger, a stiff brush and some water, a brown acrylic. I then stamped the wood grain all over the paper. I pulled out a gray Freebie tag from Unity, and tore up and collaged the paper onto the tag. I then added some other cut up pieces of paper as well. Finally, I gessoed over the top of that and messed up of the inked wood grain. So I restamped those. Then I tried adding tree stamped images using a variety of inks and embossing powders and created the mess at the top right side. I then tried to emboss the detailed circle snowflake from this month’s kit and used a very sparkling, not fine enough embossing powder and created the circle mess at the bottom left.

I was ready to ditch the whole thing but I really loved the colors and the wood grain and the solid heft of the tag. So, I decided to capitalize on my messes. I pulled out the cabin and stamped and white embossed that on  patterned paper that matched the colors of the tag. I colored in the roof and sides with brush ink pens and added more snow with a white pen and fussy cut it out.

I then stamped the smallest snowflake on the same paper and fussy cut that out! Then I used 2 stencils, first to add snowflakes with one with a texture paste. I added a little sparkly embossing powder on top and heat set those. Then, I used a crackle stencil and tried to create smoke clouds from the chimney in the cabin.

Finally, I stamped the sentiment and added my own snowy look to the sentiment with a gel pen. I glued everything on, tried to make cabin blend in by extending snowy ground and added white dots all over. I finished off the tag with ribbons and called it good enough!


Well, I think I ended up creating a somewhat cohesive look from a mess! Let me know what you think! Now on to my next endeavor! Happy crafting till next time! 


Friday, October 23, 2020

Another Wreath Card using Unity’s 10/20 SMAK!

I coupled the wreath from Unity’s, The Best Memories kit with patterned paper from Prima’s pretty pack, Pumpkin And Spice to produce this card! I stamped the plain wreath circle using Versafine brown ink on a panel sheet from the kit. I then spattered Speckled Egg oxide ink onto the panel.

I decided to emboss flowers and leaves in coordinating colors to add to the wreath. I used a few different powders but I have to say I was very impressed with my new pink and blue Lindy’s Gang powders. They are so opaque... show up great on brown paper! I used a Rusty Hinge, a Wow Tangerine (which has a sparkle to it), and a Seth Apter Butter. I used an eyelash trim to circle the wreath before adhering the cut up leaves and flowers. I embossed the sentiment and added a flower on brown paper as well. After fussy cutting it, I used an embossing pen to add a frame around the sentiment. 

I backed the panel with another paper from the kit and added crystals to finish the card up.


I think this sentiment is so apropos now... the important reminder that, in these trying times, look for or even create those happy loving moments. Thanks for stopping by for this simple card!


Tuesday, October 20, 2020

October SMAK Tree Cards

Tried a couple different approaches with the lovely trees stamp from Unity’s October SMAK, The Best Memories. There are so many ways to use these stamps, especially for scrapbooking, I imagine! 

First, I used a sparkly green Nuvo Embossing powder and added watercolor mountains in the background to match the navy paper I was going to use for the base layer. I decided to try embossing one of the snowflakes in 3 spots across the 2 papers. This time I used a couple of embossing powders (Stampendous and Wow) to make sure they really showed up. To cover the gap, I had planned on using a gold paper from Brutus Monroe. I added green crystals, tiny snowflakes and fancy ribbon for embellishments. Since, I’ll be using this one for the holidays, I added the ‘For My Favorite’ sentiment at the bottom, using another Stampendous embossing powder.

I wasn’t satisfied with this card, so, this time, I started with watercolor paper. I stamped the trees again, this time using a green Zing powder (yes, I have an embossing powder problem ;-). I then taped all the sides with purple tape and loosely added blue and green watercolors to the background as clouds and ground. I pulled off the tape and added blue and green pen lines around the image. I found a Somerset Studio Artist paper in the new magazine that I used as a foundation. I also found a die cut blue paper scrap I could use. I tried adding white paint flecks to it, but it was too absorbent. So I ended up pulling out a BoBunny green paste and a Tim Holtz holiday stencil and added pine needles and holly leaves to it instead. I pulled the card together on green cardstock and added fancy ribbon.


There is so much more that could be done with these trees. I just love their size! Well, enough for now, till next time, happy crafting!

Saturday, October 17, 2020

Winter Moose Scene

I’m not sure why I felt the need to create this card... but it was calling me to do it! This card has tons of texture and I went a little crazy on it. I used patterned paper (Bo Bunny), gesso, Daler Rowney acrylic paints, Art Anthology (AA) media, various embossing powders (Seth Apter Baked Texture, Stampendous, and Wow), Prismacolor pencils, Gansai Tambi watercolors, and Archival Coffee and Stampin Up Taupe inks,

Starting with a 6x6 teal patterned paper (can see scroll detail peeking through in top left and bottom right corners), I white gessoed the paper. I then added with a spatula and my finger, at the bottom, AA Mermaid and, at the top, AA Cayman and white acrylic all over. When I was satisfied a had the beginning of a sky and hill, I embossed the fence from Unity’s beautiful SMAK kit, Winter Wild (10/17) I used a Stampendous Powder from a kit. I added white acrylic and Raw Sienna to build out the impression of a snowy fence and later added AA’s Walnut Sorbet (which has a slight sparkle to it). 


Next, I pulled out the trees from the kit and created a mask for the hill. I stamped and embossed twice, moving the stamp in between and using 2 different powders (a patina and a teal) for color and texture differentiation. I also added white acrylic on some for a snowy effect. 

I then turned to the left side of the picture and first added white and Raw Sienna painted lines. I then stamped and embossed the wheel tracks stamp from the kit using another embossing powder. Turned out okay... not great, and added more white paint and sienna. I decided to try to make a road into the hill and used both the AA paint and my watercolors.


I then stamped out the moose from the kit with Archival Coffee and used my pencils to add dimension to the image. I fussy cut it out and then realized I probably should have reversed the direction of the hill and fence as I didn’t want to cover up the fence. So, to salvage it, I decided to add a sentiment in the middle and ended up using a die. I pulled a stamp from Unity’s Winter Blessings kit and used the Taupe ink with it. Again, I backed it with a Bo Bunny paper scrap I had and created a second inner layer by diecutting an in between size and embossing the paper. I then attached the moose head to that.

After looking at it more... I decided to paint in my own fence and add the sentiment and moose on foam strips. I spattered the moose and background heavily with white paint. I cut the paper to fit an A6 sized Kraft card and called it done.


Let me know what you think... does the moose look wonky hanging out in the middle or okay? How do you think it turned out?

If nothing else, I had so much fun putting this one together! I absolutely think the Unity kits used are some of the best in their whole line of Christmas/winter themed kits! If you are not following me and enjoy my crafty efforts, please click on follow or add your email to keep updated! 

Well, hope you enjoyed my journey... till next time, happy crafting!


Friday, October 16, 2020

Unity’s October SMAK + Ciao Bella Paper

 Oh my, My October SMAK, The Best Memories finally came in! I was drawn to both wreaths but I ended up stamping out the smaller one using an old Stampin Up Taupe ink on scrap pale beige paper. To see what I could do with it, I pulled out Spectrum Noir Metallic Pens and started adding brown, gold, copper and silver inks to the petals. Liking the look, I then used the brown pen and a black pen to embellish the stems and leaves more.

Okay... Well, I ended up loving how it turned out! Now I had to figure out what to do with it. I recently picked up Ciao Bella’s Sound of Winter, and thought the colors were complementary. So I picked a snowy background paper out and stamped the smaller snowflake from the kit using Distress Weathered Wood and Wow Sea Salt powders. After deciding on the sentiment I would use, I then fussy cut pinecone clusters, a lamp and squirrel from the paper to place around the wreath. I lifted the lantern and and a larger cluster with foam tape. Needing more embellishments, I decided to add Nuvo droplets around the wreath, in a wedgewood color, a silver and a whitish/blue clear sparkly mix. I also added Liquid Pearl drops in Rose Gold.


I stamped and embossed the sentiment twice on paper from the pack using one of the blue powders and then a Brutus Monroe Espresso color. There’s a blue halo effect around the letters, some from smudging, others deliberate, that I’m fine with! I also did a little snowflake stamping around the sentiment too. I then tore it and inked the edges with distress oxide inks. To complete the card I added a little paper burlap hand cut out.


I love how this card turned out... so different from the normal. And perfect for the times we are in! Hope you enjoyed this different approach! Till next time, happy crafting!

Monday, October 12, 2020

Autumn Leaves Card

Hello again! Been busy making ATCs and sample entries for Unity’s Show & Tell monthly Challenge which I am hosting the next 3 months. (‘How to’s’ on my entries submitted there will be documented on a Unity Stamp Co’s blog.

The inspiration for this card came from my new Stencil Girl, Turkish Wedged Stones stencil, my 2 Tim Holtz color collections, Crackling Campfire and Speckled Egg, and Unity’s August KOM, Count Your Blessings. The TH color collections include all line products, embossing powders, inks, sprays and paints.

I had a lot of fun using the paints, inks and embossing powders from both Tim Holtz’s color collections. I’ve been watching mixed media videos about using stencils. So, using what I learned, I added paint through the stencil onto watercolor paper with a makeup sponge. After cleaning the front of the stencil, I turned it over and added paint to the back of the stencil before turning it over and lining it up and pressing down on the already stenciled paper. Pretty cool technique as it fills color back into the untouched white areas. I loved the stone colors created with these 2 colors. To differentiate the stones and add dimension, when dry,  I added grayish brown paint and pens. I also applied a little white paint with a spatula over the stone areas. Loved the textured look it ended up creating. 

Next I turned to the leaf from the kit. I pulled out the matching embossing powders, and a brown and orange powder, and ended up sprinkling the powders over the inked leaves. I also spattered oxide ink over them and fussy cut them out. I stamped a random sentiment from another kit and backed that up. 

To pull the Kraft mounted card together, I added a gray strip of corrugated paper, teal ribbon and coordinating enamel dots. 


Hope you get a little inspiration from this one! Till next time, happy crafting!


Saturday, October 3, 2020

Friends of Unity October Bog Hop

Welcome to the Friends of Unity October Blog Hop! Birthdays are our focus this hop, just in time for several occasions in my immediate family! Remember to comment on each blog for a chance at winning some Unity goodness!

For the first card, I used another Somerset Studio artist paper, as I very much enjoy the artistic look of them... a development skill I really want to acquire. Notice the script in the paper... which is where i got the idea for this card!

I decided to use the leaf from the Letting Go kit. Using purple, red and blue archival inks, I stamped the leaf out. I then added coordinating brighter/darker watercolors to the image. Using the 6/17 Be Fearless SMAK kit, I white embossed the script over the image and fussy cut it out. 

To make the card stand out, I used purple paper as a foundation, to frame a purple embossed random Unity birthday greeting, and as a fussy cut shadow for the leaf. I added purple crystals for accent.

The second card began with watercolor paper and 2 Altenew spray inks ihtn blue and green. I then used the wonderfully versatile Small Details background stamp with Coffee archival ink. I also randomly added some Dinged Dots using the archival ink as well. I then added the corner stamp from the Hello Beautiful kit using a brown Nuvo embossing powder. 

Next, I turned to the main image, the car from the Consider Yourself Vintage kit. The image was embossed using Aqua Tinsel powder. After consideration, I decided just to use just one of the sentiments from the kit (knowing my audience). I pulled another sentiment from Slowly Turning Classic. I decided to use vintage ephemera to stamp the images on using Ground Espresso oxide ink. I also used a long stamp from an old kit to stamp around the sentiments. I then cut the sentiments down.

Having the base piece, car and the sentiments, I decided to pull Kraft cardstock and looked for a "road" like stamp. Found one in the The Ocean is Calling. I stamped it on the card stock and white embossed it on the background several times. I tore the Kraft cardstock, attached everything together onto a Kraft card base, and added crystals, studs and ribbon to complete the card.

Now, on to the hop! You should have come here from - 

Eileen’s Blog!

Now, follow on to -

Bobbie Sue’s Blog!

If you need to start from the beginning, head over to -

Crystal’s blog!